
You pull last season’s basil out of its net pot and the pebbles come with it: a tangle of brown roots, a green tint on the top layer and a faint pond smell. Throw them out and buy a new bag, or wash them and go again? Short answer: clay pebbles for hydroponics are one of the few growing media you can reuse for years, as long as you strip out the old roots, wash off the organic film and then disinfect them before replanting. In a two-season tomato trial, reused expanded clay that had been washed and chemically sterilised out-yielded reused clay that had simply been put back to work.
This guide covers what clay pebbles (also sold as LECA, Hydroton or “clay balls”) actually do in a root zone, which systems they suit, how to prepare a new bag, and a five-step clean-and-reuse routine with the soak times and temperatures plant pathologists use. By the end you’ll know when clay pebbles are the right medium, when they aren’t, and how to keep one bag going for many crops.
What are clay pebbles for hydroponics?
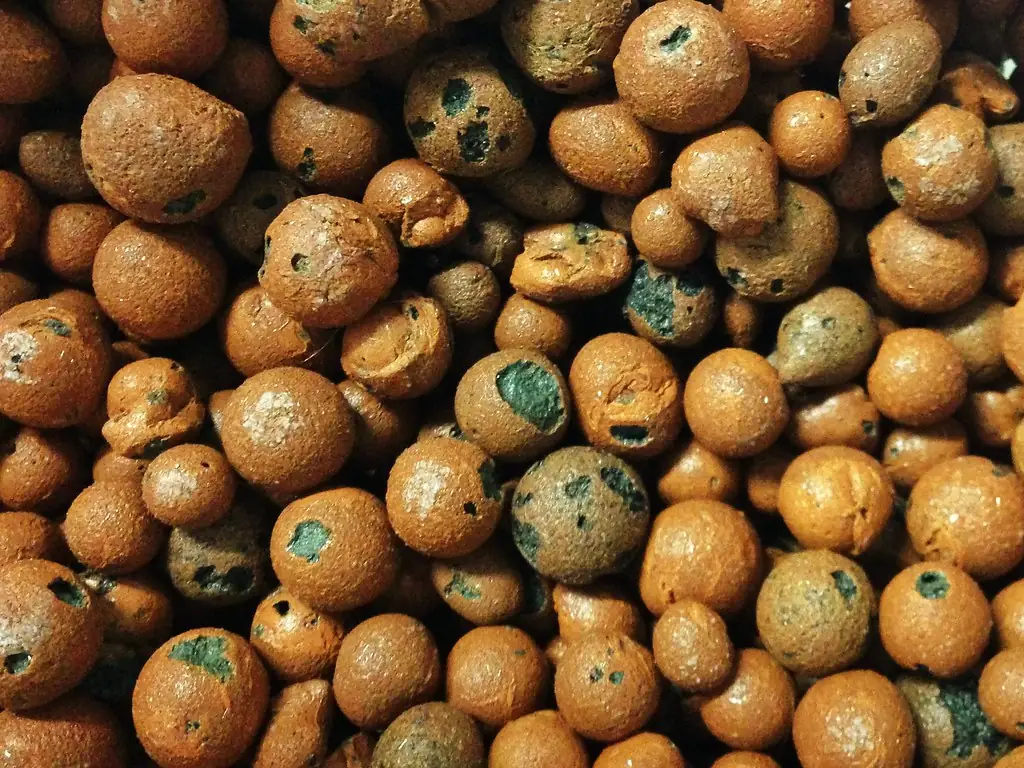
Clay pebbles are small balls of clay that have been fired in a kiln until they puff up, leaving a hard ceramic shell around a honeycomb of tiny internal pores. The industry name is LECA (lightweight expanded clay aggregate); Hydroton is a well-known brand. They’re light, they don’t break down, and they give roots something solid to grip without packing down like soil.
Horticultural researchers class expanded clay as an inert medium, meaning it’s chemically and biologically passive. That’s mostly true, but not perfectly: Jarosz and colleagues at the University of Life Sciences in Lublin point out that some studies have found ion adsorption and exchange happening in expanded clay during cultivation. In practice, that’s one reason to test the runoff of a new or reused batch rather than assume it’s perfectly neutral.
Why the structure matters: air between, water within
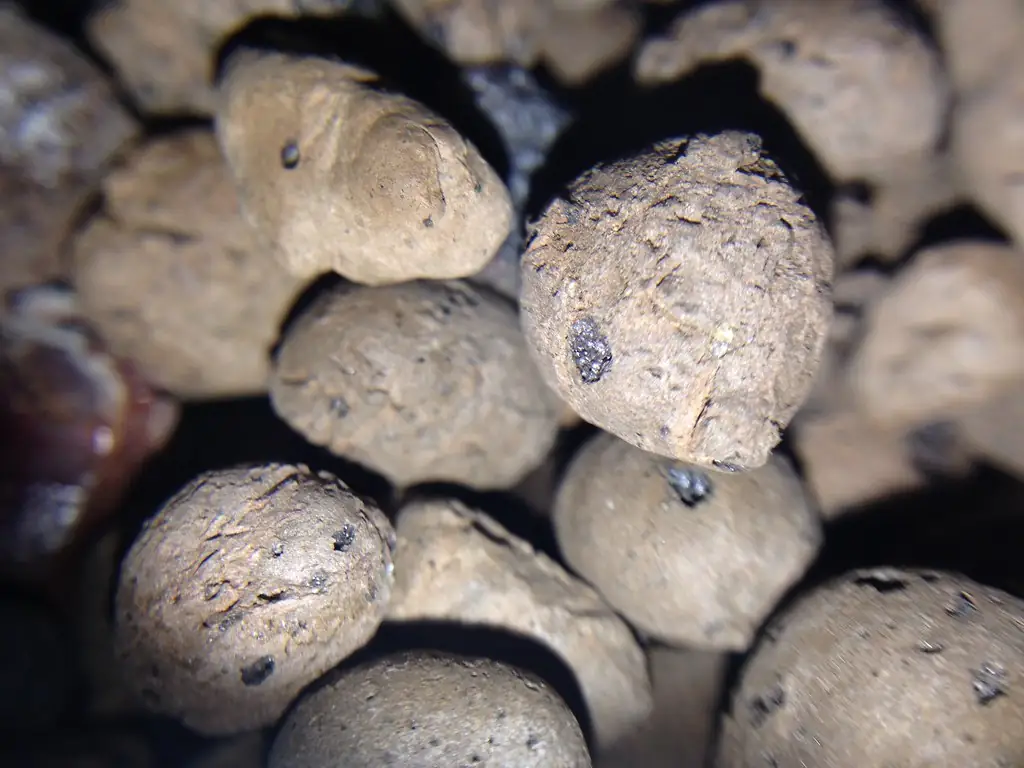
Baked clay aggregates have two kinds of pore space. A study of baked ceramic aggregates (a close cousin of LECA) in the Journal of the American Society for Horticultural Science described a bimodal pore system: large gaps between particles and small pores inside each particle. The large gaps drain quickly and fill with air; the small internal pores hang on to a film of water.
That’s the whole appeal. Roots in clay pebbles sit in an open, airy matrix, which is exactly what you want in a flood-and-drain system or a bucket that drips around the clock. The trade-off is that the pebbles hold far less water than rockwool or peat, so they forgive a pump failure much less.
Clay pebbles vs other hydroponic media, and where they fit
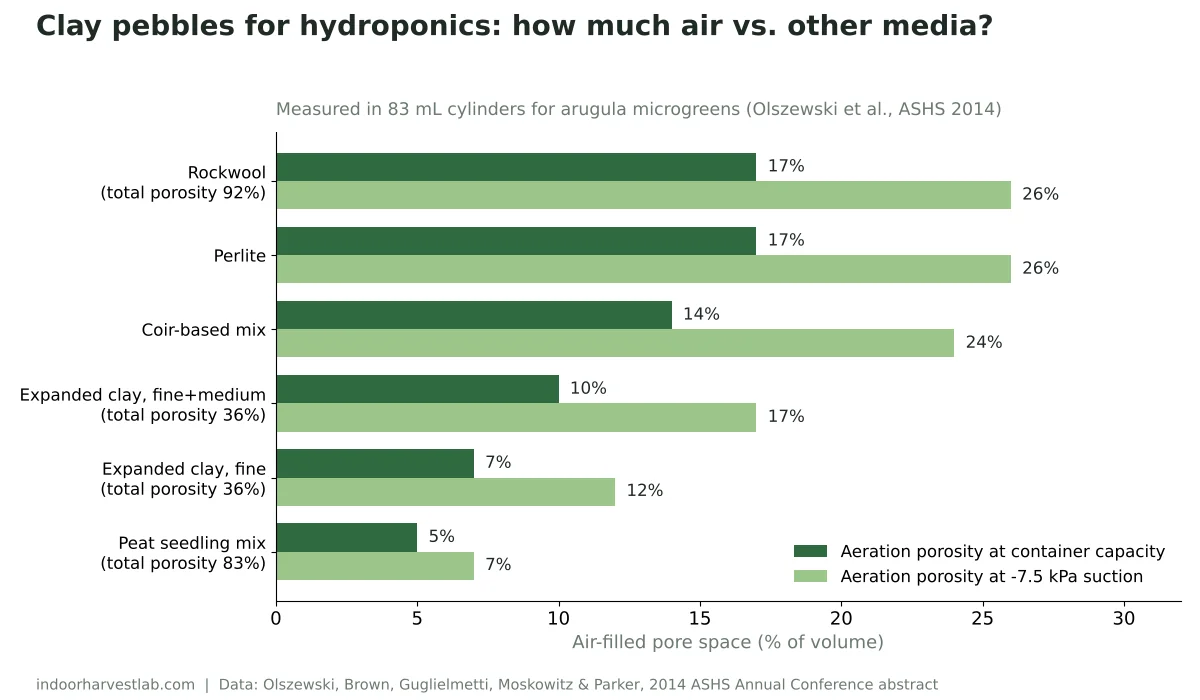
The best side-by-side data for home growers comes from a Temple University study presented at the 2014 ASHS Annual Conference. The team measured the physical properties of six media, including fine and fine-plus-medium grades of heat-expanded clay, and then grew arugula microgreens in each under a hydroponic nutrient solution.
Both expanded clay grades had a total porosity of only 36%, against 92% for rockwool and 83% for a peat-based seedling mix. They had the highest bulk density of the group, too. In plain terms, a pot of clay pebbles is mostly solid ceramic, and a pot of rockwool is mostly empty space waiting to be filled with water or air.
| Medium | Total porosity | Aeration porosity | Reusable? | Best fit |
|---|---|---|---|---|
| Expanded clay (fine) | 36% | 7% | Yes, after cleaning | Ebb and flow, buckets, net-pot top layer |
| Expanded clay (fine + medium) | 36% | 10% | Yes, after cleaning | Same as above |
| Rockwool | 92% | 17% | Generally single use | Seed starting, slabs, NFT plugs |
| Perlite | Not reported | 17% | Possible, but crumbles | Wick systems, mixes |
| Coir-based mix | Not reported | 14% | Limited (organic, breaks down) | Drip-fed containers |
| Peat seedling mix | 83% | 5% | No | Germination trays |
One result surprised the researchers. The arugula grown in the two expanded clay grades matched the peat-based mix for shoot dry weight per seedling and seedling count, while perlite, the coir-based mix and rockwool produced lighter seedlings. Their conclusion was that heat-expanded clay “may be an adequate hydroponic media” for arugula microgreens. So the fine grades aren’t just for big plants.
Which hydroponic systems suit clay pebbles?
Clay pebbles shine wherever the root zone gets wet and then drains, or where you need ballast to hold a plant upright. They’re a poor choice wherever the medium has to hold water on its own for long periods.
- Ebb and flow (flood and drain): the classic match. The tray floods, the pebbles soak, the tray drains and air pulls back in between particles. See our ebb and flow hydroponics guide for flood timing.
- Dutch buckets and drip-fed containers: the free-draining structure keeps constant drip irrigation from waterlogging roots. This is where most tomato and pepper work with expanded clay has been done.
- Net pots in deep water culture and Kratky: a layer of pebbles anchors the seedling plug and shades it. In deep water culture the roots soon grow through into the solution, so the pebbles are really just a collar.
- Semi-hydro houseplants and herbs: pots sitting in a shallow reservoir, where the pebbles wick a little water up to the roots.
Where they struggle: seed germination in coarse grades (seeds fall into the gaps and dry out), wick systems that rely on strong capillary rise, and any setup where a pump failure could leave roots dry for hours. Start seeds in rockwool or plugs and move them into pebbles once roots show.
What the pepper trial shows
A Hungarian greenhouse trial published in the International Journal of Horticultural Science grew hydroponic peppers on baked clay pellets and found that, like rockwool, they were a suitable medium for root anchorage. Crushed 4–8 mm clay pebbles worked both in plastic tubes and in buckets. For buckets, the authors recommended placing the drainage holes on the side, 6 cm (about 2.4 in) above the bottom, which leaves a small reservoir in the base. That’s the same logic behind a Dutch bucket’s elbow drain.
How to prepare new clay pebbles before use
New clay pebbles for hydroponics aren’t ready to pour straight into a system. Shipping grinds the pebbles against one another, and the fine clay dust that collects at the bottom of the bag will cloud your reservoir and can settle in pump intakes, drippers and fittings.
Step 1: Rinse off the dust
Pour the pebbles into a bucket or a colander and rinse them with a hose or tap until the water runs clear. Do it outdoors or in a utility sink; the red-brown slurry stains grout.
Step 2: Soak them
Soak the rinsed pebbles in clean water before planting. Dry pebbles are light and will float in a flooded tray or a deep-water net pot. Soaking also fills the internal pores, so the first flood doesn’t pull water away from fresh transplants.
Step 3: Check the runoff pH and EC
Because expanded clay isn’t perfectly inert, test the soak water with your pH and EC meters. If the pH has drifted noticeably compared with your source water, give the pebbles another rinse and soak, or soak them in pH-adjusted water. If the EC is clearly higher than your tap water, keep rinsing until it settles. Our guides to lowering pH in hydroponics and the hydroponic EC chart give the target ranges for common crops.
How to clean and reuse clay pebbles for hydroponics
Reuse is the main money-saving reason to choose clay pebbles. It’s also the main risk. A used bag carries old roots, algae and, if the last crop got sick, the spores that made it sick.
The best evidence on whether cleaning matters comes from the Lublin tomato study (Jarosz, Dzida and Nurzyńska-Wierdak, 2012). Over 2007–2008 the team compared new expanded clay with clay reused from a year-round tomato crop. The reused clay was either chemically sterilised, washed with old roots removed and then chemically sterilised, or left untreated. The untreated reused clay gave the lowest total yield, 15.10 kg per plant, and the lowest marketable yield, 14.07 kg per plant. The washed-and-sterilised clay yielded significantly more.
New clay still had an edge in some ways. It produced the heaviest fruit, averaging 150.8 g, against 138.6 g from washed-and-sterilised reused clay. So cleaning recovers most of the value of a used bag, but not quite all of it.
Step 1: Strip out the old roots
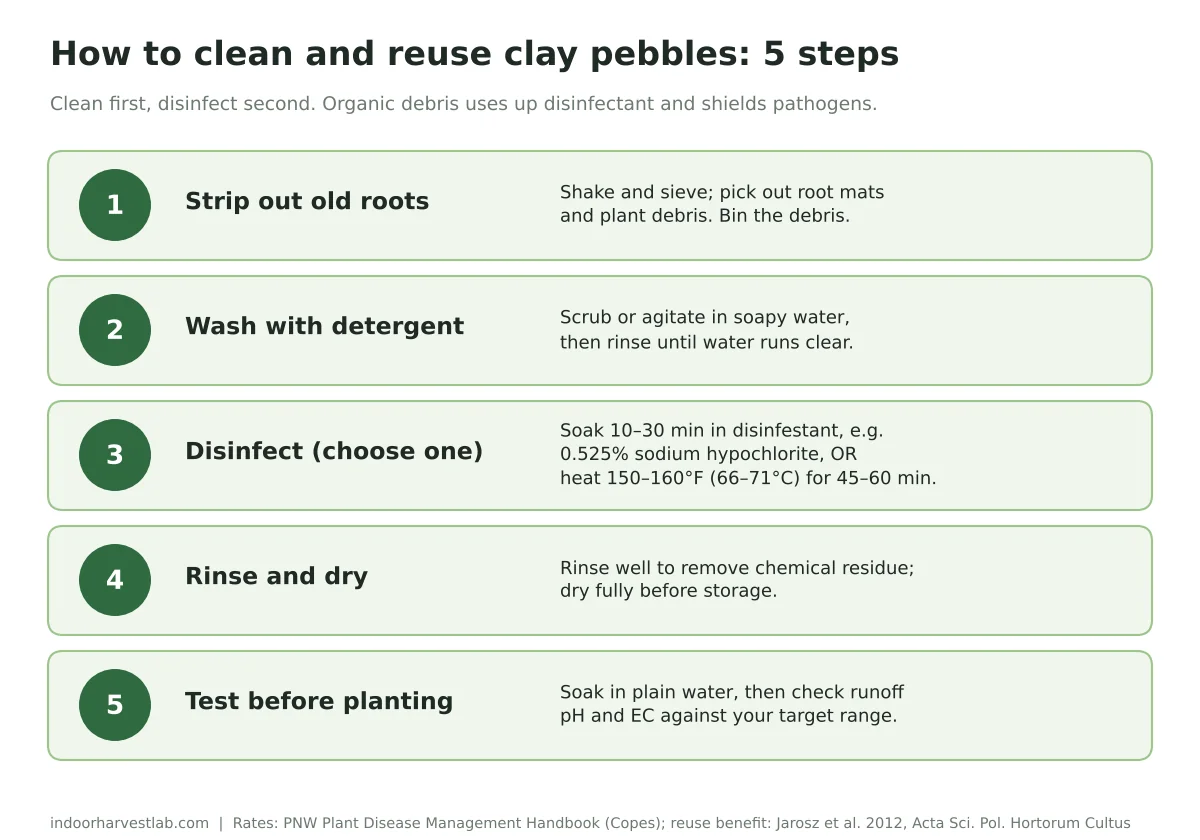
Dump the pebbles onto a tarp or into a coarse sieve and work the root mass apart with your fingers. Pick out every root mat and plant scrap you can see, and put the debris in the bin, not the compost pile next to your grow room. This step does more than anything that follows, because roots are where pathogens live and feed.
Step 2: Wash with detergent and rinse
Agitate the pebbles in a bucket of warm soapy water, then rinse until the water runs clear. The Pacific Northwest Plant Disease Management Handbook, in a chapter by USDA plant pathologist Warren Copes, explains why. Disinfestants react with organic matter and get used up doing so, and soil or debris can physically shield pathogens from the chemical. Washing with detergent removes the organic films and gummy residues that hold pathogens. For low-risk situations, the handbook notes, cleaning alone may be enough.
Step 3: Disinfect with chlorine or heat
For reused containers, the handbook’s recommendation is to wash thoroughly and then either submerge them in disinfestant for 10 to 30 minutes or treat them with steam at 150–160°F (66–71°C) for 45 to 60 minutes. A treatment it cites as effective is submerging trays in 0.525% sodium hypochlorite for 10 minutes. Clay pebbles have far more surface than a plant tray, so it’s reasonable to use the longer end of the soak time and to stir them partway through.
Bleach strengths vary, so work it out from the label. A 5.25% bleach diluted 1 part to 9 parts water gives 0.525%. For an 8.25% bleach, use roughly 1 part to 15 parts water. Use bleach outdoors or with good ventilation, wear gloves, and never mix it with hydrogen peroxide products, acids or ammonia-based cleaners.
Prefer heat? The commercial standard for pasteurising root media, as described in the Greenhouse Management online textbook, is aerated steam held for 30 minutes after the coldest spot reaches 140°F (60°C). Most plant pathogens die under those conditions. The point to copy at home is “measure the coldest spot”: put a thermometer in the middle of the batch, not on the edge.
Hydrogen peroxide and peroxyacetic acid products are also used as disinfestants in greenhouses. If you go that route, buy a horticultural product and follow its label rate and contact time.
Step 4: Rinse, dry and store
Rinse the pebbles thoroughly to remove chemical residue, then spread them out to dry completely before bagging. Damp pebbles sealed in a bag are an invitation to mould and algae.
Step 5: Test before replanting
Treat a reused batch like a new bag: soak it in plain water and check the runoff pH and EC before transplanting. A white crust on pebbles from a previous crop is usually dried mineral salts, and it will show up as high EC in the soak water. Keep rinsing until the reading settles.
Numbers to hold
| What | Value | Source |
|---|---|---|
| Total porosity, expanded clay (fine and fine + medium) | 36% (rockwool 92%, peat mix 83%) | Olszewski et al., ASHS 2014 |
| Aeration porosity, expanded clay | 7–10% (perlite and rockwool 17%) | Olszewski et al., ASHS 2014 |
| Pebble size used in a successful pepper trial | 4–8 mm, crushed | Szilágyi et al., 2006 |
| Bucket side drain height | 6 cm (≈2.4 in) above the base | Szilágyi et al., 2006 |
| Disinfestant soak for reused containers | 10–30 min; e.g. 0.525% sodium hypochlorite for 10 min | PNW Plant Disease Management Handbook |
| Steam treatment for reused containers | 150–160°F (66–71°C) for 45–60 min | PNW Plant Disease Management Handbook |
| Pasteurisation benchmark for root media | 140°F (60°C) at the coldest spot, held 30 min | Greenhouse Management, ch. 13 |
| Nutrient solution temperature to slow Pythium (lettuce, spinach) | 68–72°F (20–22°C) | e-GRO Edible Alert 7(6), 2022 |
| Dissolved oxygen target (saturated) | 8 ppm O2 | e-GRO Edible Alert 7(6), 2022 |
Troubleshooting clay pebbles in hydroponics
Most problems with clay pebbles for hydroponics are really root-zone problems that the pebbles make visible. Here’s how to read the signs.
| What you see | Likely cause | What to do |
|---|---|---|
| Pebbles float when the tray floods | New, dry pebbles with empty internal pores | Pre-soak before planting; top with a heavier layer if needed |
| Cloudy red-brown reservoir after setup | Clay dust from shipping | Drain, rinse pebbles until clear, refill; check pump intake |
| Green film on the top layer | Algae growing where light hits wet pebbles | Block light with a cover or opaque collar; see algae in hydroponics |
| White crust on pebbles | Dried mineral salts from evaporation | Rinse; check EC of runoff before replanting |
| Brown, slimy roots and a sour smell | Root rot (often Pythium), helped by warm, low-oxygen water | Remove infected plants, then clean and disinfect pebbles; see hydroponic root rot |
| Small black flies around the pots | Fungus gnats or shore flies breeding in damp algae | Dry the surface, remove algae; see fungus gnats |
| Plants wilt soon after a pump stops | Low water-holding capacity of pebbles | Fix the timer or pump; consider a deeper bucket reservoir |
The algae and flies rows are connected. A University of Georgia plant pathologist writing in e-GRO Edible Alert 7(6) notes that algae can harbour shore flies and fungus gnats, and that these insects can carry root-pathogen spores through their gut and spread them to new areas. Keeping the top layer of pebbles dark and dry does double duty.
From the lab bench
Here’s how to read the evidence when you’re deciding what to do with a used bag tonight.
Washing is the step that matters most. Every disinfection guide puts debris removal first, and the reason is chemical, not cosmetic. Chlorine is used up by whatever organic matter it touches, so a soak full of root fragments can drop below a lethal dose before it reaches the spores you care about. Strip the roots, wash, and only then disinfect. UConn greenhouse specialist Rosa Raudales makes the same point in e-GRO Edible Alert 7(3), and adds a useful rule: always aim for the lowest effective dose, because stronger isn’t always deadlier to pathogens but is harsher on people and plants.
Porous materials hide pathogens. The e-GRO alert describes how roots grow into the pores of polystyrene rafts and leave pathogens behind that survive cleaning, so new roots follow the old channels straight into trouble. Clay pebbles are porous too. Treat that as a warning: after a confirmed root-rot outbreak, a fresh bag is cheap insurance compared with losing the next crop. After a healthy crop, cleaning and disinfecting is a sound bet, and the Lublin tomato data support it.
“Inert” is a working assumption, not a guarantee. Expanded clay won’t feed your plants or rot, but it can hold ions on its surfaces. A soak-and-test before every new crop costs five minutes and removes the guesswork.
Match the grade to the job. The ASHS data show fine expanded clay holding more water and less air than perlite or rockwool. That’s good for small plants that dry out fast and less good for big fruiting plants on constant drip, which need the air. Coarser pebbles in buckets and finer grades for small pots and microgreens is a sensible starting point.
The bottom line: are clay pebbles worth it?
If you run an ebb-and-flow tray, Dutch buckets, or net pots that need a stable collar, clay pebbles for hydroponics are worth it. You pay more up front than for a bag of perlite, but the pebbles don’t decompose, they drain freely, and one bag can serve crop after crop if you clean it properly. If you mostly start seeds or grow in a Kratky jar where the roots hang in solution anyway, you need only a handful as a top layer.
The one non-negotiable is the cleaning routine. Reused clay that’s simply dumped back into service is the version that lost yield in the tomato trial. Build the five steps into your end-of-crop routine and the pebbles will outlast the system they sit in.
FAQ
Do clay pebbles need to be soaked before use?
Yes. Rinse new clay pebbles until the water runs clear to remove the clay dust, then soak them in clean water before planting. Dry pebbles float in flooded trays and net pots, and soaking fills their internal pores. Finish by checking the soak water’s pH and EC against your source water.
Can you reuse clay pebbles for hydroponics?
Yes, clay pebbles for hydroponics can be reused for many crops if you clean them properly. In a two-year tomato study, reused expanded clay that was washed and chemically sterilised gave significantly higher yields than reused clay with no treatment. Remove old roots, wash with detergent, disinfect, rinse and dry before storage.
How do you sterilise clay pebbles?
After washing off all roots and debris, either soak the pebbles for 10 to 30 minutes in a disinfestant such as a 0.525% sodium hypochlorite solution, or heat-treat them with steam at 150–160°F (66–71°C) for 45 to 60 minutes. These are the rates the Pacific Northwest Plant Disease Management Handbook gives for reused containers. Rinse thoroughly afterwards.
Do clay pebbles change pH?
Expanded clay is classed as an inert medium, but studies have found some ion adsorption and exchange in it during cultivation. That’s why it’s worth soaking new or reused pebbles and testing the runoff pH and EC before you plant, then rinsing again if the readings drift.
Are clay pebbles good for seed starting?
Coarse clay pebbles are a poor choice for germination because small seeds fall into the gaps and dry out. Start seeds in rockwool or plugs and transfer them once roots appear. Fine grades are different: in one study, arugula microgreens grown in fine expanded clay matched a peat-based seedling mix.
Clay pebbles or rockwool: which is better?
They do different jobs. Rockwool holds much more water (92% total porosity vs 36% for expanded clay in one study), which makes it ideal for seed starting. Clay pebbles drain freely, don’t break down and can be reused, which suits ebb and flow trays, Dutch buckets and net-pot collars.
Sources
- Olszewski, M., Brown, A., Guglielmetti, M., Moskowitz, M. and Parker, D. (2014). Physical and Chemical Characteristics of Hydroponic Media and Their Effects on Growth of Arugula Microgreens. ASHS Annual Conference, Orlando, FL. Temple University.
- Jarosz, Z., Dzida, K. and Nurzyńska-Wierdak, R. (2012). Possibility of reusing expanded clay in greenhouse tomato cultivation. Part I. Yield and chemical composition of fruits. Acta Scientiarum Polonorum Hortorum Cultus 11(6): 119.
- Szilágyi, Z., Slezák, K., Ferenczy, A. and Terbe, I. (2006). Hydroponic pepper growing on baked clay pellets. International Journal of Horticultural Science 12(4): 37.
- Steinberg, S. L., Kluitenberg, G. J., Jones, S. B., et al. (2005). Physical and hydraulic properties of baked ceramic aggregates used for plant growth medium. Journal of the American Society for Horticultural Science 130(5): 767–774.
- Copes, W. E. Use of Disinfestants to Control Plant Pathogens. Pacific Northwest Plant Disease Management Handbook, Oregon State University, Washington State University and University of Idaho.
- Williams-Woodward, J. (2022). Root disease management in hydroponic systems. e-GRO Edible Alert 7(6). University of Georgia / e-GRO.
- Raudales, R. E. (2022). Don’t treat all surfaces the same. e-GRO Edible Alert 7(3). University of Connecticut / e-GRO.
- Chapter 13: Soil Pasteurization, Fumigation, and Solarization. Greenhouse Management (online textbook).