
It’s the first properly cold week of the year. You sowed a tray of radish microgreens on Sunday, the same way you did in September, and by Thursday… almost nothing. A few pale hooks poking through, a lot of bare seed, and a faint musty smell. Nothing changed except the weather outside, and that turns out to be the whole story.
Short answer: Growing microgreens in winter works perfectly well, but you have to replace the warmth and light that autumn quietly gave you for free. Keep the growing medium near 75°F (24°C) until the seeds sprout, hold the room around 65–75°F (18–24°C) afterwards, give the trays 12–16 hours of grow light a day, and keep air moving so cold, damp trays don’t turn moldy. Do those four things and microgreens in winter grow almost as fast as they do in summer.
This guide pulls together extension research and peer-reviewed trials into one plan. By the end you’ll know exactly how cold is too cold, how much a cheap heat mat actually buys you, where to put the trays in a drafty house, and how to tell a temperature problem from a light or water problem at a glance.
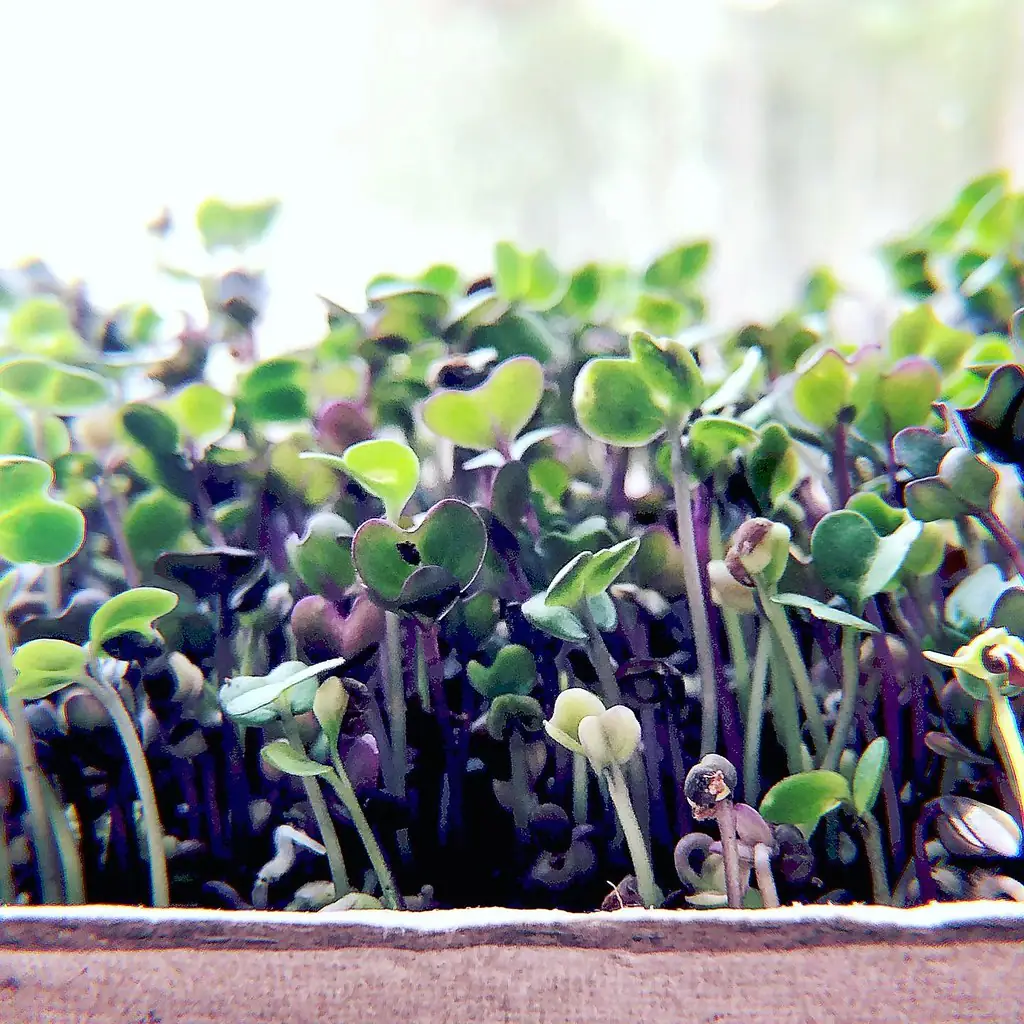
Can You Grow Microgreens in Winter? Yes, and Here’s What Changes
Microgreens don’t know what month it is. They respond to only a handful of things: the temperature of the seed and the medium, the amount of light hitting the leaves, the water in the tray and the air around it. Winter changes three of those at once, which is why a routine that worked flawlessly in September can suddenly stall in December.
Cold slows germination far more than most people expect
Seed germination is temperature-driven chemistry. Classic germination data from J. F. Harrington, published by Oregon State University Extension, shows how steep the curve is. Radish seed planted half an inch deep takes about 4 days to emerge at 68°F, 6 days at 59°F, 11 days at 50°F and 29 days at 41°F. Peas go from 7 days at 68°F to 13 days at 50°F. Cool rooms don’t just add a day; they can double or triple the wait.
That matters more for microgreens than for any other crop, because the whole crop cycle is only one to three weeks long. University of Illinois Extension gives that 1–3 week window for most microgreens, and NC State Extension puts it at 7–21 days. Add a week of slow germination to that and you’ve lost a third of your harvest speed.
Light drops just as the house cools down
Short days and a low sun mean a windowsill delivers far less light in winter than in summer. Faust and Logan’s US daily light integral maps (HortScience, 2018) show how far outdoor light falls in the winter months, and a pane of glass passes only part of what’s outside. Microgreens grown on a winter windowsill tend to stretch, lean and stay pale. That’s a light problem, not a temperature problem, and it needs a different fix.
Cold, still air and wet trays invite mold
When the room cools, water evaporates more slowly from the tray surface. If you keep watering on your summer schedule, the medium stays soggy and the canopy stays damp. That’s the classic recipe for the fuzzy gray growth covered in our microgreens mold guide. Winter doesn’t create mold by itself, but it removes the drying that used to keep it in check.
The Numbers to Hold for Microgreens in Winter
Here are the targets worth writing on a sticky note and putting next to your trays. Every value comes from an extension guide or a controlled study listed in the sources at the end.
| What to control | Target | Why it matters | Source |
|---|---|---|---|
| Medium temperature during germination | About 75°F (24°C) | Fastest, most even sprouting for common microgreen crops | Univ. of Illinois Ext.; SARE FNE20-966 (75°F ±3°F setpoint) |
| Room temperature after germination | About 65–75°F (18–24°C); research rooms run 21°C day / 17°C night | Steady growth without soft, stretched stems | Jones-Baumgardt et al. 2019; Toscano et al. 2021 (24 ± 2°C) |
| Danger zone | Below about 59°F (15°C) at the seed | Days to emergence roughly double or more | OSU Extension / Harrington |
| Relative humidity | About 50–60% | Enough moisture to grow, dry enough to resist mold | SARE (~50%); Toscano et al. (50–60%) |
| Light duration | 12–16 hours a day | Makes up for short winter days | NC State Ext. (12–16 h); SARE (14 h) |
| Light intensity | More is better up to at least 600 µmol·m⁻²·s⁻¹ for brassicas | Fresh yield rose 36–82% from 100 to 600 µmol·m⁻²·s⁻¹ | Jones-Baumgardt et al. 2019 |
| Light height (LED/fluorescent shop lights) | 4–6 inches above the tray (home setups) | Low-output home fixtures need to be close | NC State Ext. |
| Days to harvest | 7–21 days in a warm room; 13–25 days in a cool winter grow room | Cold slows the whole cycle, not just germination | NC State Ext.; SARE |
Notice the pattern: warmth matters most in the first few days, and light matters most after that. That’s why the most efficient winter setups put heat under the tray during germination and put light over it for the rest of the cycle.
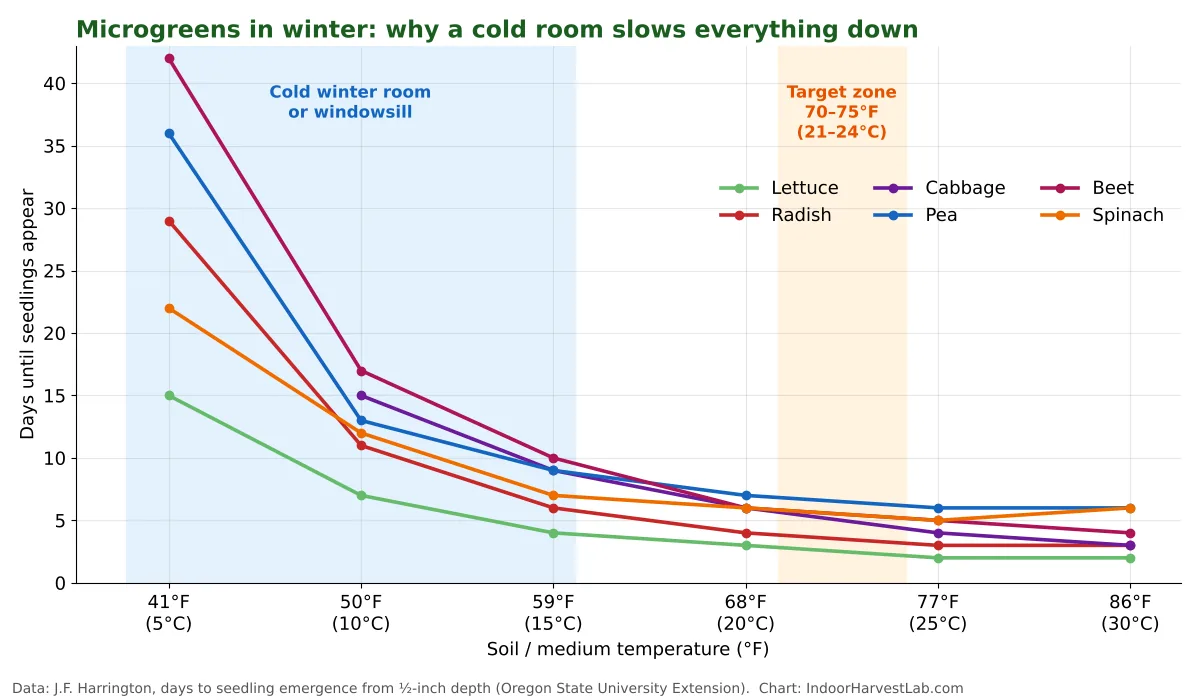
How Cold Is Too Cold? Temperature Ranges for Common Microgreens
Not every crop minds the cold equally. Lettuce, spinach and peas are cool-season plants and will still sprout in a chilly room, just slowly. Brassicas such as radish, cabbage, broccoli and kale prefer it warmer for germination. And a few popular microgreens, like basil and amaranth, are warm-season plants that sulk badly in a cold house.
| Crop | Min. germination temp | Optimum (°F) | Days to emerge at 50°F | Days to emerge at 68°F | Days to emerge at 77°F |
|---|---|---|---|---|---|
| Lettuce | 35°F (2°C) | 75°F | 7 | 3 | 2 |
| Radish | 40°F (4°C) | 85°F | 11 | 4 | 3 |
| Cabbage (brassica proxy) | 40°F (4°C) | 85°F | 15 | 6 | 4 |
| Pea (pea shoots) | 40°F (4°C) | 75°F | 13 | 7 | 6 |
| Beet | 40°F (4°C) | 85°F | 17 | 6 | 5 |
| Spinach | 35°F (2°C) | 70°F | 12 | 6 | 5 |
| Swiss chard | 40°F (4°C) | 85°F | n/a | n/a | n/a |
Two lessons jump out. First, the gain from warming a cold tray is huge at the bottom of the range and small at the top. Moving radish from 50°F to 68°F saves about a week; moving it from 68°F to 77°F saves one day. You don’t need a hot tray, just one that isn’t cold.
Second, cold doesn’t only slow things down; it can stop some crops altogether. In a 2024 study on buckwheat microgreens, Johnson and colleagues grew trays at 16°C and 25°C and ran extra tests at 4°C and 8°C. The extreme cold treatments hindered sprouting and growth, while the moderate 16°C treatment actually boosted phenolic and flavonoid content. Cool is fine. Cold is not.
Too warm has a cost as well
Pushing the heat up doesn’t give you a free lunch. A 2025 aeroponic study on hemp microgreens (Vetchinnikov et al., E3S Web of Conferences) compared 22, 24, 26 and 28°C. At 28°C the shoots were 46% heavier, but vitamin C fell by 33% and sugars by 22%. For a home grower, that’s a good reason to aim for comfortable room temperatures rather than cranking a heater to maximum.
If you want the full germination picture for vegetables and herbs beyond microgreens, our seed germination temperature chart covers more than two dozen crops.
How to Set Up a Winter Microgreens Station (Step by Step)
You don’t need a grow tent or a greenhouse. A shelf, a seedling heat mat, an LED shop light and a cheap thermometer will cover nearly every home. Here’s the order that makes the most difference for the least money.
Step 1: Pick the warmest, most stable spot, not the brightest
In summer, the windowsill is the obvious choice. In winter it’s often the worst one, because single-pane or older windows radiate cold at night and leak cold drafts along the sill. An interior shelf, a kitchen counter away from the door, or the top of a cupboard is usually several degrees warmer and much more stable. Once you add a grow light, you don’t need the window at all.
Keep trays away from exterior doors, floor drafts and the direct blast of a heating vent, which dries the top of the tray while the bottom stays wet.
Step 2: Put a thermometer in the tray, not on the wall
Room thermostats measure air at head height. Your seeds sit at tray level, often on a cold countertop or shelf. A cheap probe thermometer pushed into the medium tells you what the seed actually feels. If it reads below about 65°F during germination, heat is your first fix.
Step 3: Add bottom heat for germination only
A standard seedling heat mat sits under the tray and warms the medium, not the room. The University of Illinois Extension gives about 75°F as the ideal soil temperature for microgreen germination. A thermostat controller lets you set that number exactly instead of guessing.
Interestingly, the farm in the SARE-funded cold-room project in New Hampshire found that once they held their room at 75°F, they didn’t need heat mats at all. That’s the general rule: heat the seed when the room is cold, and skip the mat when the room is already warm enough.
Once most seeds have germinated and the trays come out of blackout (see our blackout period guide), you can usually turn the mat off or down. Warm roots under cool air are fine, but a hot mat under a dense, lit canopy can dry the medium quickly.
Step 4: Light for 12–16 hours a day
Winter daylight isn’t enough on its own. NC State Extension recommends keeping grow lights 4–6 inches above the tray and running them 12–16 hours a day. The New Hampshire cold-room farm ran its LEDs for 14 hours a day, with lights hung 17 inches above the trays. Their fixtures were stronger commercial units, which is why they could sit higher. Our microgreens light requirements guide explains how to match fixture output to height.
Step 5: Use the lights as a heater
Here’s a smart trick from that same project: they ran the lights at night, from 6 PM to 8 AM, during the coldest part of the 24-hour cycle. LEDs and fluorescent tubes give off some waste heat, and timing the light period for the night means that heat arrives when the room needs it most. If your house gets cold overnight, flipping your light schedule is a free few degrees.
Step 6: Keep air moving
The SARE grow room used three small horizontal airflow fans plus window fans to keep air circulating. At home, a small clip-on fan on its lowest setting, pointed across (not directly at) the trays, does the same job. Gentle airflow dries leaf surfaces, evens out temperature and humidity, and is one of the best low-cost defenses against mold.
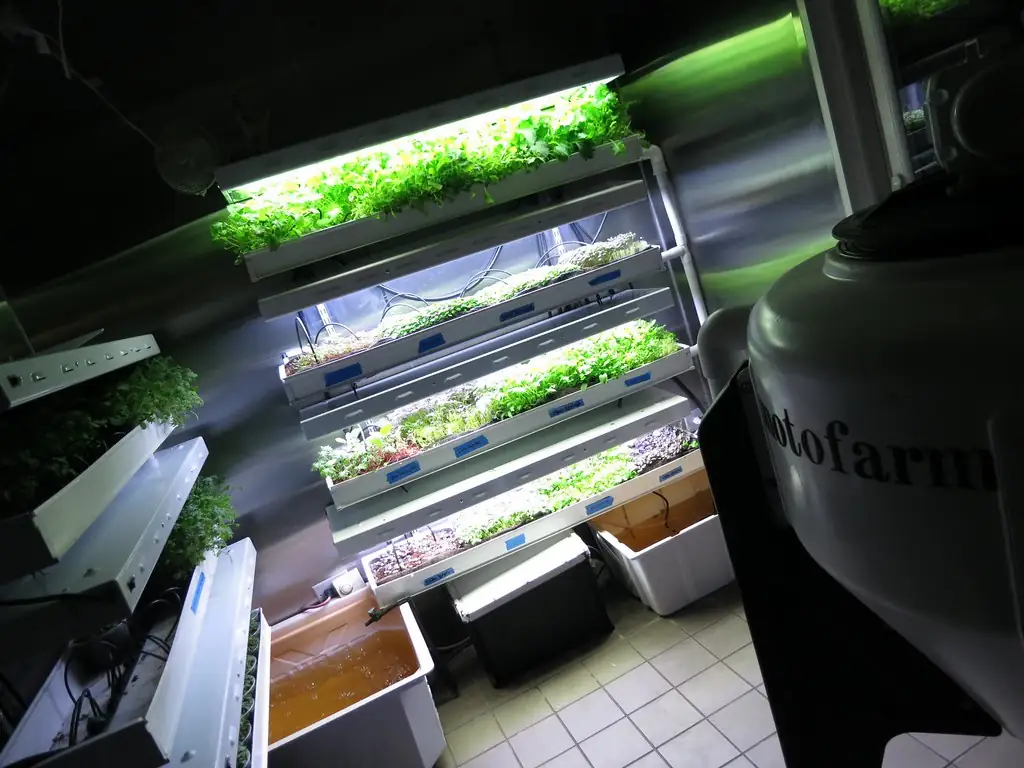
Light: The Other Half of Growing Microgreens in Winter
Once the seeds are up, light becomes the main limit. Winter trays that sit on a windowsill without extra light usually look the same: long, thin, floppy stems leaning toward the glass, small cotyledons and a washed-out color. Growers often blame the cold, but the cause is usually light.
The strongest evidence comes from a University of Guelph trial (Jones-Baumgardt et al., HortScience, 2019). Kale, cabbage, arugula and mustard microgreens were grown under LEDs at six intensities from 100 to 600 µmol·m⁻²·s⁻¹, with a 16-hour photoperiod and 21°C/17°C day/night temperatures. Going from the lowest to the highest light raised fresh yield by 36% in kale, 56% in cabbage, 76% in arugula and 82% in mustard. Hypocotyls (the stems) also got shorter, which means sturdier, better-looking greens.
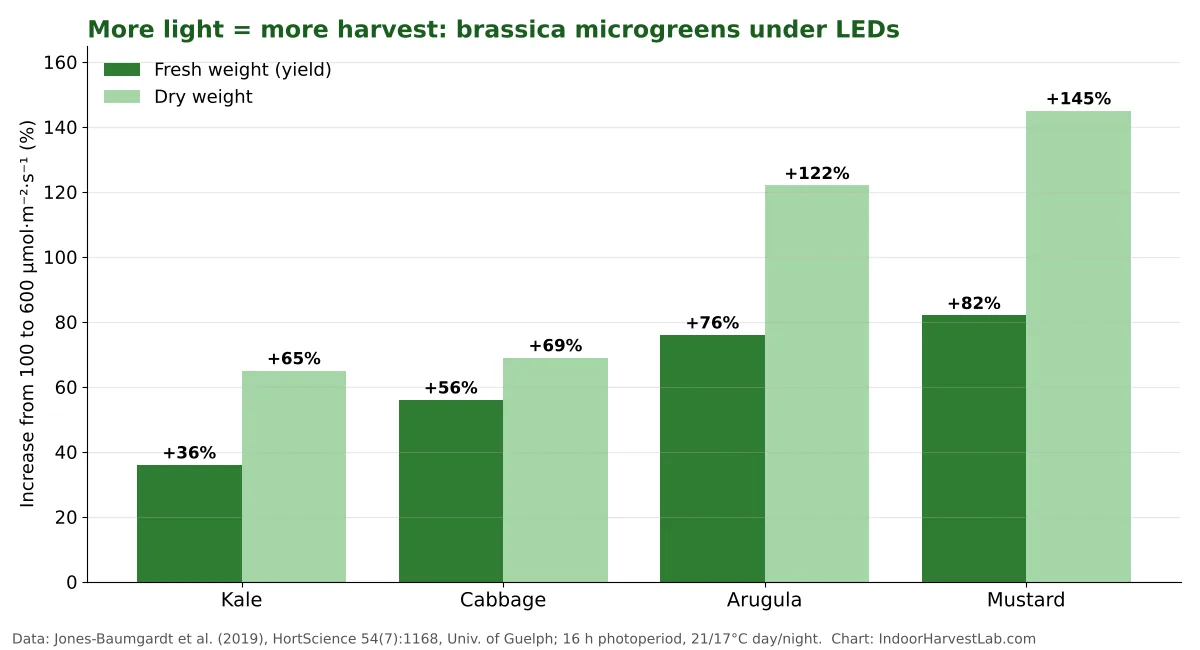
You don’t need 600 µmol·m⁻²·s⁻¹ at home to benefit; every step up from dim light pays off. In practice:
- Lower the light before you buy a new one. Light intensity falls off quickly with distance, so moving a shop light from 12 inches to 4–6 inches above the tray can make a bigger difference than an upgrade.
- Run it longer in winter. A 14–16 hour photoperiod makes up for weaker fixtures. A cheap outlet timer keeps it consistent.
- Don’t rely on the window. Treat any window light as a bonus, not the main source, between roughly November and February.
If you’ve already lost a tray to stretching, our leggy seedlings guide explains the physiology. The same shade-avoidance response that makes tomato seedlings leggy makes microgreens flop.
Watering, Mold and Troubleshooting Microgreens in Winter
Cold trays dry slowly. That single fact explains most winter watering problems. A tray that needed water every day in August may need it every second or third day in January, and watering on the old schedule keeps the medium waterlogged.
Water by weight, not by calendar
Lift the tray. A freshly watered tray is noticeably heavy; one that needs water feels light. The Illinois Extension guide puts it bluntly: don’t overwater, and bottom-water where you can. Bottom watering (pouring water into a solid tray underneath and letting the medium wick it up) keeps the stems and leaves dry, which is exactly what you want in a cool room.
Take the chill off the water
Cold tap water in winter can be well below room temperature. Pouring it into a tray you’ve just warmed to 75°F on a heat mat cools the root zone right back down. Fill your watering jug the night before and let it sit at room temperature. It’s a small habit with no cost.
Aim for moderate humidity, not a sauna
Humidity domes are useful for the first day or two, but in a cool room they trap condensation that drips back onto the seed. The New Hampshire cold-room growers kept humidity around 50%, and controlled studies often run 50–60% relative humidity. Once seeds have rooted, remove the dome or prop it open, and let the fan do its work.
Before you panic about mold, check what you’re actually seeing. Fine, fuzzy white root hairs on radish and other brassicas are normal and appear on the roots near the base. They vanish when you mist them. Mold looks like gray or white cobwebs spreading across the surface and over the seed coats, often with a musty smell. Our microgreens mold guide walks through the difference in detail.
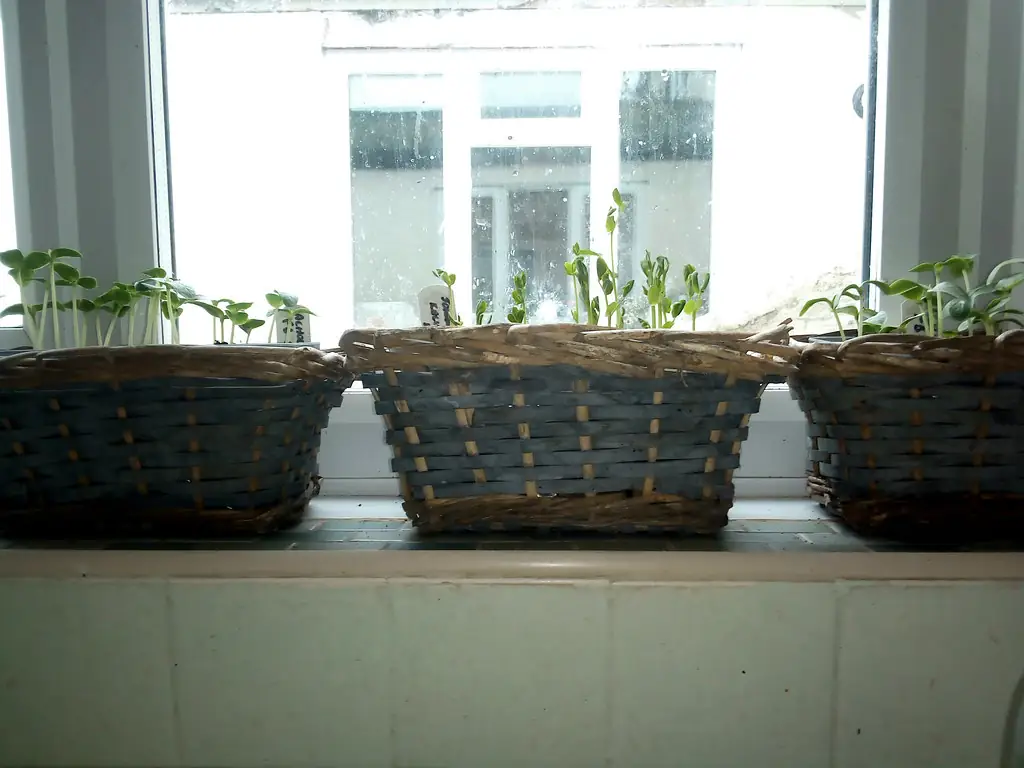
Winter microgreens troubleshooting: symptoms, causes and fixes
Most winter problems trace back to cold medium, too little light, or too much water in a cool room. Match the symptom to the fix:
| What you see | Most likely cause | What to do |
|---|---|---|
| Seeds sit for days with no sprouting | Medium below ~60°F (15°C) | Heat mat set to ~75°F; move tray off cold windowsill or countertop |
| Patchy, uneven germination | Cold drafts or one side of the tray colder (window, door, vent) | Move to a stable interior shelf; rotate the tray daily |
| Long, thin, pale stems leaning one way | Too little light | Add or lower a grow light (4–6 in for home fixtures); run 12–16 h |
| Yellow leaves after blackout | Not enough light yet; normal for a day or so | Uncover and put under light; color should come in within 1–2 days |
| Gray or white cobwebby growth, musty smell | Mold from wet medium and still air | Water less, bottom-water, add a fan, remove the dome; see the mold guide |
| Stems collapse at the base | Damping-off in waterlogged, cool medium | Discard affected tray, sanitize, lower seeding density and watering |
| Slow growth even with heat and light | Cold irrigation water or night-time chill | Use room-temperature water; run lights overnight for their waste heat |
| Crop grows fast but tastes flat | Too warm (e.g., near 28°C/82°F) | Bring room back toward 65–75°F (18–24°C) |
If collapsing stems are your issue, the damping-off guide covers prevention in more depth. Overcrowded trays make every winter problem worse, so it’s worth checking your seeding density too.
Best crops for growing microgreens in winter
If your house runs cool and you don’t want to buy much gear, choose crops that tolerate the cold. Based on the germination data above, these are the most forgiving picks:
- Pea shoots. Peas germinate at temperatures as low as 40°F and are big, vigorous seeds. The New Hampshire cold-room farm averaged about 17 oz (17.28 oz) of pea shoots per 10×20 tray, against about 7.3 oz for its other microgreens. See our pea shoots guide.
- Radish. Fast even in a cool room: about 6 days to emerge at 59°F versus 4 at 68°F, so it stays one of the quickest crops.
- Lettuce and spinach. Cool-season crops that sprout from 35°F, though they’re slower and more delicate as microgreens.
- Kale, cabbage, broccoli and mustard. Reliable once warm; give them a heat mat for the first few days.
Save warm-season crops such as basil, amaranth and some herbs for a warm spot with a heat mat, or for spring. For a ranked list by speed and difficulty, our best microgreens for beginners guide is a good next read.
From the Lab Bench: How to Think About Winter Trays
Strip away the details and growing microgreens in winter comes down to one idea: separate the jobs. Germination is a temperature job. Growth is a light job. Health is an air-and-water job. Most winter failures happen when one fix is expected to do all three, like moving trays to a sunny window and hoping it handles warmth, light and drying at once.
The germination data make the economics obvious. The biggest time savings come from lifting a cold tray into the mid-60s °F; beyond about 70–75°F the extra days saved are tiny and the risk of drying out rises. That’s why a thermostat-controlled heat mat is the highest-value winter purchase: it targets the seed, uses little energy, and you can switch it off as soon as germination is done.
Light is where the yield is. The Guelph data show brassica microgreens are still converting extra photons into extra biomass at intensities far above what a windowsill or a high-hanging fixture provides in winter. If you’re choosing between a warmer room and a brighter light once the seeds are up, the light usually wins.
Finally, warmth and quality pull in slightly different directions. The buckwheat work found more phenolics at a moderate 16°C, and the hemp study saw vitamin C drop at 28°C. There’s also an efficiency argument: a modelling study of a microgreen vertical farm (Parkes et al., Scientific Reports, 2023) found 20°C was the best air temperature for minimising greenhouse-gas emissions per kilogram. A comfortable 65–70°F room with strong light is closer to the sweet spot than a hot one.
FAQ: Microgreens in Winter
Can you grow microgreens in winter?
Yes. Microgreens grow indoors year-round. In winter you mainly need to add warmth during germination (about 75°F or 24°C at the medium), 12–16 hours of grow light a day, and good airflow so cool, damp trays don’t go moldy.
What is the ideal temperature for microgreens?
University of Illinois Extension gives about 75°F (24°C) as the ideal soil temperature for germination. After germination, a room around 65–75°F (18–24°C) works well; controlled research often uses about 21°C by day and 17°C at night.
Is 60°F too cold for microgreens?
Not fatal, but slow. Harrington’s germination data show radish takes about 6 days to emerge at 59°F versus 4 days at 68°F, and slower crops such as beet and pea take 9–10 days. A heat mat under the tray fixes this quickly.
Do microgreens need a heat mat in winter?
Only if the growing medium is cold. If your room stays near 70–75°F, you can skip it; a New Hampshire cold-room farm found heat mats unnecessary once the room was held at 75°F. In cooler homes, a thermostat-controlled mat during germination is the best value upgrade.
How many hours of light do microgreens need in winter?
NC State Extension recommends 12–16 hours of grow light per day, with home fixtures about 4–6 inches above the tray. Short winter days and weak window light are rarely enough on their own.
Why are my winter microgreens leggy and pale?
Almost always too little light. Lower the grow light, run it longer, and stop relying on a windowsill. Research on brassica microgreens shows stems get shorter and yields rise as light intensity increases.
Why are my microgreens molding in winter?
Cool trays dry slowly, so summer watering habits leave the medium soggy. Water less often, bottom-water, remove the humidity dome once seeds root, and add a small fan for gentle airflow.
Sources
- Harrington, J. F. Soil temperature conditions for vegetable seed germination. Oregon State University Extension Service (reviewed 2024). https://extension.oregonstate.edu/gardening/techniques/soil-temperature-conditions-vegetable-seed-germination
- Grant, Z. Growing Microgreens. University of Illinois Extension, Cook County. https://extension.illinois.edu/sites/default/files/growing_microgreens_1.pdf
- Wilhelm, J. (Fat Peach Farm) with University of New Hampshire Cooperative Extension. Exploring the Feasibility of Growing Microgreens in a Modified Cold Storage Room. SARE Farmer/Grower Grant FNE20-966, final report. https://projects.sare.org/project-reports/fne20-966
- NC Cooperative Extension, Beaufort County Center (2024). Growing Microgreens Indoors: A Winter Gardening Adventure. https://beaufort.ces.ncsu.edu/2024/12/growing-microgreens-indoors-a-winter-gardening-adventure/
- Jones-Baumgardt, C., Llewellyn, D., Ying, Q., & Zheng, Y. (2019). Intensity of sole-source light-emitting diodes affects growth, yield, and quality of Brassicaceae microgreens. HortScience, 54(7), 1168–1174. doi:10.21273/HORTSCI13788-18
- Johnson, M. A., Kumar, M., & Thakur, S. (2024). Effect of variation in temperature and light duration on morpho-physiology and phytochemical content in sprouts and microgreens of common buckwheat. Plant Foods for Human Nutrition, 79(4), 875–885. doi:10.1007/s11130-024-01221-7
- Vetchinnikov, A. et al. (2025). The effect of air temperature on the growth and development of hemp microgreens grown using aeroponics. E3S Web of Conferences, 613, 02004. doi:10.1051/e3sconf/202561302004
- Toscano, S., Cavallaro, V., Ferrante, A., Romano, D., & Patané, C. (2021). Effects of different light spectra on final biomass production and nutritional quality of two microgreens. Plants, 10(8), 1584. doi:10.3390/plants10081584
- Parkes, M. G., Azevedo, D. L., Cavallo, A. C., Domingos, T., & Teixeira, R. F. M. (2023). Life cycle assessment of microgreen production: effects of indoor vertical farm management on yield and environmental performance. Scientific Reports, 13, 11324. doi:10.1038/s41598-023-38325-0
- Faust, J. E., & Logan, J. (2018). Daily light integral: a research review and high-resolution maps of the United States. HortScience, 53(9), 1250–1257. HortScience 53(9):1250