
It’s November, the scrambled eggs are on, and you reach for the chives out by the back step. They’re a brown, flattened tuft. Or maybe you bought a little supermarket pot in October, set it on the kitchen sill, and three weeks later it’s a floppy, pale tangle that tastes of almost nothing. Chives are supposed to be the easy herb. So why is it so hard to grow chives indoors?
Short answer: you can grow chives indoors all year if you give them a bright south window or 14–16 hours under a grow light, a well-drained pot, and cool rooms of about 65–70°F (18–21°C) by day and 55–60°F (13–16°C) at night. Start from seed at 65–70°F, or dig a garden clump of 4–6 bulbs after it has frozen outdoors. Snip leaves about 1 inch above the soil and they regrow.
This guide pulls together university extension advice, commercial greenhouse data and a controlled lighting study into one plan. By the end you’ll know which starting route suits you, the exact numbers to hold, how to harvest without exhausting the pot, and how to fix the leggy, yellow or stalled chives most people end up with.
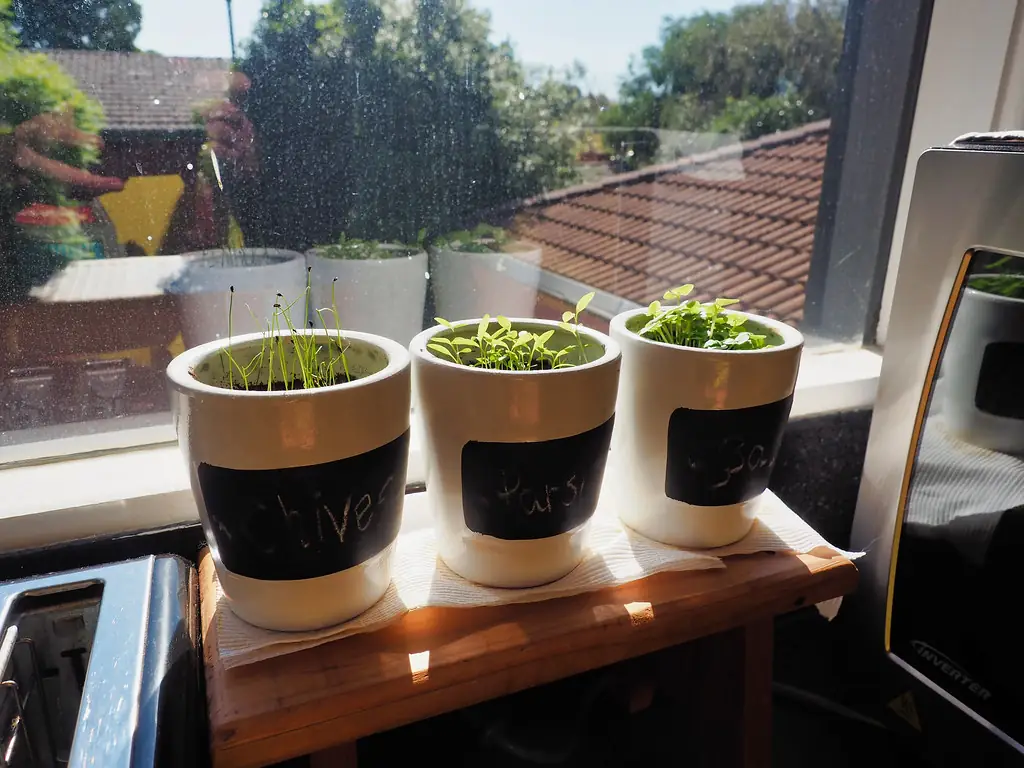
Can You Grow Chives Indoors in Winter?
Yes, but it helps to know what kind of plant you’re dealing with. Chives (Allium schoenoprasum) are a hardy perennial that grows in clumps from small underground bulbs, rated for USDA zones 3–9 by Johnny’s Selected Seeds. Outdoors, they die back in autumn, rest through the cold, and push fresh leaves in spring.
That rhythm follows them inside. The University of Minnesota Extension is blunt about it: an indoor plant “will not grow much during the winter when light is poor” and may even die back a bit. In other words, slow winter growth is normal. It isn’t something you did wrong.
The timing of the move matters too. University of Illinois Extension recommends digging garden clumps for indoor growing after a freeze, in December–January, and warns that clumps potted in the fall “do not perform as well and tend to become leggy.” So the October instinct to rescue your chives before the frost is, ironically, the one most likely to give you weak plants.
Here’s the practical takeaway. When you grow chives indoors in winter, the goal is steady, modest snipping, not summer abundance. Give them strong light, keep the room cool, and plan on having two pots rather than one if you cook with them often.
Numbers to Hold When You Grow Chives Indoors
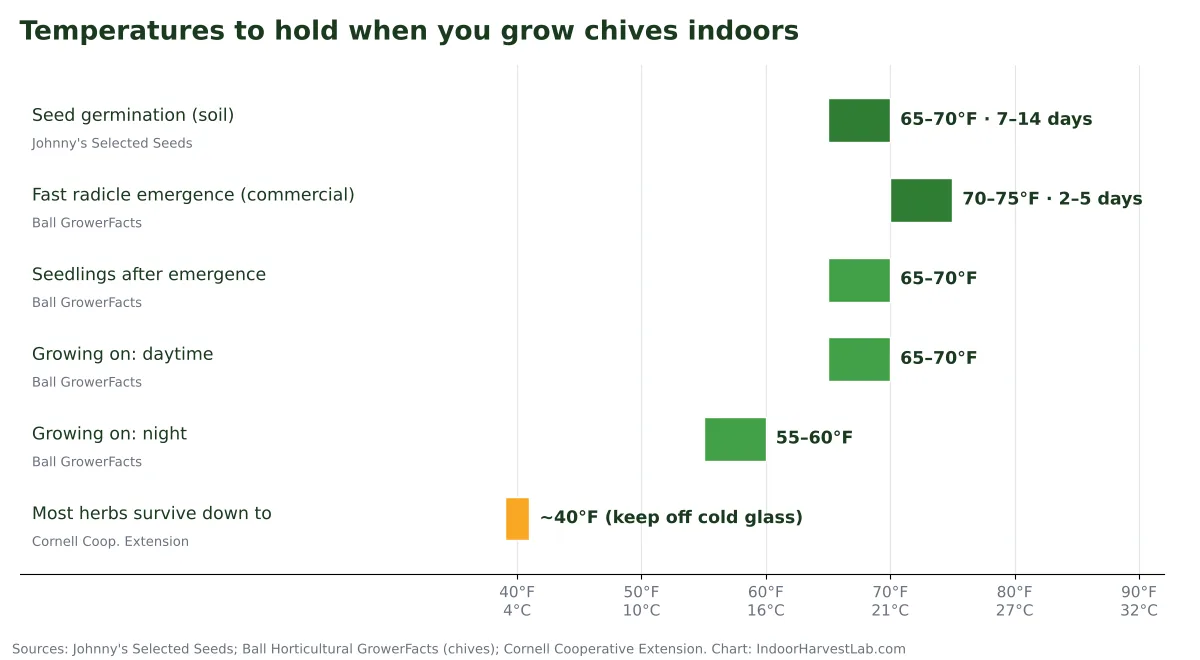
Most chive advice says “sunny window, keep moist” and stops there. These are the actual targets, each traced to its source. Commercial greenhouse figures are marked as such, because they’re tuned for production benches rather than kitchen sills.
| What | Target | Source |
|---|---|---|
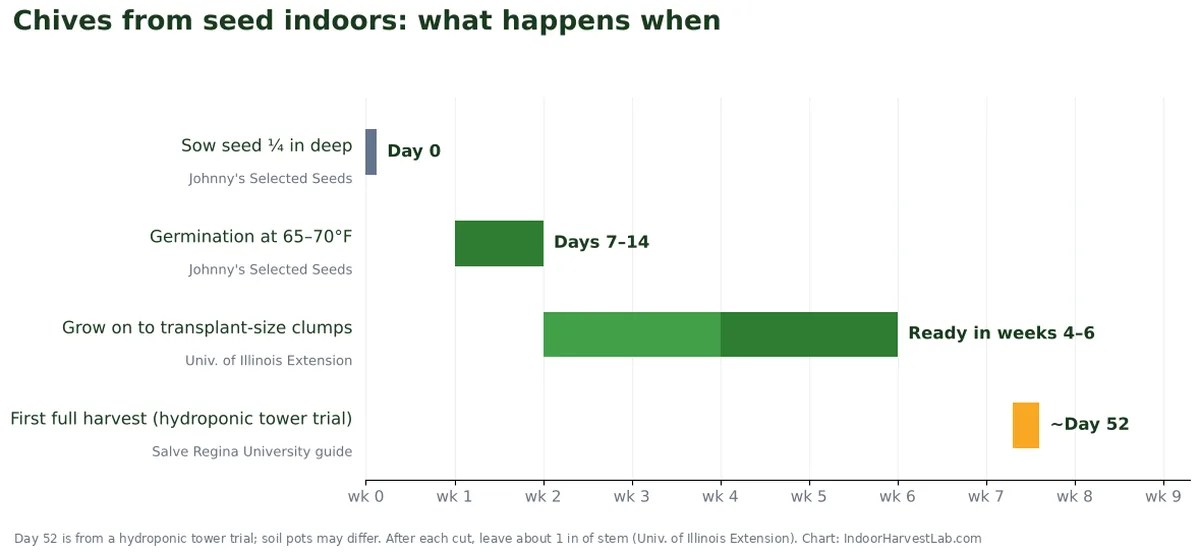
| Germination temperature | 65–70°F (18–21°C); seedlings appear in 7–14 days | Johnny’s Selected Seeds |
| Fast germination (commercial) | 70–75°F (21–24°C) soil; radicle emerges in 2–5 days | Ball GrowerFacts |
| Sowing depth | ¼ inch (about 6 mm) | Johnny’s |
| Seeds per cell | Several per plug, thinned to 3–4 seedlings | Johnny’s |
| Clump size when dividing | At least 4–6 bulbs | Illinois Extension; Cornell CCE |
| Window light | 6–8 hours of direct light is best | UMN Extension |
| Grow-light schedule | 6–12 in below two 40-watt cool white fluorescent tubes, 14–16 h a day | Cornell CCE |
| Air temperature, growing on | Day 65–70°F (18–21°C); night 55–60°F (13–16°C) | Ball GrowerFacts |
| Cold limit | Most herbs survive down to almost 40°F (4°C); keep pots off cold glass | Cornell CCE |
| Soil pH | 6.0–7.0 (home gardens); 5.8–6.2 in commercial soilless mixes | UMN; Ball |
| Feeding in pots | Liquid fertilizer at half label strength every 4–6 weeks; none in winter | UMN Extension |
| Hydroponic pH / ppm | pH 6.1–7.8 (target 6.5); 1,260–1,540 ppm (target 1,350) | Salve Regina Univ. guide |
| Harvest cut | About 1 inch above the soil | Illinois Extension |
| Mature height | 10–12 in (Illinois); 12–18 in (Johnny’s) | Illinois; Johnny’s |
A quick note on the ppm figure: ppm readings depend on your meter’s conversion factor, so if you run chives hydroponically, compare EC readings instead. Two meters can disagree on the same water, so judge by trend, not a single number.
Seed, Garden Clump or Supermarket Pot: Which Start Is Best?
There are three realistic ways to grow chives indoors from scratch. They differ mostly in how soon you eat and how much the plant has in reserve.
| Starting route | Time to first snip | Strengths | Watch-outs |
|---|---|---|---|
| From seed | Slowest: 7–14 days to germinate, 4–6 weeks to transplant-size clumps | Cheap; you choose the cultivar; no pests carried in | Seed is slow to germinate (Illinois); thin, delicate leaves for the first weeks |
| Garden clump, dug after a freeze | Fastest: the bulbs already hold reserves | Vigorous regrowth; a free plant | Dig Dec–Jan, not in early fall; check roots and leaves for insects first |
| Supermarket potted chives | Immediate, but regrowth varies | Instant harvest | Dozens of seedlings crammed in one pot; divide into small clumps and repot |
If you have chives in the garden, the clump route is the fastest way to grow chives indoors. If you don’t, sow seed now and buy a supermarket pot to cover the wait. Treat that pot as a short-term harvest, then split it into small clumps so the plants aren’t fighting for light and water.
Choosing a cultivar for indoor pots
Not every chive is equally happy on a windowsill. Illinois Extension singles out ‘Grolau’ as a variety developed for indoor culture and greenhouse forcing that is less likely to go leggy, and ‘Profusion’, a sterile variety it describes as good for pot culture. If you’re buying seed for a kitchen pot, those two are worth looking for.
What about garlic chives?
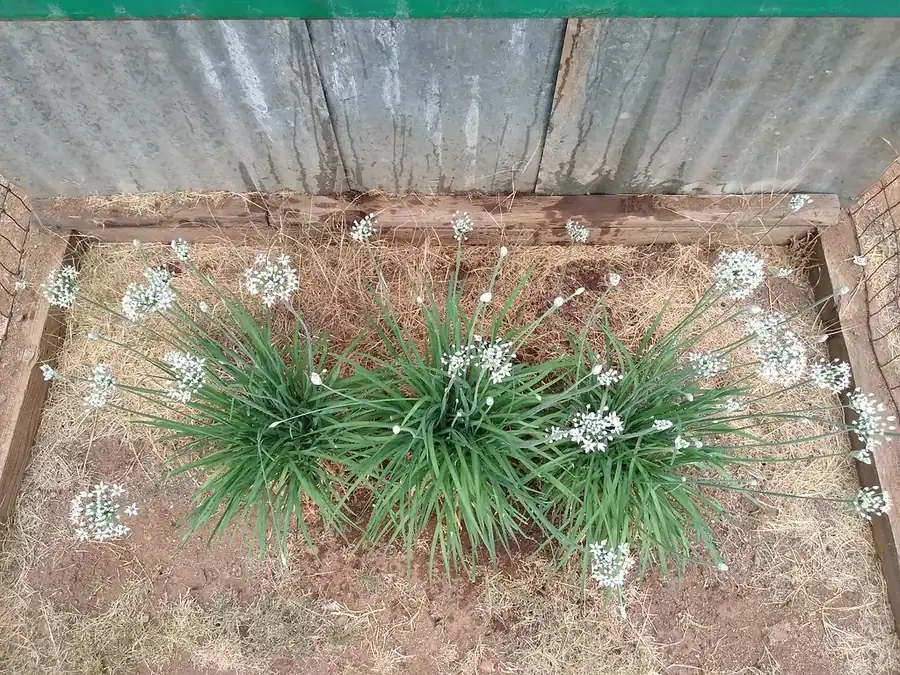
Garlic chives (Allium tuberosum) have flat leaves, white star-shaped flowers and a mild garlic flavour. Illinois Extension lists them at 12–18 inches tall and says their culture is the same as common chives, so everything in this guide applies. Give them a slightly deeper pot to suit the taller leaves.
How to Grow Chives Indoors, Step by Step
There are two reliable ways to grow chives indoors. Pick the route that matches your situation. Both end in the same place: a dense, well-lit clump that you can cut from every few weeks.
Route A: Growing chives indoors from seed
- Fill small pots or plug trays with a moist, well-drained, sterile potting mix, in containers with drainage holes (Cornell CCE). Fresh, sterile mix is your best defence against damping-off.
- Sow several seeds per cell, ¼ inch deep (Johnny’s). Chive seedlings are grass-thin, so a little cluster per cell grows into a usable clump faster than a single plant.
- Hold the mix at 65–70°F (18–21°C) and keep it evenly moist. Expect seedlings in 7–14 days (Johnny’s). A heat mat helps in a cold kitchen; our seed germination temperature chart shows how chives compare with other herbs.
- Give light the day they emerge. Put seedlings 6–12 inches under fluorescent or LED lights for 14–16 hours (Cornell CCE). Weak light at this stage is the main cause of floppy, leggy seedlings.
- Thin to 3–4 seedlings per cell (Johnny’s) and let the soil dry slightly between waterings once they’re up, as the Ball GrowerFacts sheet advises for the post-emergence stage.
- Move clumps into their final pot at 4–6 weeks, when Illinois Extension says seed-grown chives reach transplant size. Group 2–3 clumps in a 6-inch pot for a fuller look.
- Start snipping lightly once the leaves are around 4 inches (10 cm) tall, the height GrowVeg suggests for the first cut on forced chives.
Route B: Bringing a garden clump indoors
- Let the clump go through a freeze. Leave it outdoors until the leaves have been frosted, then dig in December–January (Illinois Extension). This is the step most people skip, and it’s the one that prevents leggy indoor growth.
- Dig a section with at least 4–6 bulbs (Illinois Extension, Cornell CCE). Tease the roots apart gently and put the leftover clumps back in the ground.
- Inspect leaves and roots for insects and eggs before the clump comes inside, and wash them off with a hose if you see any (Cornell CCE).
- Pot into fresh, well-drained potting mix, not garden soil, in a container with drainage holes. Garden soil compacts in pots and invites fungus gnats.
- Trim the old leaves back to about 1 inch above the soil so the clump puts its energy into new, tender growth.
- Place it in your brightest spot and keep the room cool rather than warm. New shoots are ready to cut when they reach about 4 inches.
If your garden chives are in a container already, the same logic applies: leave the pot outside to get frosted, then bring it in. Just make sure a terracotta pot can’t freeze-crack before you do.
Light, Water, Feeding and Harvest for Indoor Chives
Once the pot is established, four things decide how well you grow chives indoors: light, water, food and how you cut. Get them right and you have a steady supply instead of a sad tuft.
Light: the real limiting factor
UMN Extension calls 6–8 hours of direct light “best.” In a northern winter, even a south window rarely delivers that, which is why Cornell CCE suggests you “will likely need some additional light” as days shorten and recommends 14–16 hours under lights.
Research shows how big the gap is. In a University of Tennessee study of hydroponic chives grown in a commercial greenhouse, Sams, Wheeler and Kopsell (2016) measured natural light averaging a daily light integral (DLI) of 8.5 mol·m⁻²·d⁻¹, swinging from 4 to 18. Adding supplemental light at 70 µmol·m⁻²·s⁻¹ (6.05 mol·m⁻²·d⁻¹ extra a day) doubled total shoot fresh and dry weight compared with sunlight alone. A 20% blue / 80% red LED gave 37% more fresh weight than high-pressure sodium lamps.
You don’t need a red-and-blue light at home; a full-spectrum white LED is easier on the eyes. What the study tells you is simple: chives respond strongly to more total light per day. If you’re choosing a fixture, our grow lights for seed starting guide covers what to look for, and the same lights work well for herbs.
Water: moist, never soggy
Water when the top of the mix feels dry, then let the excess drain away. Indoor pots in cool winter rooms dry slowly, so check with a finger rather than watering on a schedule. Chives come back from a little dryness much more readily than from roots sitting in water.
Feeding: less than you think
UMN Extension recommends liquid fertilizer at half the label strength every 4–6 weeks for container chives and none during winter, warning that over-fertilizing can harm both the plant and its flavour. Cornell’s general advice for winter herbs is a low dose every two weeks at most. In practice, if you grow chives indoors under lights and the plant is growing actively under lights, feed lightly; if it has slowed in a dim window, skip it.
Harvest: cut low, cut often
Illinois Extension advises cutting leaves about 1 inch above the soil and harvesting throughout the season, because leaves left too long become tough. UMN likewise says to snip leaves from the base of the plant rather than shearing the tips. Cut a bundle from one side of the clump at a time, and let it regrow before you return.
If your chives send up flower stalks, cut them off at the soil line (UMN). The flowers are edible, but the stalks themselves are tough. Got more than you can use? GrowVeg notes that chive leaves freeze well, so you can snap off what you need later.
Growing chives hydroponically
Chives also do well without soil. A Salve Regina University growing guide for the cultivar ‘Dolores’ propagated seed in rockwool, moved seedlings into a tower system on day 15, and took the first full harvest on day 52, with a 12-hour photoperiod, a target pH of 6.5 and about 1,350 ppm. The guide rates drip and wick setups as the best fit. If you’re new to soilless growing, start with a wick system or the Kratky method, and keep pH in range with a calibrated meter.
Troubleshooting Indoor Chives: Symptoms and Fixes
When you grow chives indoors, most problems trace back to light, water or timing. Use this table to match what you see to the most likely cause.
| What you see | Most likely cause | What to do |
|---|---|---|
| Long, floppy, pale leaves | Too little light; clump potted in fall without a cold rest (Illinois) | Add a grow light for 14–16 h; next year dig after a freeze; try ‘Grolau’ |
| Almost no new growth in midwinter | Normal winter slowdown in poor light (UMN) | Boost light, keep cool; don’t fertilize to force it |
| Yellowing, soft leaf bases; sour-smelling mix | Waterlogged roots | Let the mix dry out; repot in fresh mix if it stays soggy |
| Brown, crispy leaf tips | Mix allowed to dry out completely; dry heated air | Water more consistently; move away from heat vents |
| Tiny black flies around the pot | Fungus gnats breeding in damp mix | Let the surface dry between waterings; see our fungus gnat guide |
| Weak, mild flavour | Over-fertilizing (UMN) or low light | Cut back feeding; increase light |
| Grey or fuzzy patches, rotting leaves | Fungal disease, a known problem in chive crops (Ball) | Remove affected leaves, improve airflow, water at the soil not over the leaves |
If a whole pot collapses, don’t keep nursing it. Chive seed is cheap and a fresh sowing reaches transplant size in about 4–6 weeks.
From the Lab Bench
A few principles explain almost everything about how to grow chives indoors, and they’re worth understanding because they let you troubleshoot plants this guide doesn’t cover.
Chives regrow from the bottom, not the tip. Like grasses and onions, chive leaves extend from growing tissue near their base. That’s why the 1-inch cut works: you remove the leaf blade but leave the part that makes new leaf. Shave the clump to the bulbs every week and you’re asking it to rebuild from stored reserves again and again, which is how indoor pots get exhausted.
The cold rest is a feature, not a delay. A hardy bulb perennial is built to slow down in short, cold days and restart after winter. Illinois Extension’s finding that fall-potted clumps go leggy while frosted clumps do better fits that biology. When you dig after a freeze, you’re bringing in a plant that has already done its resting and is primed to grow.
Light sets the ceiling; everything else just avoids losses. The Tennessee study’s doubling of yield with extra light is the clearest number in chive research for indoor growers. Fertilizer, watering and temperature can’t push a plant past what its daily light allows. If your chives are thin, look at light first.
Run two pots, not one. This is simple arithmetic rather than a study result: a single clump recovering from a cut can’t keep up with daily cooking. Two or three smaller pots harvested in turn give each one time to rebuild. It’s the same rotation idea we use for regrowing green onions and garlic greens.
For more on keeping a whole windowsill productive through the dark months, see our guide to growing herbs indoors in winter.
FAQ
Can chives grow indoors all year?
Yes. Chives grow indoors year-round in a bright window with 6–8 hours of direct light or under grow lights for 14–16 hours a day. Expect slower growth in midwinter, which University of Minnesota Extension says is normal when light is poor.
How long do chives take to grow from seed indoors?
Chive seed germinates in 7–14 days at 65–70°F (18–21°C), and University of Illinois Extension says seed-grown chives take 4–6 weeks to reach transplant size. Light harvesting can start once leaves are about 4 inches tall.
Should I bring my garden chives inside before frost?
No. Illinois Extension recommends digging chive clumps for indoor growing after a freeze, in December–January. Clumps potted in early fall tend to perform poorly and grow leggy.
How do you cut chives so they keep growing?
Snip leaves about 1 inch above the soil, taking a bundle from one side of the clump at a time. The leaves regrow from their base. Avoid trimming just the tips, and cut off flower stalks at the soil line.
Why are my indoor chives floppy and thin?
Floppy, thin chives are usually short of light. Add a grow light for 14–16 hours a day, keep the room cool, and for next winter try a cultivar bred for pots, such as ‘Grolau’.
Can you grow chives in water or hydroponics?
Yes. A Salve Regina University guide grew chives in a hydroponic tower at a target pH of 6.5 and about 1,350 ppm, with the first full harvest on day 52. Wick and drip systems suit chives well.
How often should I fertilize indoor chives?
Lightly. University of Minnesota Extension suggests liquid fertilizer at half strength every 4–6 weeks for container chives and none in winter. Too much fertilizer weakens the flavour.
Sources
- MacKenzie, J. and Mah Kooyman, S. Growing chives in home gardens. University of Minnesota Extension.
- University of Illinois Extension. Chives. Herb Gardening, University of Illinois Urbana-Champaign.
- Fernandez, L. (2026). Propagate herbs now to enjoy all winter. Cornell Cooperative Extension, Orleans County.
- Johnny’s Selected Seeds. Chives: Key Growing Information. Growers’ Library.
- Ball Horticultural Company (2020). GrowerFacts: Chives Onion (Allium schoenoprasum). West Chicago, IL.
- Sams, C. E., Wheeler, J. and Kopsell, D. (2016). Supplemental light improves yield and quality of chives in a commercial hydroponic production system. American Society for Horticultural Science Annual Conference, abstract 25132. University of Tennessee, Knoxville.
- Lloyd, H. E. (2023). Salve Regina University Hydroponic Growing Guide: Dolores Chive. Hydroponic Center, Salve Regina University.
- Hendry, A. M. (2014). How to harvest chives all year round. GrowVeg.