
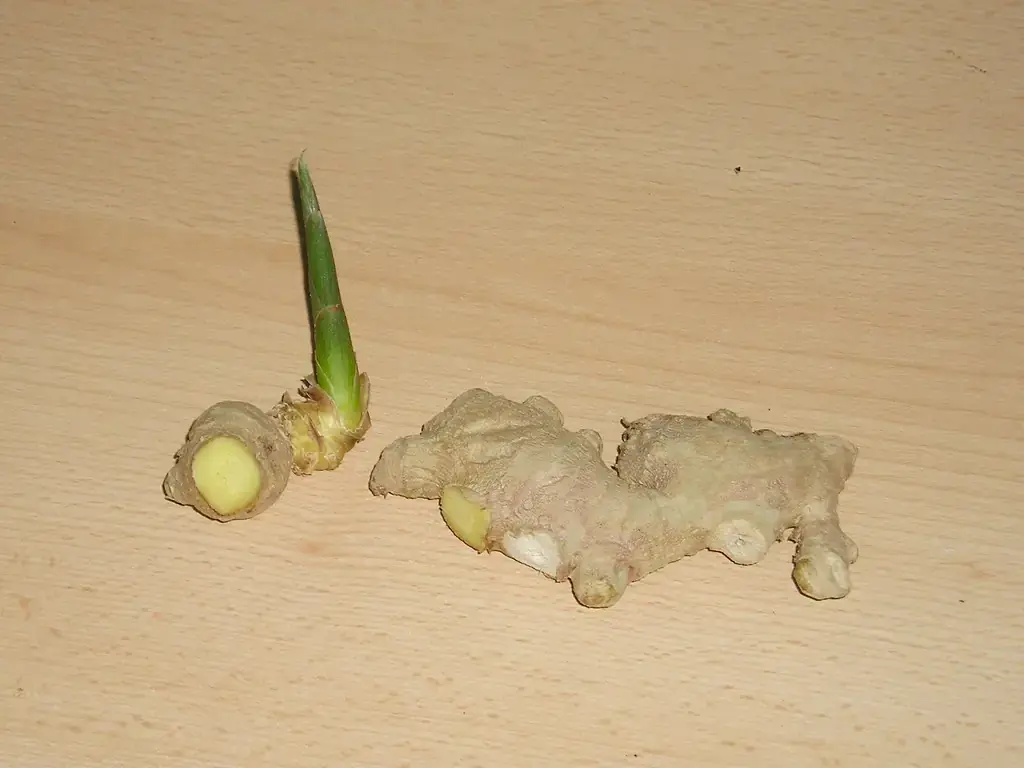
You bought a knobby hand of ginger for a stir-fry, forgot about it in the fruit bowl, and two weeks later a little green spike is poking out of one end. It looks like the root is asking to be planted. Can you really grow a ginger plant from a grocery-store knob? You can, and it’ll grow.
Short answer: To learn how to grow ginger indoors, start with a plump, firm rhizome, soak it overnight, cut it into 2–3 inch pieces with two or three buds each, and plant them about 2 inches deep in a wide pot of loose, well-drained mix. Keep the pot at 70–80°F until shoots appear (3–8 weeks), then grow it warm (68°F or more, never below 50°F) and bright, with soil that stays moist but never soggy. Dig your crop when the leaves yellow, usually 8–10 months after planting.
Table of Contents
Table of Contents
By the end of this guide you’ll know which store-bought roots will actually sprout, what size pot gives the most ginger per piece (there’s real yield data on this), how to keep a tropical plant happy through a northern winter, and how to harvest a little at a time without killing the plant.
Why ginger is a good (but slow) indoor crop
Ginger (Zingiber officinale) is a tropical perennial, hardy outdoors only in about USDA zones 8–12, according to NC State Extension. Everywhere colder, it has to spend at least part of its life inside. That’s actually good news for you: a heated home is closer to ginger’s comfort zone than a northern garden is for most of the year.
The catch is patience. Ginger needs a long, warm season. UVM Extension gives 3–8 weeks just to sprout and 8–10 months to a mature harvest, and University of Maryland Extension quotes the same 8–10 month window. There’s no shortcut on the calendar, but there’s very little daily work once the plant is up.
Here’s what you get for the wait:
- Fresh rhizomes that are juicier and milder than the dried-out supermarket kind, especially if you dig some early.
- Edible shoots and leaves. NC State Extension notes the leaves, shoots and young flower spikes can be cooked, so the plant is useful before harvest.
- A handsome houseplant. Ginger grows 2–3 feet tall in a pot (UVM), with long, glossy, bamboo-like leaves.
- Its own seed stock. Save one or two pieces at harvest and you never need to buy a starter root again.
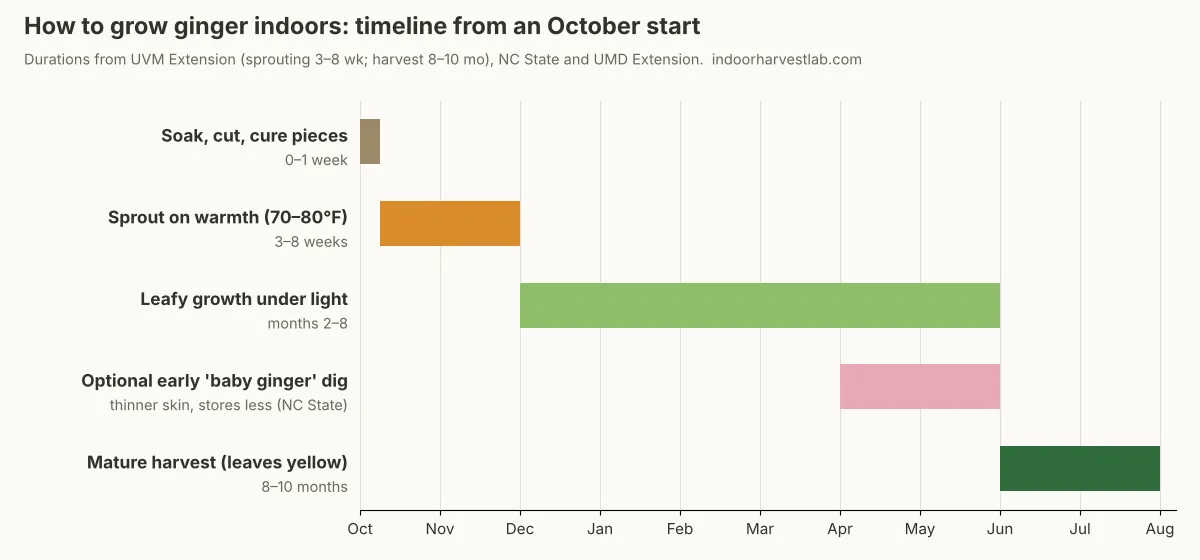
If you start in October, as the chart shows, the plant spends the darkest months building its first leaves and makes most of its rhizome growth as spring days lengthen. A late-winter start, the timing Maryland Extension suggests for gardeners who move pots outdoors, works too. Indoors, you can start any month you can keep the soil warm.
The numbers to hold for growing ginger indoors
These are the numbers that matter most when you work out how to grow ginger indoors. Print this table or stick it on the fridge. Every value comes from an extension service or a field trial, cited in the right-hand column.
| What | Target | Source |
|---|---|---|
| Sprouting temperature | 70–80°F (21–27°C); heat mat in cool rooms | UVM Extension |
| Growing air temperature | 68°F (20°C) or warmer | UVM Extension |
| Absolute minimum | Never below 50°F (10°C) | UVM; NC State; UMD |
| Ideal root-zone (soil) temperature | 78–86°F (26–30°C); NC State gives ~77°F as preferred | Univ. of Illinois Ext.; NC State |
| Soil pH | 6.0–6.5 | PlantVillage, Penn State |
| Seed piece size | 2–3 in (5–8 cm), with 2–3 buds | UVM; NC State (at least 2 eyes) |
| Planting depth | About 2 in (5 cm) of soil over the piece | UVM |
| Pot size | At least 12 in wide; 5–10 gal grow bags work well | UVM; UMD Extension |
| Pieces per pot | 2 per 5-gal, 3 per 10-gal bag | Univ. of Illinois Ext. |
| Light | Full sun (6+ h) to partial shade (2–6 h) | NC State |
| Feeding | Balanced fertilizer monthly | UMD Extension |
| Time to sprout | 3–8 weeks | UVM |
| Time to mature harvest | 8–10 months | UVM; NC State; UMD |
| Fridge / freezer storage | Up to 3 months whole / 6 months cut | UVM |
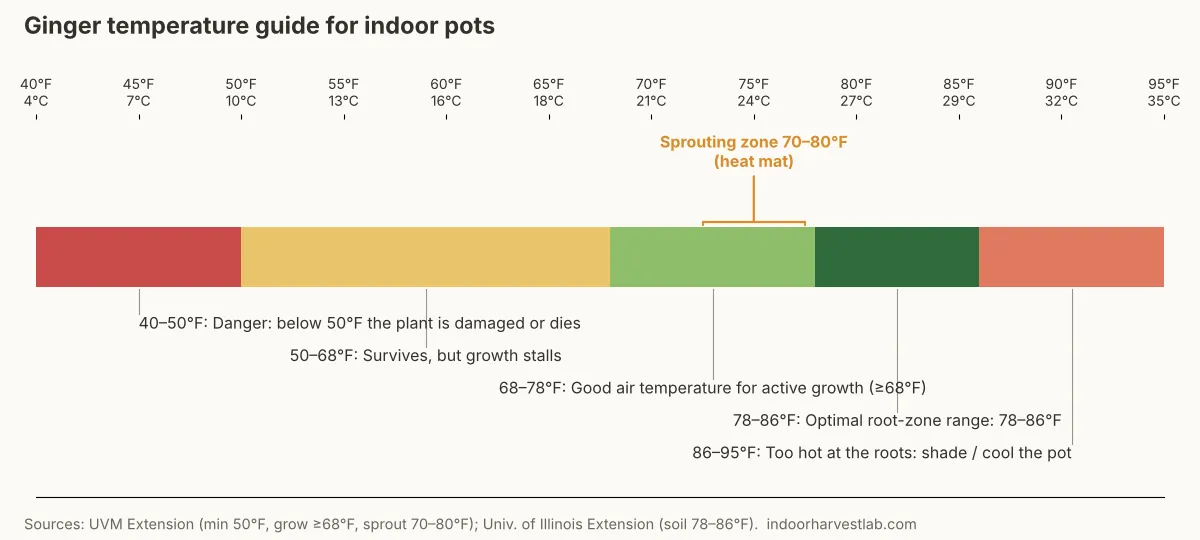
Notice the gap between the air minimum (50°F) and the root-zone optimum (78–86°F). That gap is where most indoor ginger stalls. A room that feels fine to you at 66°F is keeping the pot cooler than the plant would like, which is why the heat mat and pot placement matter so much in winter.
How to grow ginger indoors, step by step
Here’s how to grow ginger indoors from a single store-bought root. The procedure below synthesises advice from UVM, NC State, Maryland and Illinois Extension. Each step explains why it matters, so you can adapt it to your space.
Step 1: Pick a root that wants to grow
Choose a rhizome that is firm (not shriveled), several inches long, with several visible buds or “eyes,” as UVM Extension advises. Look for small yellowish or green-tipped nubs at the ends of the fingers; those are the buds that become shoots.
Where you buy matters. University of Maryland Extension warns that some grocery-store ginger “can be treated with a growth inhibitor.” Organic ginger, ginger from an Asian or farmers’ market, or seed ginger from a nursery is a safer bet. If a root has already started pushing a green tip in your kitchen, that’s the best proof it isn’t inhibited.
Step 2: Soak, cut and let the cuts heal
NC State Extension recommends soaking grocery ginger in warm water overnight to help it wake up. Then cut it into pieces 2–3 inches long, each with at least two or three buds (UVM). More buds per piece means more chances of a shoot if one bud fails.
Let the cut faces dry and callus before planting, as NC State advises. A Maine farm trial funded by Northeast SARE cured cut seed pieces for about a week. A dry, sealed cut is much less likely to rot in warm, damp soil.
Step 3: Choose a wide pot and a loose, rich mix
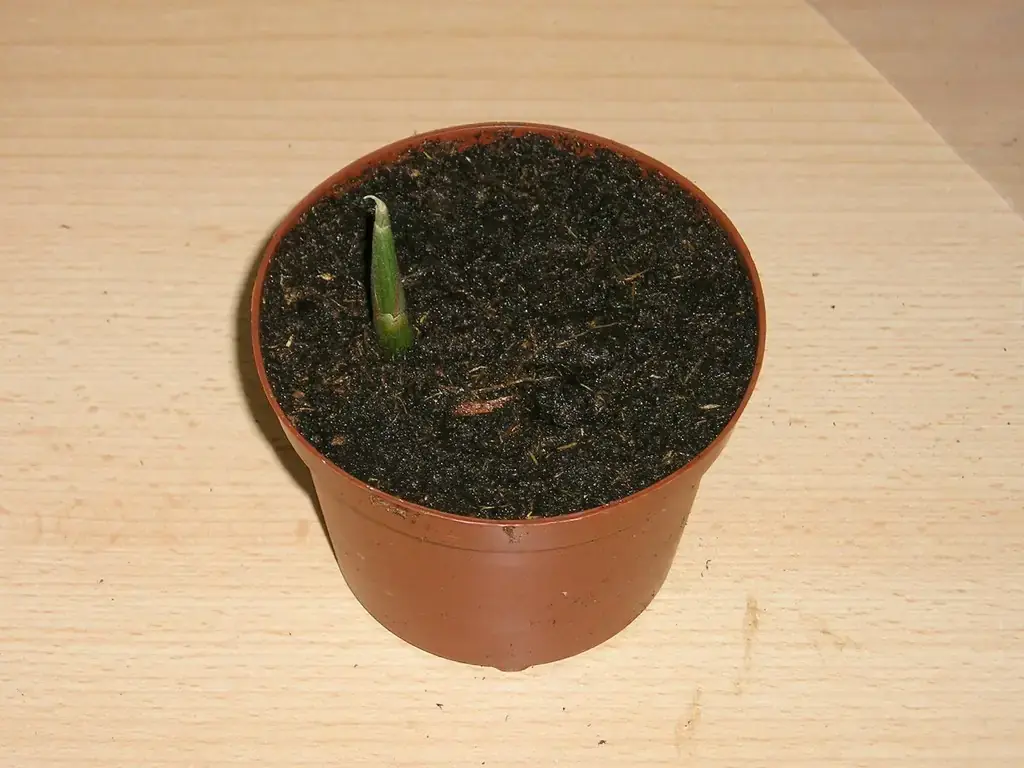
Ginger grows sideways, not down. UVM suggests a pot at least 12 inches in diameter, and Maryland Extension notes that width matters more than depth, with good results in 5–10 gallon grow bags. Drainage holes are non-negotiable.
Use a nutrient-rich, well-draining mix. NC State describes ginger as preferring soil high in organic matter with good drainage. A quality potting mix blended with about a quarter compost does that job. The SARE trial grew container ginger in 3 parts peat-based potting mix to 1 part manure compost. Aim for a pH of 6.0–6.5 (PlantVillage).
How many pieces should go in each pot? Two independent sources point the same way: fewer is better.
| Container setup | Result reported | Source |
|---|---|---|
| 1 piece per 20-gal fabric pot (2021) | 67.95 oz harvested from 5.8 oz planted (+1,072%) | SARE FNE21-980 |
| 2 pieces per 20-gal pot (2021) | 144.96 oz from 11.6 oz planted (+1,150%) | SARE FNE21-980 |
| 4 pieces per 20-gal pot (2021) | 150.72 oz from 23.2 oz planted (+550%) | SARE FNE21-980 |
| 10-gal vs 5-gal bags, same density | 10-gal bags gave more high-quality rhizome per plant | Univ. of Illinois Ext. |
Read the table this way: doubling from two to four pieces per pot added almost no extra ginger. The pot’s root volume, not the number of pieces, set the ceiling. For a home grower, that means one or two good pieces in a big pot beats crowding.
Step 4: Plant shallow, buds up
Lay each piece flat with the buds pointing up and cover it with about 2 inches of mix (UVM). Space pieces roughly 6–8 inches apart if you put more than one in a pot (NC State’s in-ground spacing). Fill the pot almost to the top, leaving a little room to add mix later; ginger forms rhizomes near the surface, and field growers hill soil over them several times a season (PlantVillage).
Step 5: Keep it warm and barely damp until shoots appear
This is the step most people get wrong. Put the pot somewhere at 70–80°F, or on a seedling heat mat, and water sparingly until sprouts appear, as UVM advises. The piece has no leaves yet, so it can’t use much water; wet, cool soil is exactly the condition NC State links to bacterial and fungal rot.
Expect a wait of 3–8 weeks. University of New Hampshire researchers, sprouting commercial seed at 75–85°F, still saw first shoots only about six weeks after planting. A quiet pot after four weeks is normal. Remove the heat mat once shoots are up (UVM). Our seed germination temperature chart explains how a heat mat changes root-zone temperature if you haven’t used one before.
Step 6: Give the shoots light
Once shoots appear, move the pot to a bright window or under a grow light (UVM). Ginger is flexible about light: NC State lists it for full sun (6+ hours) through partial shade (2–6 hours). A south- or west-facing window works in summer; in winter, most northern windows won’t be enough, so add an LED. Our guide to how many hours of light plants need covers timers and fixture distance.
Step 7: Water and feed through the growing season
Keep the soil moist but never wet (UVM). Water when the top inch feels dry, then let the pot drain fully; never leave it sitting in a saucer of water. Mist or group plants together if your heating dries the air, as UVM suggests for dry indoor conditions.
Feed with a balanced fertilizer about once a month (Maryland Extension). Illinois Extension uses about ½ cup of slow-release starter fertilizer per grow bag at planting, and the SARE farm fed fish emulsion every other week. Any of these approaches works; pick one and be consistent. If rhizomes push up through the surface, top up with a little more mix to keep them covered.
Light, temperature and winter care for indoor ginger
Most advice on how to grow ginger indoors skips this part, yet indoor ginger rarely dies of one big mistake. It slowly sulks in a room that’s a bit too cool and a bit too dim. Here’s how to fix both.
Temperature: warm the roots, not just the room
UVM sets the floor at 50°F and the growing target at 68°F or warmer, while Illinois Extension puts the optimal soil temperature at 78–86°F. Root-zone heat matters: in the UNH trials, heating the root zone early in the season gave higher yields at every harvest date.
Indoors, practical ways to raise root temperature include:
- Keep the pot off cold floors and away from single-pane glass at night.
- Set it on a plant stand or shelf near (not on) a heat source.
- Use a heat mat in winter if the room drops below about 68°F.
- Use dark or fabric pots, which warm faster under lights.
The upper limit matters too. Illinois Extension advises shade if soil runs above 86°F despite daily watering, so don’t park a pot directly against a hot radiator.
Light: moderate is fine
Field and tunnel data suggest ginger doesn’t need intense light. In a two-season HortScience study (Lashley et al., 2024), yield differences between 0%, 22% and 40% shade were not statistically significant. Illinois Extension even recommends 30–50% shade cloth for summer tunnels. For you, that means a bright window or a modest LED is enough. Don’t buy a high-powered fixture just for ginger.
Overwintering and dormancy
Ginger doesn’t care about the calendar; it cares about warmth. If you started in spring and the plant is still growing when cold weather arrives, bring it inside before nights drop toward 50°F; Maryland Extension notes ginger dies below that point. The same move-it-in-early logic applies as in our guide to overwintering peppers indoors.
If the plant goes dormant (leaves yellow and die back), Maryland Extension suggests keeping the soil lightly moist and around 70°F through dormancy. Pair ginger with your other winter indoor herbs and it can share their light setup.
Troubleshooting: why your indoor ginger isn’t growing
Use this table to match what you see to the most likely cause. Fix the cause and new growth usually follows within a couple of weeks.
| What you see | Most likely cause | What to do |
|---|---|---|
| No shoots after 8+ weeks | Too cool, or a growth-inhibited grocery root | Check that soil is 70–80°F; if a piece is firm but dormant, wait; if it’s still bare at ~10 weeks, restart with organic or nursery seed ginger |
| Piece feels soft or smells sour | Rot from cold, wet soil before shoots appear | Discard it; next time callus cuts, water sparingly, add bottom heat |
| Leaves yellow from the bottom early in the season | Overwatering or a pot with poor drainage | Let the top inch dry; check drainage holes; repot into a looser mix if needed |
| Pale, slow growth all over | Low feeding or too little light | Feed monthly; move closer to a window or under an LED |
| Brown, crispy leaf tips | Dry indoor air or the soil drying out completely | Water more evenly; mist or group plants (UVM) |
| Fine webbing or stippled leaves | Spider mites (a common indoor pest in dry air) | Shower the foliage; raise humidity; isolate the plant |
| Tiny black flies around the pot | Fungus gnats in damp mix | Let the surface dry; see our fungus gnat guide |
| Whole plant yellowing after 8+ months | Normal end of season | Time to harvest (see below) |
One rule saves most failing ginger: before shoots appear, err on the dry side. NC State flags cold, wet conditions as the trigger for rhizome rot, and a leafless piece can’t use much water anyway.
Harvesting and storing your homegrown ginger
There are three ways to harvest, and you can combine them.
Mature harvest: when the leaves yellow
UVM Extension says to harvest at 8–10 months, after the foliage has yellowed and dried. Tip the pot out, brush off the mix, cut away the stems and save one or two healthy rhizomes for replanting. Penn State’s PlantVillage recommends curing rhizomes for 3–5 days to prevent mildew before storage.
Early “baby ginger” harvest
You can dig earlier. NC State Extension notes that earlier harvests give thinner-skinned rhizomes that don’t store as long. That tender, pink-tinged “baby ginger” is exactly what Northeast growers sell, according to UNH. The trade-off is yield: in the UNH trials, waiting two extra months after an early September dig doubled yields. If you want quantity, wait; if you want tender, mild ginger, dig some early.
Steal a piece without killing the plant
Once the plant has several shoots, you can brush back the mix at the edge of the pot and snap off an outer finger of rhizome. Cover the rest back up. This works because ginger keeps growing from its remaining buds, so the plant carries on.
Storage
UVM gives up to 3 months in the fridge for whole rhizomes and up to 6 months in the freezer for cut pieces. Maryland Extension adds that rhizomes keep a few days at room temperature and that drying works for longer storage.
From the lab bench
Strip away the folklore, and the question of how to grow ginger indoors comes down to one physiological fact: you’re running a tropical rhizome crop at the cool edge of its range. Everything in this guide is really about closing that temperature gap.
The sprouting phase is the vulnerable one. A cut rhizome is a storage organ full of starch, and until it has leaves, it’s living off that store. Warmth speeds bud break; cold and wet slow it while giving rot organisms time to move in. That’s why the consistent extension advice (callus, warmth, little water) works. If a piece fails, the cause is almost always one of those three.
The SARE container data are worth reading carefully. Doubling seed pieces from two to four per 20-gallon pot nearly halved the percentage return, because total harvest was barely higher. That’s classic intra-pot competition: the pot’s volume, nutrients and root-zone heat are the limiting resource, not the number of buds. The practical rule: give each piece room before adding more pieces. One caveat is that the farm’s 2022 season failed across all treatments after a cold early season, a reminder that temperature outranks everything else.
The shade data deserve a similar reading. The HortScience trial found no significant yield differences between 0% and 40% shade, so ginger tolerates moderate light well. It doesn’t mean light is irrelevant indoors, where levels are far lower than in a high tunnel. A sensible interpretation: give ginger the same bright window or LED you’d give indoor tomatoes or herbs, and spend your energy on warmth instead.
Finally, about grocery ginger. Not every supermarket root will sprout, and an inhibitor-treated piece looks identical to an untreated one. That’s why a visible bud swelling or green tip is the most reliable selection test. If you’re learning how to grow ginger indoors for the first time, treat the first planting as a germination test: plant three or four pieces, keep the strongest, and keep your own seed from then on.
FAQ
Can I grow ginger from a grocery store root?
Yes, often. Choose a firm, plump rhizome with visible buds, ideally organic, because University of Maryland Extension warns some grocery ginger is treated with a growth inhibitor. Soak it overnight, cut it into 2–3 inch pieces with buds, and plant shallowly in warm soil.
How long does ginger take to grow indoors?
Expect 3–8 weeks for shoots to appear and 8–10 months to a mature harvest, according to UVM Extension. You can dig tender baby ginger earlier, but yields are lower.
Can I grow ginger indoors in water?
A piece can sprout in a shallow dish of water, but rhizomes rot easily when they sit wet, and extension guides grow ginger in well-drained soil. Use water only to soak the root overnight, then move it into a loose potting mix.
What size pot do I need for ginger?
Use a pot at least 12 inches wide (UVM). Wide beats deep because ginger spreads sideways. A 5–10 gallon grow bag holds 2–3 pieces, and Illinois Extension found 10-gallon bags gave more high-quality rhizome per plant than 5-gallon bags.
Does ginger need full sun indoors?
No. NC State lists ginger for full sun to partial shade, and a 2024 HortScience study found no significant yield difference between 0% and 40% shade. A bright window or a basic LED grow light is enough.
Why is my ginger not sprouting?
The most common causes are cool soil, overwatering before shoots appear, and growth-inhibited grocery roots. Keep the pot at 70–80°F, water sparingly until shoots show, and allow up to 8 weeks before giving up.
Can I eat ginger leaves?
Yes. NC State Extension notes that ginger leaves, shoots and young flower spikes can be cooked. Snip a few leaves at a time so the plant keeps enough foliage to feed the rhizome.
Sources
- Benoit, D. J. (2019). Growing ginger and turmeric indoors. University of Vermont Extension Master Gardener Program.
- North Carolina State University Extension. Zingiber officinale (ginger). NC State Extension Gardener Plant Toolbox.
- Llewellyn, S. (2025). Growing ginger… really!. University of Maryland Extension, Maryland Grows blog.
- Frillman, N. (2026). Transplanting ginger. University of Illinois Extension.
- University of New Hampshire (2018). Northeast growers interested in offering ‘baby ginger’ to consumers (research by B. Sideman and S. Beck). UNH Today.
- Emery, E. (2023). Ginger spacing in high tunnels for maximum yields. Northeast SARE project FNE21-980, final report.
- Lashley, W. E., Yang, G., & Robinson, J. (2024). Comparative study of ginger cultivars under shading conditions in a high tunnel. HortScience, 59(10).
- PlantVillage, Penn State University. Ginger: cultivation information.