

Short answer: Harvest microgreens when the first true leaves are just forming, which for most crops is 6 to 14 days after sowing (radish and arugula first, beet and carrot last) and about 1.5 to 3 inches tall. Cut the stems with clean, sharp scissors or a knife just above the growing mix, leave the roots behind, and do not wash what you plan to store. Chilled in the dark at about 41 °F (5 °C), fresh-cut microgreens keep 10 to 14 days; at room temperature they last only a day or two.
That is the whole method in one paragraph. The rest of this guide explains how to read the right stage for each crop, how to harvest microgreens cleanly so they store well, why washing before storage shortens shelf life, and what the research says about storage temperature and light. Every number below comes from university extension guides or peer-reviewed postharvest studies, listed at the end.
Table of Contents
When to harvest microgreens: the stage that matters
A microgreen is a seedling eaten young, so timing is about growth stage, not the calendar. Virginia Cooperative Extension defines the window clearly: microgreens are harvested “from when the first true leaves are forming to when they have fully emerged” (Virginia Tech SPES-756). Utah State University Extension puts it more simply: plants are ready as soon as you begin to see the first true leaves, or sooner if you prefer the taste (USU Extension, Beck).
The first leaves you see are cotyledons, the seed leaves. They are usually smooth and simple. True leaves come next from the growing point between them and look like a small version of the adult plant’s leaf, such as the toothed leaf of radish or the frilly leaf of kale. LSU AgCenter describes the same two harvest stages: the cotyledon stage and the true-leaf stage.
- Too early: stems are short, cotyledons are still pale or partly closed, and yield per tray is low.
- Right: cotyledons are fully open and green, the stand is 1.5 to 3 inches tall (Penn State Extension), and true leaves are just visible.
- Too late: true leaves are large, lower cotyledons start to yellow, stems get fibrous, and some crops turn bitter or stringy. At that point you are growing baby greens, not microgreens.
Height is only a rough guide to when to harvest microgreens. Penn State’s home guide shows mustard ready by day 8 at about 2 inches, while pea shoots were ready by day 9 at 4 to 5 inches (Penn State, Di Gioia). Big-seeded crops simply stand taller at the same stage.
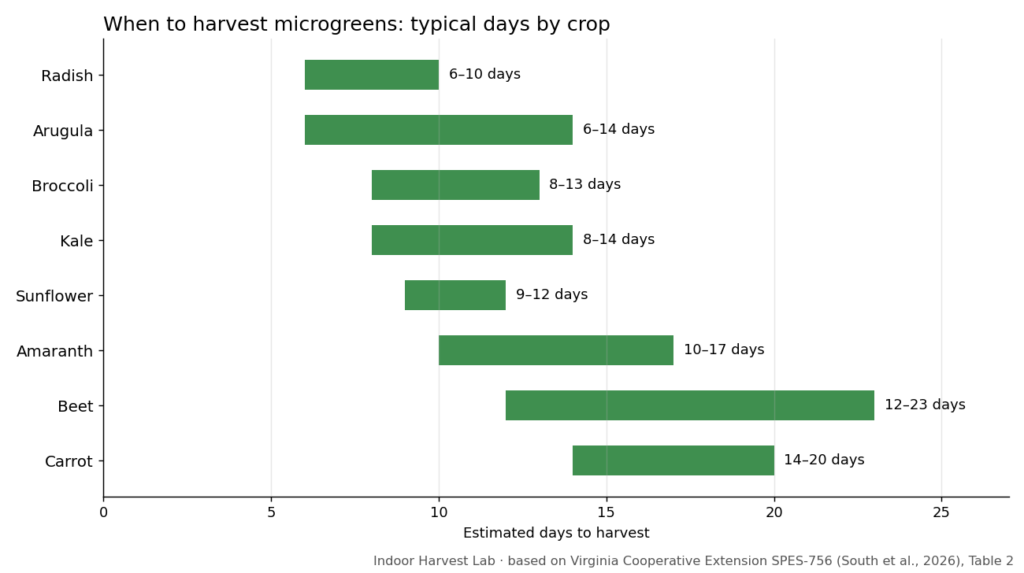
Days to harvest microgreens by crop
The best day to harvest microgreens varies with temperature, light, seed lot and how long the tray stayed covered, so treat these as planning ranges. The table combines the two extension sources that publish crop-by-crop timing.
| Crop | Virginia Tech SPES-756 (days) | Utah State Table 1 (days) | Taste at harvest (USU) |
|---|---|---|---|
| Radish | 6–10 | 8–12 | Nutty, spicy |
| Arugula | 6–14 | 6–8 | Peppery |
| Broccoli | 8–13 | 8–12 | Mild broccoli |
| Kale | 8–14 | 8–12 | Strong brassica, nutty |
| Sunflower | 9–12 | 9–10 | Nutty, sweet |
| Pea shoots | — | 8–10 | Sweet pea |
| Amaranth | 10–17 | — | — |
| Basil | — | 12–16 | Intense basil |
| Beet | 12–23 | — | — |
| Carrot | 14–20 | — | — |
| Cilantro | — | 21–28 | Cilantro |
Penn State gives the overall span as 7 to 21 days from seeding to harvest, depending on crop and growing conditions (Penn State Extension). If a tray runs slower than the table, the usual reasons are a cool room, weak light or a long cover period; the blackout period guide and the microgreens light guide cover both.
How to harvest microgreens step by step
The goal when you harvest microgreens is a clean cut, dry leaves and no growing mix in the bag. Damaged, wet tissue is what spoils first.
- Plan the day. Harvest microgreens when you are ready to eat or chill them. Penn State’s home guide suggests cutting right before use; for storage, go straight to the fridge.
- Keep the leaves dry. Water from below the day before rather than misting just before cutting, so the canopy is dry at harvest. Wet leaves in a bag lead to condensation, which Penn State advises avoiding in storage.
- Clean your tools and hands. Use scissors or a knife with hard, non-porous surfaces that can be washed and sanitized, and clean the bowl or container that will hold the cut greens (University of Nevada, Reno).
- Grab a small handful. Gather a bunch of stems gently with one hand so they stand upright.
- Cut just above the mix. Slice a little above the surface, below the cotyledons. Virginia Tech’s guidance is to keep “most of the stem, cotyledon, and leaves” and leave the roots behind. Cutting lower picks up soil, perlite or mat fibres.
- Move the cut bunch straight into a clean container. Do not pile it on the tray edge or a counter where it picks up grit.
- Pick out debris and seed hulls. Sunflower and buckwheat often carry hulls; brush them off or pick them out by hand.
- Chill within minutes. Put the container in the fridge right away, ideally at about 41 °F (5 °C), in the dark part of the fridge.
Penn State notes that electric knives and clippers are faster but make less precise cuts that damage tissue and reduce shelf life compared with scissors. For a home tray, sharp scissors are the best tool to harvest microgreens.

Harvest microgreens in batches or all at once?
You can harvest microgreens a handful at a time over two or three days, cutting what you need for each meal. That gives the freshest possible greens, but the stand keeps growing, so the last cut will be taller and closer to the true-leaf stage. For crops with a narrow window, such as radish and arugula, cut the whole tray at once and store it.
Should you wash before you store? How to harvest microgreens that keep
This is where most people who harvest microgreens at home lose shelf life. The extension advice is consistent:
- Penn State (commercial guide): do not wash microgreens before sale, because washing “decreases their post-harvest life”; tell buyers to wash before eating.
- Penn State (home guide): washing in drinking water before eating is always recommended, but shelf life “may be substantially reduced after washing”, so bag and chill them unwashed and wash right before use.
- University of Nevada, Reno: post-harvest washing “appears to be ineffective and could increase the risk of contamination” because it damages tissue.
- LSU AgCenter: for longer storage, wash only immediately before use.
Research agrees. In daikon radish microgreens, a 100 mg/L chlorine wash cut microbial counts by only 0.5 log units, and populations rebounded after day 7 of storage (Xiao et al. 2014, LWT). So the practical rule is simple: harvest microgreens clean, store them dry, and rinse only the portion you are about to eat.
How long microgreens last after you harvest microgreens
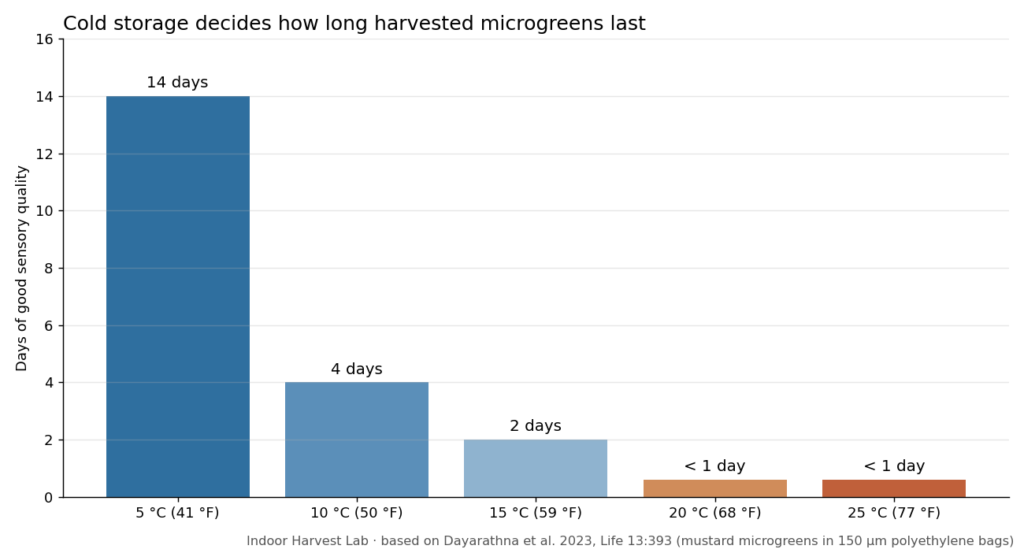
Once you harvest microgreens, temperature is the biggest factor. Penn State reports that dark storage at 41 °F can extend shelf life to 10 to 14 days, compared with 2 to 4 days at room temperature. Xiao and colleagues measured a shelf life of only 1 to 2 days at ambient temperature for radish microgreens.
| Storage temperature | Mustard microgreens: days of good quality | What it means at home |
|---|---|---|
| 5 °C (41 °F) | 14 | Normal fridge, back shelf |
| 10 °C (50 °F) | 4 | Fridge door or a warm fridge |
| 15 °C (59 °F) | 2 | Cool cellar |
| 20 °C (68 °F) | Less than 1 | Kitchen counter |
| 25 °C (77 °F) | Less than 1 | Warm room |
Those figures come from a storage trial with mustard microgreens packed in 150 µm polyethylene bags; at 5 °C they kept good sensory quality for 14 days with no significant change in antioxidant activity (Dayarathna et al. 2023, Life). For radish microgreens, Xiao’s team found 1 °C was the best storage temperature, with no chilling injury. Virginia Tech notes that the best temperature is still being studied and may differ between species, so 34 to 41 °F is a sensible home target.
Store them in the dark
Light in storage matters too, so harvest microgreens into a box you can close. Radish microgreens kept under light during cold storage deteriorated faster, while dark storage maintained quality, even though light raised vitamin C (Xiao et al. 2014, Food Chemistry). A closed box in the fridge, not a clear bag under the fridge light by the door, is the better choice.
Best containers
- Clamshell or lidded box: Virginia Tech notes clamshells and plastic bags are the usual packs. A box protects the stems from crushing.
- Paper towel: a dry paper towel in the base catches drips from condensation. This is a common home practice rather than a tested treatment, so change it if it gets damp.
- Airtight container: LSU AgCenter says harvested microgreens can be kept for up to two weeks in an airtight container in the fridge.
Microgreens harvest mistakes to avoid
- Waiting too long. Once true leaves are fully expanded, texture and flavour change fast. Harvest microgreens as soon as the stand hits the right stage.
- Cutting into the mix. Penn State warns that biting into perlite is an unpleasant experience. Cut higher.
- Harvesting wet greens. Water on leaves in a closed box leads to condensation, sliminess and decay.
- Washing everything, then storing it. Wash only what you will eat now.
- Leaving cut greens on the counter. At room temperature, quality can collapse in less than a day.
- Dull or dirty tools. Ragged cuts bruise stems; dirty blades move microbes onto food.
- Cutting a tray with mold. White, fuzzy growth that stays on the stems is not the same as root hairs; the microgreens mold guide shows how to tell them apart. When in doubt, compost it.
Food safety when you harvest microgreens
Microgreens are eaten raw, so treat them like any fresh salad crop. A USDA-led review noted that microgreens had not been linked to foodborne illness outbreaks at the time of writing but had been the subject of seven recalls, so the potential to carry pathogens exists (Turner, Luo and Buchanan 2020, Journal of Food Science). The same review describes how quickly microgreens dehydrate, wilt and decay after harvest, which is why cold storage matters so much.
Simple habits cover most of the risk each time you harvest microgreens: use clean water for growing (the University of Nevada, Reno guide sets the standard at no detectable E. coli per 100 ml for any water that touches seed or crop), wash hands, sanitize scissors and containers, and keep the harvest cold.
After the harvest: the tray and the roots
Most crops do not regrow well after you harvest microgreens, because the growing point is removed with the stem. LSU AgCenter mentions one exception: corn can give a second microgreen crop when cut above halfway up the plant. For almost every other crop, compost the root mat and growing mix, as Penn State’s home guide suggests, then wash the tray before the next sowing. Getting the next tray’s seeding density right is the easiest way to raise yield per cut.
Where this applies
The harvest stage and cutting method apply anywhere. Timing and storage depend on your room: a warm apartment speeds growth (Utah State keeps trays at 72 °F with lights on and 68 °F at night), so check trays daily, while a cool basement adds several days to the ranges above. In humid climates or muggy summer kitchens, keep a fan running near the trays in the last days before you harvest microgreens, and chill the cut greens immediately. If you grow on mats rather than soil (see microgreens without soil), cutting is easier because there is no loose mix, but keep the cut above the mat fibres. More guides are in the microgreens growing guides section.
FAQ
How do you know when microgreens are ready to harvest?
Harvest microgreens when the cotyledons are fully open and green and the first true leaves are just starting to show. Most crops reach this stage in 6 to 14 days at 1.5 to 3 inches tall.
Can you harvest microgreens too early?
Yes. You can eat them at the cotyledon stage, but yield is lower and the flavour milder. Utah State says to harvest microgreens as soon as true leaves appear or earlier if you like the taste, so it is partly a matter of preference.
Should you cut microgreens at the base?
Harvest microgreens by cutting just above the growing mix, not at the roots. You keep almost all of the stem and avoid picking up soil or mat fibres.
How long do microgreens last in the fridge?
About 10 to 14 days at 41 °F in the dark if they are cut dry and not washed, according to Penn State. In a warmer fridge door, expect only a few days.
Do you wash microgreens after harvesting?
Harvest microgreens dry and wash them right before eating, not before storage. Washing before storage shortens shelf life and can damage tissue.
Sources
- South, K. et al. (2026). Introduction to Microgreen Production in Indoor Vertical Farms and Greenhouses (SPES-756). Virginia Cooperative Extension.
- Sánchez, E., and Berghage, R. (updated 2025). Growing Microgreens. Penn State Extension.
- Di Gioia, F. (updated 2026). A Step-by-Step Guide for Growing Microgreens at Home. Penn State Extension.
- Beck, S. (2025, updated 2026). Grow Your Own Microgreens. Utah State University Extension.
- Microgreens: A Guide to Growing Microgreens for the Home Gardener. LSU AgCenter.
- Moe, J. (2020). Microgreens and Produce Safety. University of Nevada, Reno, Desert Farming Initiative.
- Xiao, Z. et al. (2014). Postharvest quality and shelf life of radish microgreens as impacted by storage temperature, packaging film, and chlorine wash treatment. LWT – Food Science and Technology.
- Xiao, Z. et al. (2014). Effect of light exposure on sensorial quality, concentrations of bioactive compounds and antioxidant capacity of radish microgreens during low temperature storage. Food Chemistry 151: 472–479.
- Dayarathna, N. N. et al. (2023). Effect of Storage Temperature on Storage Life and Sensory Attributes of Packaged Mustard Microgreens. Life 13(2): 393.
- Turner, E. R., Luo, Y., and Buchanan, R. L. (2020). Microgreen nutrition, food safety, and shelf life: A review. Journal of Food Science 85(4): 870–882.
Featured image: “20201021-NRCS-LSC-0464” by USDAgov, Public Domain Mark.