
You’ve cleared a shelf, bought a tray, and opened the seed shop’s microgreens page: dozens of crops, from amaranth to wasabi mustard, each promising colour and flavour. Which one won’t turn into a mouldy, patchy mess on your first try?
Short answer: The best microgreens for beginners are radish, broccoli, kale, arugula and mild Asian greens such as mizuna and Tokyo Bekana, followed by sunflower and pea shoots once you’re happy to soak seed overnight. These crops need no special seed treatment (or just a soak), spend only one to four days under cover, and are ready to cut in roughly 6 to 14 days. Leave basil, cilantro, beet, chard and amaranth for your third or fourth tray, because they are slower and fussier.
That shortlist isn’t a matter of taste. It comes from lining up extension tables from Utah State, Virginia Tech and Mississippi State against Johnny’s 29-variety yield trial. By the end you’ll know which crop to sow first, how much seed it needs, and the numbers that keep a tray healthy.
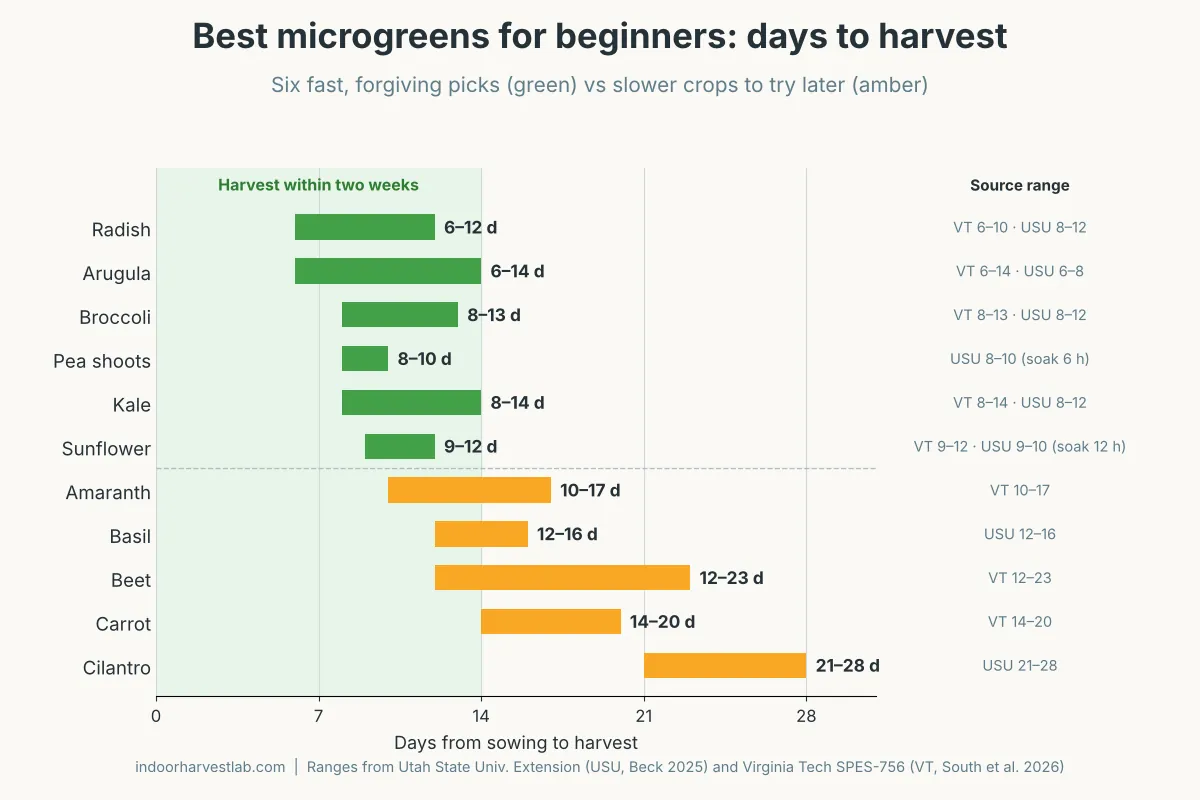
Best microgreens for beginners at a glance
Here are the eight easiest microgreens to grow, ranked for a first-time grower, with the numbers you’ll actually use. “Days covered” is the blackout time under a lid or second tray after sowing.
| Rank | Crop | Days to harvest | Seed per 10×20 tray | Pre-soak | Days covered | Flavour |
|---|---|---|---|---|---|---|
| 1 | Radish | 6–10 (VT); 8–12 (USU) | 42 g (USU) | No | 1–2 | Nutty, spicy |
| 2 | Broccoli | 8–13 (VT); 8–12 (USU) | 28 g (USU); 13 g (Johnny’s) | No | 2–4 | Mild broccoli |
| 3 | Kale | 8–14 (VT); 8–12 (USU) | 28 g (USU); 10 g (Johnny’s) | No | 1–2 | Strong brassica, nutty |
| 4 | Mild Asian greens (Tokyo Bekana, mizuna, pac choi) | 10–12 (Johnny’s average) | 9.5–14 g (Johnny’s) | No | Not listed | Mild (MSU) |
| 5 | Arugula | 6–14 (VT); 6–8 (USU) | 10 g (USU, Johnny’s) | No | 1–2 | Peppery |
| 6 | Red cabbage | 13.5 (Johnny’s average) | 10.5 g (Johnny’s) | No | Not listed | Mild (MSU) |
| 7 | Sunflower | 9–12 (VT); 9–10 (USU) | 48 g (USU) | 12 hours | 3 | Nutty, sweet |
| 8 | Pea shoots | 8–10 (USU) | 150 g (USU) | 6 hours | 3 | Sweet pea |
Don’t worry that the seed rates disagree. Utah State sows thickly, Johnny’s sows lighter, and seed size varies by lot. Start in the middle and adjust by 10 to 20% next time; our microgreens seeding density chart scales any rate to your container.
What makes a microgreen beginner-friendly?
Four traits separate the best microgreens for beginners from the frustrating ones:
- Speed. Every extra day in a warm, damp tray is another day for trouble. Virginia Tech names damping-off (Pythium or Phytophthora) as the disease of most concern in microgreens and warns that mildews can also be a problem. A crop cut on day 9 has less time to go wrong than one cut on day 25.
- No fussy seed prep. Penn State notes that most microgreen seeds need no treatment; only large or hard-coated seeds such as pea and sunflower benefit from an overnight soak (Di Gioia, Penn State).
- Quick, even germination. UF/IFAS lists cabbage, beet, kale, kohlrabi, mizuna, mustard, radish, Swiss chard and amaranth as microgreens that “germinate easily and grow quickly” (Treadwell et al., HS1164).
- Easy-to-find seed. In a 2018–2019 survey cited by Virginia Tech, the most common microgreens grown by US producers were radish, sunflower, arugula, broccoli and kale, so seed is cheap and widely sold.
Beet, chard and amaranth germinate easily too, yet they sit in the “later” group. Germination is only half the job: hard hulls and a need for dry conditions make them harder to finish well.
The best microgreens for beginners, ranked
Each of the best microgreens for beginners below comes with the reason it earned its place, the numbers to start with, and the one thing most likely to trip you up.
1. Radish: the fastest win
Radish is the classic first tray for good reason. Virginia Tech gives it the quickest finish of any crop in its table, 6 to 10 days from sowing to harvest, and Utah State needs only 1 to 2 days under cover with no soak. In Johnny’s trial, ‘Hong Vit’ averaged 11.5 oz per tray in 9.5 days, and ‘Red Arrow’ was ready in 8.
The flavour is nutty and spicy, and colours run from pink-stemmed ‘Hong Vit’ to dark purple ‘Sango’ (Mississippi State). The seed is big enough to spread evenly by hand. Don’t panic at the fuzzy white root hairs on day two or three; they’re normal, not mould. Our radish microgreens guide covers the crop in depth.
2. Broccoli: mild and familiar
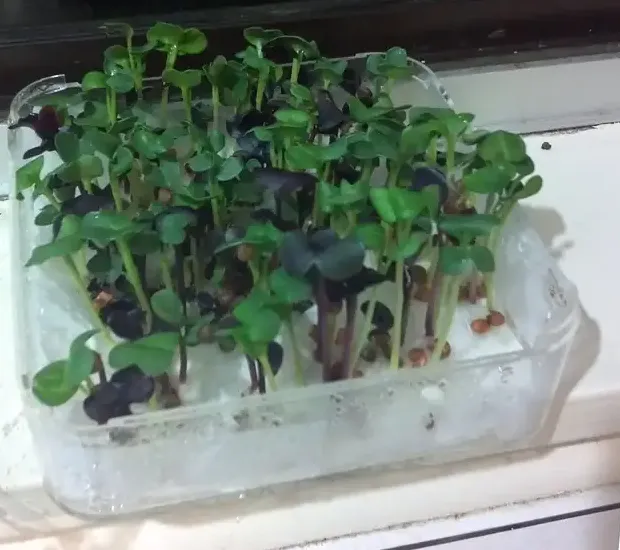
Broccoli tastes like a milder, fresher version of the vegetable, an easy sell to anyone in the house. Utah State lists 2 to 4 days covered and 8 to 12 days to harvest; Virginia Tech gives 8 to 13. In Johnny’s trial it produced 11.5 oz per tray from just 13 g of seed in 12.5 days, tied for the second-highest yield of all 29 varieties.
Its one demand is patience: broccoli may need a day or two longer under cover than radish, so check daily and uncover once most seeds have rooted.
3. Kale: the robust grower
Kale is the dependable all-rounder of the list. Mississippi State describes ‘Blue Curly’ as a “robust grower” with a mild, spinach-like flavour, and ‘Red Russian’ adds pink-edged, blue-green leaves. Utah State calls the taste “strong brassica, nutty” and lists 1 to 2 days covered and 8 to 12 days to harvest.
In Johnny’s trial ‘Red Russian’ gave 11 oz per tray from only 10 g of seed in 13.5 days, a light seed rate for such a solid harvest.
4. Mild Asian greens: the surprise top yielder
If you want the biggest harvest for the least effort, look past the famous names. Tokyo Bekana, a tender Chinese cabbage, topped all 29 varieties in Johnny’s trial at 15 oz per tray in 10 days from 14 g of seed. Mizuna gave 10 oz in 12 days from 9.5 g, and UF/IFAS lists mizuna among the crops that germinate easily and grow quickly.
Mississippi State describes pac choi microgreens as mild, with bright white stems. These greens bulk up salads and sandwiches without the bite of radish or arugula.
5. Arugula: peppery but small-seeded
Arugula grows fast (6 to 8 days in Utah State’s table, 6 to 14 in Virginia Tech’s) and has the peppery bite of full-size rocket. Johnny’s trial got 10 oz per tray from 10 g in 14 days.
It ranks fifth only because the seed is tiny. Small seeds are easy to over-sow into a damp mat and carry little stored energy, so keep the cover time short (1 to 2 days at Utah State) and get the tray under light promptly.
6. Red cabbage: colour plus vitamin C
Red cabbage microgreens have dark green leaves with purple margins and a mild flavour (Mississippi State). They also carry a nutrition headline: in a University of Maryland and USDA study of 25 commercial microgreens, red cabbage had the highest vitamin C of all, at the top of a range of 20.4 to 147.0 mg per 100 g fresh weight (Xiao et al., 2012).
Johnny’s trial gave 8.5 oz per tray from 10.5 g in 13.5 days, a little less than broccoli or kale.
7. Sunflower: big flavour, one extra step
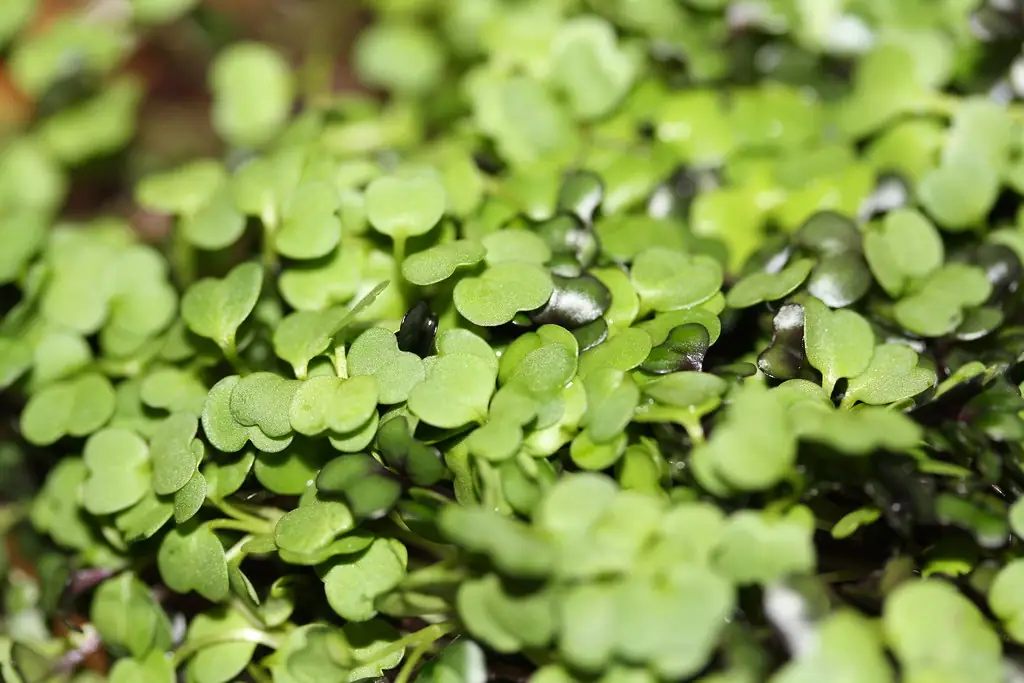
Sunflower shoots are crunchy, nutty and sweet. Utah State soaks the seed for 12 hours, sows 48 g per tray, keeps it covered for 3 days and harvests in 9 to 10 days. Penn State recommends weighting sunflower and pea seed during germination.
The catch is the hull. Shells often ride up on the seed leaves and must be brushed off before eating, which makes sunflower a great second or third tray rather than your first. Our sunflower microgreens guide explains how to get clean shoots.
8. Pea shoots: heavy seed, forgiving crop
Pea shoots are big, sweet and satisfying to grow. Utah State soaks the seed for 6 hours, sows 150 g per tray, covers it for 3 days and harvests in 8 to 10 days. In Penn State’s photo series, peas reached 4 to 5 inches and were ready to harvest on day 9. Mississippi State adds that pea shoots “can be recut once”, which few other microgreens can do.
They rank last only because of seed cost and the soak: 150 g per tray adds up. Once you’re comfortable soaking, they’re one of the most reliable crops going; see our pea shoots guide.
Microgreens to wait on, and ones you should never grow
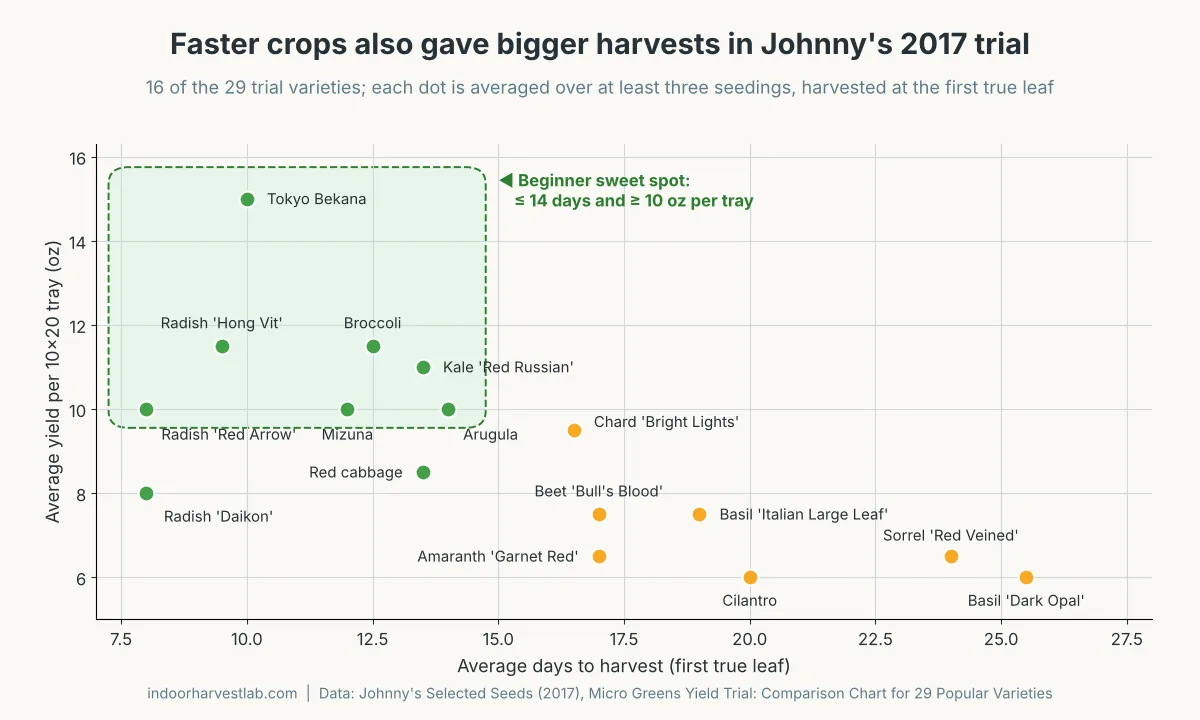
Some popular crops are wonderful later but aren’t the best microgreens for beginners, because they punish first-time mistakes. The chart shows why: in Johnny’s trial, the slow crops were also the low yielders.
| Crop | What makes it harder | The numbers |
|---|---|---|
| Basil | Slow to germinate and slow to size up | 4–7 days covered, 12–16 days to harvest (USU); 19–25.5 days and 6–7.5 oz per tray in Johnny’s trial |
| Cilantro | Very slow; seed is often split or primed for even germination (MSU) | 7–14 days covered, 21–28 days to harvest (USU); 6 oz per tray in 20 days (Johnny’s) |
| Beet and Swiss chard | Hard seed hulls “need to be removed before eating”; priming recommended (MSU) | Beet 12–23 days (VT); ‘Bull’s Blood’ 7.5 oz in 17 days (Johnny’s) |
| Amaranth | “Needs to be grown very dry” (MSU), so it suffers from overwatering | 10–17 days (VT); ‘Garnet Red’ 6.5 oz in 17 days (Johnny’s) |
| Carrot | Slow and fine-textured | 14–20 days (VT) |
These crops still earn a place later: cilantro had the highest carotenoids and garnet amaranth the most vitamin K1 of the 25 microgreens Xiao and colleagues tested.
Never grow these as microgreens: tomato, pepper, eggplant and potato. Penn State Extension warns they “are not edible at the seedling stage” because they contain alkaloids that are toxic at high levels (The ABCs of Microgreens). Penn State also advises against using wild plants for microgreens unless you are a plant expert, and against any species you’re allergic to.
Numbers to hold for your first trays
Keep these targets on a sticky note by the tray while you grow easy microgreens at home.
| Factor | Target | Source |
|---|---|---|
| Seed per 10×20 tray | 10 g arugula, 28 g broccoli or kale, 42 g radish, 48 g sunflower, 150 g pea | Utah State |
| Seed density (any tray) | About 2 seeds per sq in for large seeds up to 12 per sq in for small seeds (1–6 per cm²) | Penn State |
| Pre-soak | Pea 6 h, sunflower 12 h; small brassica seeds no soak | Utah State |
| Germination temperature | 74 °F (23 °C) | Utah State |
| Growing temperature | 72 °F (22 °C) lights on, 68 °F (20 °C) lights off; 60–70 °F (16–21 °C) in commercial guidance | Utah State; Virginia Tech |
| Relative humidity | 50–70% | Virginia Tech |
| Days covered (blackout) | 1–2 days for radish, kale and arugula; 2–4 for broccoli; 3 for pea and sunflower | Utah State |
| Daily light integral (DLI) | 9–16 mol/m²/day, which works out to about 156–278 µmol/m²/s over 16 hours | Virginia Tech |
| Photoperiod | 18 hours on, 6 hours off on a timer | Utah State |
| Fertilizer | Little or none; the seed feeds the young crop. Hydroponic trays: EC about 1.0 mS/cm, pH 5.5–6.0 | UF/IFAS; Virginia Tech |
| Harvest stage | First true leaf, usually about 2 in tall | UF/IFAS |
| Storage | 41 °F (5 °C), in the dark | Penn State, via Virginia Tech |
The light figures come from DLI = PPFD × hours × 0.0036, so you can check a lamp’s published PPFD map in seconds. Our guide to how much light microgreens need has the conversion table for other day lengths.
How to grow your first tray of easy microgreens
This method follows Utah State’s home procedure with Penn State’s tips added. It works for all the best microgreens for beginners above; for sunflower and pea, add the soak in step 1.
Step 1: Buy the right seed
Choose seed sold for sprouts and microgreens. Penn State advises seed that has “not been treated with chemicals or coated in any way”, with a lot number and germination test date on the label. Garden-centre packets work for a test but are “not economical” per tray, says Mississippi State. Soak pea for 6 hours or sunflower for 12, then rinse.
Step 2: Set up the tray and medium
Use a shallow 10×20 (“1020”) tray with drainage holes, filled with seed-starting mix, coconut coir or a grow mat. Utah State’s no-mess method: put 2 quarts of coir in the tray, set it in a solid tray holding 2 cups of water, and after 30 minutes discard any water left in the bottom.
Step 3: Weigh and spread the seed
Weigh the seed for your crop rather than eyeballing it. Sprinkle half lengthwise and half crosswise for even cover, then mist. Penn State notes there’s no need to bury the seed; seed left on the surface keeps the shoots clean at harvest.
Step 4: Cover and weight the tray
Set something flat and heavy (2 to 5 pounds, says Utah State) on top for the first half of the covered time, then flip the cover tray so it shades the seed without touching it. Uncover once roots are pushing into the medium.
Step 5: Light, air and water
Move the tray under a grow light on an 18-hour timer, or into your brightest south-facing window, and run a gentle fan for constant airflow. Water from below so the leaves stay dry; Penn State recommends watering only as needed and letting trays drain to prevent mould.
Step 6: Harvest and store
Cut just above the medium when the seed leaves are open and the first true leaves appear. Chill what you don’t eat, dry, in a closed container at about 41 °F (5 °C), and wash right before eating.
Troubleshooting your first trays
Even the best microgreens for beginners can sulk, and most first-tray problems trace back to water, air or light. Match what you see to the likely cause:
| What you see | Likely cause | What to do next tray |
|---|---|---|
| White fuzz on roots on day 2–4 that vanishes when misted | Root hairs (normal on radish and other brassicas) | Nothing; see our microgreens mold guide to tell them apart |
| Grey, cobweb-like growth on stems and seeds, musty smell | Mould from overwatering, crowding or still air | Sow 10–20% less seed, water from below, add a fan |
| Seedlings collapse at the base in patches | Damping-off (Pythium or Phytophthora, per Virginia Tech) | Use fresh mix and clean trays; avoid soggy media |
| Pale, tall stems leaning toward the window | Too little light | Raise DLI: longer hours or move the lamp closer |
| Bare patches and uneven height | Uneven sowing, dry spots or old seed | Spread in two passes; do a germination test |
| Hulls stuck on sunflower or beet leaves | Normal for hard-hulled seed | Weight seed during germination; brush hulls off before eating |
From the lab bench
Strip away the variety names and the best microgreens for beginners share one biological advantage: they’re mostly brassicas whose seeds germinate fast and finish while the seed’s own reserves still do much of the work. UF/IFAS says most microgreens need little or no fertilizer for exactly that reason. A short cycle means fewer decisions for you and fewer days in the warm, wet conditions disease loves.
The scatter chart adds a second lesson. In Johnny’s data, slow crops didn’t make up for their extra days with extra weight; basil, cilantro, sorrel and amaranth were both slower and lighter. That’s a strong argument to build skill on fast brassicas and treat slow crops as a reward, not a starting point.
A sensible first month is three small experiments rather than one big seed order. Tray one: radish, to learn the rhythm of covering, uncovering and bottom-watering. Tray two: broccoli or Tokyo Bekana, to see how a mild, high-yield crop behaves. Tray three: sunflower or pea, to practise soaking and weighting. Record grams sown, days covered, harvest day and yield. Extension tables are averages from someone else’s room; three trays of your own notes will tell you more about your light and temperature than any chart.
One caveat: these day ranges come from controlled settings. A cool winter kitchen adds days; that’s normal, not failure.
FAQ
What are the best microgreens for beginners?
Radish, broccoli, kale, arugula and mild Asian greens such as mizuna and Tokyo Bekana are the best microgreens for beginners. They need no seed soak, spend only 1–4 days under cover and are ready in about 6–14 days. Sunflower and pea shoots are good next steps once you’re comfortable soaking seed.
What is the easiest microgreen to grow?
Radish is usually the easiest. Virginia Tech lists 6–10 days from sowing to harvest, Utah State needs only 1–2 days covered with no soak, and the seed is large enough to spread evenly by hand.
Which microgreens grow the fastest?
Radish and arugula: 6–10 and 6–14 days in Virginia Tech’s table, and Utah State lists arugula at 6–8 days.
Which microgreens give the most harvest per tray?
In Johnny’s 2017 trial, Tokyo Bekana gave the most, 15 oz per 10×20 tray in 10 days, followed by broccoli and radish ‘Hong Vit’ at 11.5 oz.
Do I need to soak microgreen seeds?
Usually not. Penn State says most microgreen seeds need no treatment. Large or hard seeds benefit from a soak: Utah State soaks pea for 6 hours and sunflower for 12 hours.
Which microgreens should beginners avoid?
Start without basil, cilantro, beet, chard and amaranth, which are slower or fussier. Never grow tomato, pepper, eggplant or potato as microgreens; Penn State warns their seedlings contain toxic alkaloids.
Do I need a grow light for easy microgreens?
Not strictly; a bright south-facing window can work, but a grow light on an 18-hour timer (Utah State) gives far more control, especially in winter.
Sources
- Beck, S. (2025, updated 2026). Grow Your Own Microgreens. Utah State University Extension.
- South, K. A., Snead, G., Roark, J., Evans, M. R. and Turner, A. (2026). Introduction to Microgreen Production in Indoor Vertical Farms and Greenhouses (SPES-756NP). Virginia Cooperative Extension.
- Di Gioia, F. (updated 2026). A Step-By-Step Guide for Growing Microgreens at Home. Penn State Extension.
- Di Gioia, F. (updated 2024). The ABCs of Microgreens. Penn State Extension.
- Treadwell, D. D., Hochmuth, R., Landrum, L. and Laughlin, W. (2010, revised 2020). Microgreens: A New Specialty Crop (HS1164). UF/IFAS Extension.
- Bachman, G. R. (2024). Microgreen Varieties for the Mississippi Gardener (Publication 2884). Mississippi State University Extension Service.
- Johnny’s Selected Seeds (2017). Micro Greens Yield Trial: Comparison Chart for 29 Popular Varieties (tech sheet).
- Xiao, Z., Lester, G. E., Luo, Y. and Wang, Q. (2012). Assessment of vitamin and carotenoid concentrations of emerging food products: edible microgreens. Journal of Agricultural and Food Chemistry, 60(31), 7644–7651. doi:10.1021/jf300459b