
You bought a clamshell of pea shoots for a salad, loved the sweet, fresh-pea crunch, and then winced at the price for a few ounces of greens. Then you noticed the seed aisle: a bag of whole dried peas costs less than that one clamshell. Can you really grow the same thing on a kitchen shelf in October?
Short answer: yes. Pea shoots are the young stems, leaves and tendrils of the garden pea (Pisum sativum), and they’re one of the easiest crops to grow indoors. Soak whole, untreated pea seed for 6–12 hours, spread it in a single dense layer on moist mix, keep the tray dark and weighted for about 3 days, then grow it under light. Most trays are ready to cut 8–10 days after sowing, and a well-cut tray can give you one smaller second harvest.
This guide turns university extension advice and recent controlled-environment research into one plan. By the end, you’ll know how much seed to put in a tray, the day-by-day schedule, how much light pea shoots actually need, how to get a second cut, and how to fix the usual problems. If you’ve grown sunflower microgreens before, you’ll find peas follow almost the same rhythm, just with bigger seeds and more forgiving timing.
What are pea shoots, and which peas should you grow?
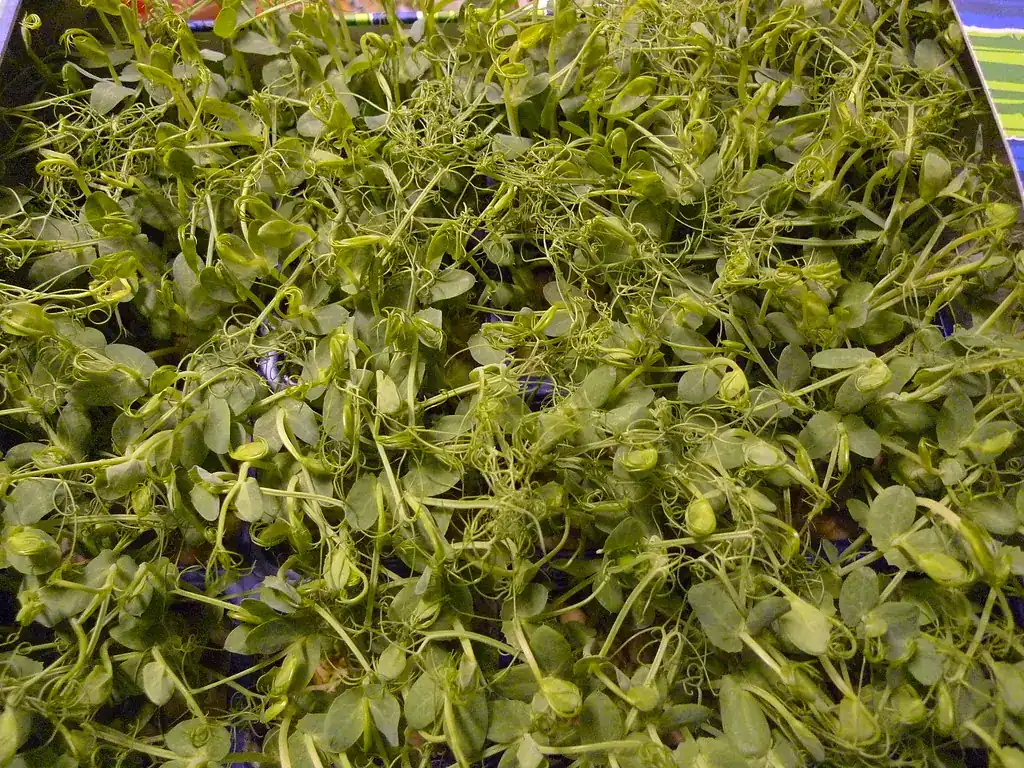
Pea shoots sit somewhere between a microgreen and a baby green. You harvest the first few inches of a pea seedling, usually with its first true leaves and the start of curly tendrils. The seed itself stays below the surface: peas have hypogeal germination, so the fleshy seed leaves (cotyledons) never come up. What you eat is all stem, leaf and tendril, which is why the flavor tastes like a fresh garden pea rather than a sprout.
Mississippi State University Extension lists pea shoots among the fastest microgreens, ready in 7–10 days, and names ‘Dwarf Grey Sugar’ as a good home variety (MSU Extension P2884). Seed sellers also offer field peas and “tendril” types bred for extra curly tendrils. Any of these work. The real choice is about the seed lot, not the name.
Can you use dried peas from the grocery store?
Often, yes. The Royal Horticultural Society’s family project grows pea shoots from dried peas and notes that fresh shoots appear within about two weeks (RHS). There are three catches, though:
- Whole peas only. Split peas have been dehulled and split in half, so they won’t grow. Skip any whole peas that are cracked or split, too.
- Untreated seed. Penn State Extension advises using organic or untreated seed for microgreens and avoiding pesticide-treated seed, because parts of the seed can end up on your plate. Garden pea seed is often fungicide-coated, and treated seed is usually dyed a bright color. Don’t eat shoots from those.
- Run a germination test. Grocery peas vary in age. Before you sow a whole tray, put 20 soaked peas on a damp paper towel for 3–4 days. If fewer than about 16 sprout, buy seed sold for microgreens or sprouting.
Are pea shoots nutritious?
They hold up well. In a 2025 study comparing six microgreens (broccoli, black radish, red beet, pea, sunflower and bean), pea microgreens stood out for their phosphorus and copper content (Balik et al., Scientific Reports 2025). A 2026 comparison found pea microgreens grown under light built up far more chlorophyll than dark-grown pea sprouts, which is a good reason to give your tray real light rather than harvesting it pale (Pavlović et al., Frontiers in Plant Science 2026). If you cook them, steaming kept the most antioxidant activity, while boiling and microwaving cut it (Tsuruoka et al., 2025).
Pea shoots: numbers to hold
Pin this table near your growing shelf. Every number below comes from an extension guide or a peer-reviewed study, so you’re not guessing.
| What | Target | Source |
|---|---|---|
| Seed per 10×20 in tray | 150 g (5.3 oz) to 6 oz (170 g) of pea seed | USU Extension; MSU Extension |
| Seed density (research) | Fresh yield peaked at about 2 seeds per cm² (roughly 2,500 seeds in a 10×20 tray) | Dubey et al., 2026 |
| Soak time | 6 hours (USU) to 8–12 hours (Penn State; about 10 h used for peas) | USU; Penn State Extension |
| Germination temperature | 74 °F (23 °C); pea germination optimum 59–77 °F (15–25 °C), best at 77 °F (25 °C) | USU; Kende et al., 2024 |
| Growing air temperature | 72 °F (22 °C) lights on, 68 °F (20 °C) lights off | USU Extension |
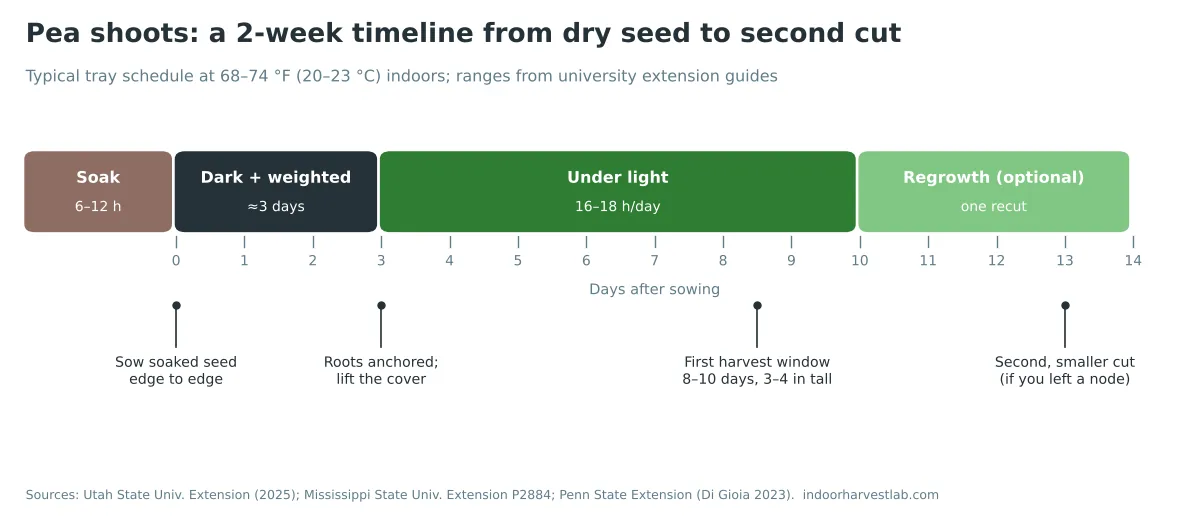
| Covered (dark + weight) | About 3 days | USU Extension |
| Light hours | 18 h on, 6 h off (USU); 16 h used in plant-factory research | USU; Liang et al., 2024 |
| Daily light integral | Microgreens are a low-light crop: DLI below 20 mol/m²/day | Penn State Extension |
| Days to harvest | 8–10 days (USU); 7–10 days (MSU) | USU; MSU Extension |
| Expected yield | 6–8 oz (170–225 g) per tray; can be recut once | MSU Extension |
| Fertilizer | Not needed for one cut; if used, 50–100 ppm nitrogen | Penn State Extension |
| Storage | 41 °F (5 °C), dark: up to 10–14 days for microgreens vs 2–4 days at room temperature | Penn State Extension |
Two notes. First, the two extension seed rates (150 g and 170 g) agree closely, which is reassuring. Second, the research density of 2 seeds per cm² came from a study that also found higher densities raised bacterial and fungal counts on the greens (Dubey et al., Plants 2026). More seed isn’t free yield; past a point it’s just more mold risk. Our full guide to microgreens seeding density explains the trade-off across crops.
How to grow pea shoots indoors, step by step
Here’s the whole process for one standard 10×20 inch tray. It takes about 15 minutes of hands-on time spread over ten days.
Step 1: Weigh and soak the seed
Weigh out about 150–170 g of whole pea seed. Rinse it, then cover it with two to three times its volume of clean, drinking-quality water. Soak for 6–12 hours. Utah State uses 6 hours, while Penn State’s step-by-step guide soaks large seeds overnight for 8–12 hours and shows peas soaked for about 10 hours, with a rinse or two along the way so the seeds get some oxygen (Penn State Extension).
Why soak at all? A pea seed has to take up a lot of water before the root can break through the seed coat. Soaking does that part in a cup instead of on the tray, so germination is faster and more even. Don’t push it much past 12 hours, though. Seeds that sit in water too long run short of oxygen and are more likely to rot.
Step 2: Prepare the tray
Use a tray with drainage holes nested inside one without holes. Fill it with about 1 inch of moist seed-starting mix or coconut coir. Utah State’s test for moisture is simple: squeeze a handful, and your hand should be wet but no water should drip out (USU Extension). Peas also grow well on hemp or coir mats if you’d rather skip the mix.
Step 3: Sow edge to edge
Drain the peas and spread them in a single, tight layer so they touch but don’t pile up. Start at the edges and corners, then fill the middle. A second layer of seed on top doesn’t add yield; it just traps moisture between seeds, which is exactly where mold starts.
Step 4: Cover, weight and keep dark for about 3 days
Set an empty tray directly on the seeds and put 2–5 pounds of weight on top. Utah State recommends keeping it in contact for the first half of the roughly 3-day dark period, then flipping the top tray so it shades the seedlings without pressing on them (USU Extension). Penn State also recommends weighting pea seed so it stays in contact with the mix (Penn State).
The weight isn’t a gimmick. Big seeds like peas tend to push themselves up out of the mix as the root grows. The weight forces the root down instead, which anchors the tray and gives you straight, even stems. For timing details across crops, see our microgreens blackout period guide.
Step 5: Move under light and bottom-water
Once roots have clearly anchored and shoots are about an inch tall, uncover the tray and put it under your grow light. Run the light for 16–18 hours a day on a timer. Water from below: pour water into the solid tray, let the mix soak it up for 15–30 minutes, then tip out what’s left. Keeping water off the leaves is one of the easiest ways to prevent mold.
Add a small fan on low. Gentle air movement dries the leaf surfaces, strengthens stems and keeps humid air from settling in the canopy, which is why Utah State calls constant airflow a must.
Step 6: Harvest at 3–4 inches
From around day 8, start tasting. Pea shoots are usually ready when they’re about 3–4 inches (9–12 cm) tall (National Agriculture in the Classroom) and the first true leaves and tendrils are opening. Cut with clean, sharp scissors. If you want a second cut, read the next section before you snip.
Light for pea shoots: PPFD, DLI and how many hours
Here’s where most indoor trays fall short. A windowsill in October gives far less light than you’d think, so pea shoots grown there tend to be pale, floppy and stretched. A small LED fixture fixes that, and the numbers show why.
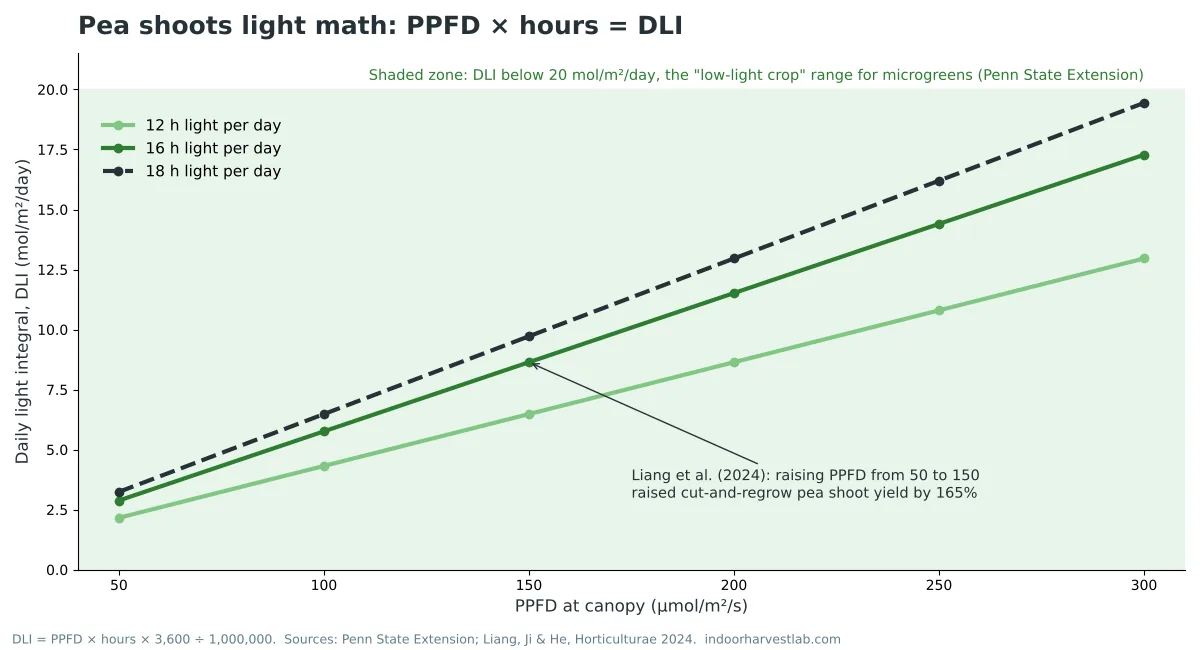
The key measure is the daily light integral (DLI): the total amount of light a plant gets in a day. You get it by multiplying the light intensity at the leaves (PPFD, in µmol/m²/s) by the hours the light is on, then dividing by 1,000,000 and multiplying by 3,600. Penn State Extension describes microgreens as a low-light crop, with a DLI below 20 mol/m²/day.
| PPFD at canopy | 16 h/day | 18 h/day | What to expect |
|---|---|---|---|
| 50 µmol/m²/s | 2.9 mol/m²/day | 3.2 mol/m²/day | Shoots grow but stretch and stay pale |
| 100 µmol/m²/s | 5.8 mol/m²/day | 6.5 mol/m²/day | Seedling-stage level used in plant-factory research |
| 150 µmol/m²/s | 8.6 mol/m²/day | 9.7 mol/m²/day | Strong growth; big yield gain in research on regrowing shoots |
| 200–300 µmol/m²/s | 11.5–17.3 mol/m²/day | 13.0–19.4 mol/m²/day | Higher flavonoid and phenolic levels; still under DLI 20 |
What does the research say? In a hydroponic LED plant factory, Chinese researchers grew pea shoots at 50, 100 and 150 µmol/m²/s. Raising intensity from 50 to 150 increased the average fresh weight of each harvested shoot by 60.2% and total fresh yield by 165.1% (Liang, Ji & He, Horticulturae 2024). That study used long-cycle, repeatedly harvested shoots, not 10-day trays, but the direction is clear: pea shoots respond strongly to more light.
A Penn State and USDA-ARS team tested pea microgreens from 100 to 400 µmol/m²/s and found that higher light intensity raised flavonoids and phenolic acids, and was the dominant factor shaping the shoots’ chemistry (Poudel et al., Food Chemistry 2025). In practice, aim for roughly 100–200 µmol/m²/s for 16–18 hours. That’s easy to hit with an LED shop light or a small panel hung 6–12 inches above the tray. Our microgreens light requirements guide covers fixture choice and hanging height in more detail.
Harvesting and regrowing pea shoots
Pea shoots have one trick most microgreens don’t: they can regrow. Mississippi State Extension notes that pea shoots “can be recut once” (MSU Extension). Sunflower and radish can’t do this because cutting removes their only growing point.
Why can peas regrow? Because the cotyledons stay below the surface, every pea seedling has small buds at the lowest nodes on its stem. If you cut above the lowest leaf node, one of those buds can grow into a new shoot. Cut below it, at the mix line, and there’s nothing left to regrow from.
How to cut for a second harvest
- Wait until shoots are 3–4 inches tall with at least one true leaf open.
- Find the lowest small leaf or scale on the stem, usually about an inch above the mix.
- Cut just above it with sharp scissors. Leave the stubs standing.
- Keep bottom-watering and keep the light on. If you have it, a light feed of 50–100 ppm nitrogen (Penn State’s microgreen rate) helps, since the seed reserves are partly used up.
- Cut again when the new shoots reach harvest height. Then compost the roots and start a fresh tray.
Set your expectations: the second cut is smaller and a bit tougher. The plant-factory study above showed that well-lit, well-fed pea plants can be cut every 4–6 days once shoots reach 10–15 cm (Liang et al., 2024), but that was a hydroponic system with full nutrient solution, not a tray of mix. For most home growers, one recut is the sensible limit. For general cutting technique and storage, see our guide to harvesting microgreens.
Storing your harvest
Don’t wash pea shoots until you’re about to eat them. Pat them dry if they’re damp, pack them loosely in a lidded box lined with a paper towel, and refrigerate. Penn State reports that dark storage at 41 °F (5 °C) can extend microgreen shelf life to 10–14 days, compared with 2–4 days at room temperature.
Pea shoots troubleshooting: symptoms and fixes
Most pea shoot problems come down to three things: water, air and light. Use this table to find yours fast.
| What you see | Likely cause | What to do |
|---|---|---|
| Peas didn’t sprout, or sprouted patchily | Old or dead seed; seed was split; mix too cold or too dry | Run a 20-seed paper towel test; keep germination near 74 °F (23 °C); press seeds into firm, moist mix |
| Sour smell; slimy, rotting seeds | Soaked too long, sown too thickly or kept too wet | Soak 6–12 h max; sow one layer only; bottom-water and drain |
| White fuzz on roots near the seeds | Usually root hairs, which are normal | Mist lightly: root hairs collapse; mold stays webby. See our microgreens mold guide |
| Grey, webby fuzz spreading over seeds and stems | Mold from stagnant, humid air | Add a fan; cut back watering; discard badly affected patches |
| Tall, pale, floppy shoots | Too little light, or the cover stayed on too long | Uncover by about day 3; raise PPFD toward 100–200; 16–18 h light |
| Seeds lifted out of the mix | No weight during germination | Weight the cover with 2–5 lb for the first 1–2 days |
| Tough, stringy stems | Harvested late, or it’s a second cut | Harvest at 3–4 in; use regrowth cuts for cooking |
| Wilting or dull leaves | Mix dried out, or tray too warm | Bottom-water; keep the room at about 68–72 °F (20–22 °C) |
If fuzz is your problem, our microgreens mold guide shows how to tell mold from root hairs in a few seconds.
From the lab bench
Pea shoots are a lesson in where a plant keeps its fuel. A pea seed carries a large store of starch and protein in its cotyledons, which stay underground. That reserve is why a pea tray can grow a dense, heavy crop on plain water, and why fertilizer matters so little for the first cut. It’s also why the second cut is smaller: by then the seed is largely spent, and the plant has to live off its own photosynthesis.
That points to the one input home growers underrate: light. With the seed doing the early heavy lifting, light decides what kind of shoot you end up with. Dim light gives you a long, pale stem, because the seedling is still trying to escape the dark. Good light gives you a shorter, greener, sweeter shoot with more of the pigments and phenolic compounds the research keeps measuring. If you change only one thing about a disappointing tray, change the light.
The second rule of thumb is about density. It’s tempting to pile in more seed for a bigger harvest, but the density research is a useful brake: yield levels off while microbial load keeps climbing. Peas are big seeds with a lot of surface area for water to cling to. One even layer, firm contact with the mix, bottom watering and moving air will do more for your harvest than an extra handful of seed.
Finally, think of pea shoots as the ideal winter crop. They tolerate the cool rooms of a heated house better than basil or sunflower do; pea seed germinates across a broad 59–77 °F (15–25 °C) range (Kende et al., Plants 2024). A shelf, one LED fixture and a timer will keep you in fresh greens from October to March. Start one tray a week and you’ll never run out.
Pea shoots FAQ
How long do pea shoots take to grow?
Usually 8–10 days from sowing indoors. Utah State Extension lists 8–10 days and Mississippi State lists 7–10 days, including about 3 days covered in the dark.
How long should I soak pea seeds for pea shoots?
Soak them for 6–12 hours. Utah State uses 6 hours; Penn State soaks large seeds overnight for 8–12 hours. Rinse once or twice and don’t soak much longer than 12 hours.
How much pea seed do I need for a 10×20 tray?
About 150 g (5.3 oz) to 6 oz (170 g) of seed per 10×20 inch tray, sown in one dense layer. Mississippi State expects 6–8 oz of shoots from 6 oz of seed.
Do pea shoots regrow after cutting?
Yes, once. Cut just above the lowest leaf node instead of at the mix line, keep watering and lighting the tray, and you can usually take one smaller second harvest.
Can I grow pea shoots from dried peas from the supermarket?
Often, yes, if they are whole, uncracked and untreated. Split peas won’t grow. Test 20 soaked peas on a damp paper towel first; if fewer than about 16 sprout, buy microgreen seed.
Do pea shoots need a grow light?
They grow on a bright windowsill, but in autumn and winter they often stretch. A small LED giving about 100–200 µmol/m²/s for 16–18 hours a day produces shorter, greener shoots.
Are pea shoots and pea microgreens the same thing?
Mostly. Both are young pea seedlings cut above the soil. Pea microgreens are usually cut younger and shorter; pea shoots may be grown a little taller with tendrils, and can be recut once.
Sources
- Beck, S. (2025, updated 2026). Grow Your Own Microgreens. Utah State University Extension.
- Mississippi State University Extension. Microgreen Varieties for the Mississippi Gardener (Publication 2884).
- Di Gioia, F. (2023). A Step-by-Step Guide for Growing Microgreens at Home. Penn State Extension.
- Sánchez, E., & Berghage, R. (2023). Growing Microgreens. Penn State Extension.
- Liang, J., Ji, F., & He, D. (2024). Higher light intensity combined with early topping improves the yield and quality of pea shoots in LED plant factory. Horticulturae, 10(6), 650. doi:10.3390/horticulturae10060650
- Poudel, P., Jeffries, K. A., Bai, J., Dorado, C., Rosskopf, E., & Di Gioia, F. (2025). Light intensity and zinc biofortification differentially impact the metabolomic profile of pea microgreens. Food Chemistry, 490, 145146. doi:10.1016/j.foodchem.2025.145146
- Dubey, S., Harbourne, N., Reilly, A., Hurley, D., & Elliott-Kingston, C. (2026). Microgreens: optimising seed density and exploring the influence of white light and white light supplemented with UV-A radiation. Plants, 15(4), 635. doi:10.3390/plants15040635
- Kende, Z., et al. (2024). Optimizing water, temperature, and density conditions for in vitro pea (Pisum sativum L.) germination. Plants, 13(19), 2776. doi:10.3390/plants13192776
- Balik, S., Elgudayem, F., Dasgan, H. Y., Kafkas, N. E., & Gruda, N. S. (2025). Nutritional quality profiles of six microgreens. Scientific Reports, 15, 6213. doi:10.1038/s41598-025-85860-z
- Pavlović, S., et al. (2026). Effects of LED light treatments on the bioactive composition and functional properties of pea microgreens: a comparative analysis with sprouts. Frontiers in Plant Science, 17, 1834435. doi:10.3389/fpls.2026.1834435
- Tsuruoka, Y., Koriyama, T., & Hosoya, T. (2025). Influence of cooking methods on phenolic compounds and their activities in pea shoots (Pisum sativum). Plant Foods for Human Nutrition, 80(3), 157. doi:10.1007/s11130-025-01403-x
- Royal Horticultural Society. Grow pea shoots. RHS Family Activities.
- National Agriculture in the Classroom. How to Grow Pea Shoots (PDF).