
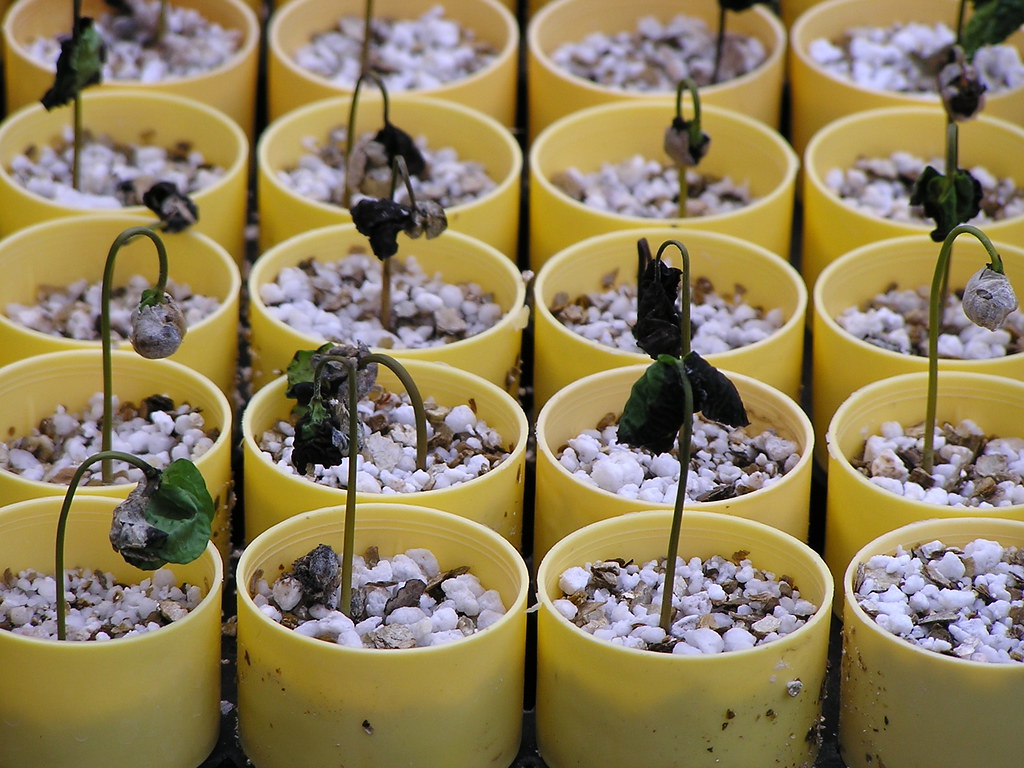
Short answer: damping-off is a seedling disease caused by soil-borne organisms, mainly Pythium, Rhizoctonia, Fusarium and Phytophthora. Seeds rot before they come up, or young stems pinch and collapse at the soil line. Seedlings that have already fallen over cannot be saved. Prevent damping-off with new sterile seed-starting mix, trays soaked in 10% bleach for 30 minutes, warm soil around 70–75 °F (21–24 °C), watering only when the surface starts to dry, good airflow and strong light.
This guide shows how to recognise the problem, which conditions favour each pathogen, what to do the day you find it, and a step-by-step prevention routine drawn from university extension services and a peer-reviewed review. It builds on our guides to leggy seedlings and hours of light for seedlings, because weak, slow seedlings are the ones the disease takes first.
Table of Contents
What damping-off looks like
Extension services describe two forms of the disease. Penn State Extension says pre-emergence damping-off “destroys the radicle and hypocotyl before the seedling emerges,” while post-emergence damping-off causes “stem rot at or just below the soil line,” after which seedlings “may discolor, wilt, collapse, and die.”
| Form | What you see | Easily confused with |
|---|---|---|
| Pre-emergence damping-off | Gaps in the tray; seeds that are soft, rotten or never come up. Utah State describes “circular bare spots” in seed flats. | Old or dead seed, cold soil, planting too deep |
| Post-emergence damping-off | A thin, pinched, discoloured stem at the soil line; the seedling topples while its leaves are still green | Seedlings leaning from weak light, or wilting from drought |
| Root rot phase | Brown roots with outer tissue that slides off (Penn State calls this “sloughing”); stunted plants | Overwatering damage, fertiliser burn |
The quickest test: a leggy seedling bends but its stem is still firm and green at the base, while a seedling with post-emergence damping-off has a stem that looks thin, discoloured or rotted right at the soil surface. If whole patches collapse in a day or two and the patch spreads, suspect damping-off.
What causes damping-off
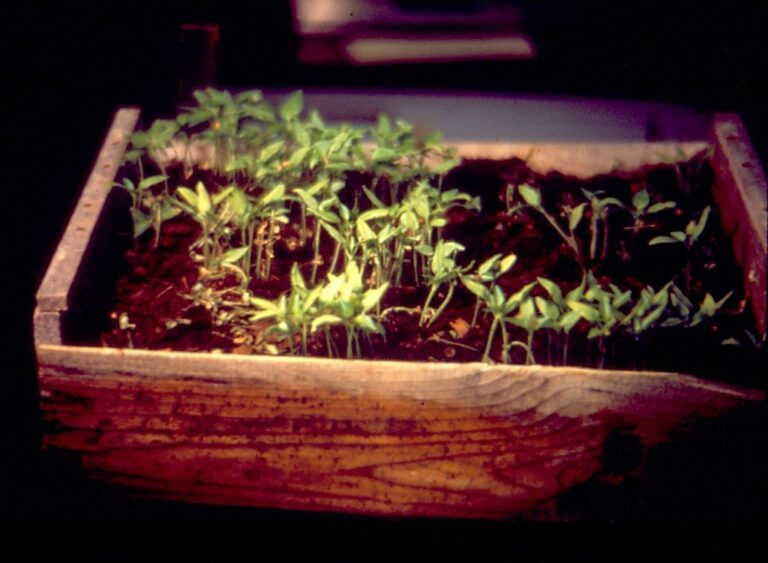
The organisms behind it live in soil, garden compost, dirty pots and trays, and sometimes on seed. A 2017 review in Agronomy for Sustainable Development (Lamichhane et al.) names Pythium, Rhizoctonia, Fusarium and Phytophthora as the main culprits and reports disease incidence ranging from 5 to 80% of seedlings. It lists excessive soil moisture, low soil temperature before emergence and crowded seedbeds among the conditions that favour the disease.
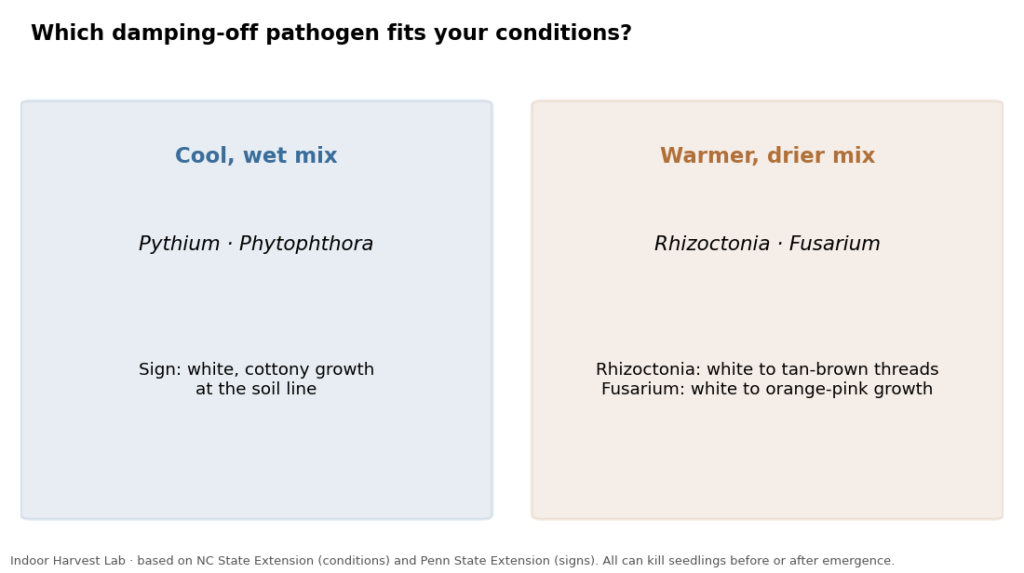
Different pathogens favour different conditions. NC State Extension explains that cool, wet soils favour Pythium and Phytophthora, while warmer, drier conditions favour Rhizoctonia and Fusarium. Penn State adds a clue you can look for with a hand lens: Pythium and Phytophthora produce “white, cottony mycelium,” Rhizoctonia “white to tan-brown mycelium” and Fusarium “white to orange-pink fungal growth.”
Utah State University’s damping-off fact sheet notes that Pythium has swimming spores, which is why standing water and saturated mix spread it so fast. That single fact explains most prevention advice: keep the mix moist, not soggy, and never let trays sit in water for days.
Which seedlings are most at risk
Any seedling can damp off, but slow starters sit in the danger zone longest. UMass Extension names spinach and cucumber, along with slow-growing onions, leeks and peppers. Damping-off also shows up in dense sowings such as microgreens, where humid air and crowded stems create the same conditions (see our guide to microgreens mold for telling root hairs from mould).
| Risk factor | Why it matters | Fix |
|---|---|---|
| Cool mix (basements, garages, windowsills in early spring) | Slows germination; favours Pythium | Heat mat to 70–75 °F (UMN) |
| Constantly wet mix, trays standing in water | Swimming spores spread; roots lack oxygen | Water only when the surface starts to dry; drain trays |
| Reused mix or garden soil | Carries the pathogens | New sterile seed-starting mix every time |
| Dirty trays and cell packs | Carry spores from last season | 10% bleach soak for 30 minutes |
| Thick sowing, humidity dome left on | Stagnant, humid air around stems | Sow at packet spacing; remove dome after germination |
| Weak light | Slow, soft, stretched stems | Strong light 12–16 hours a day (UMN) |
Keeping your seed-starting station clean
Sanitation is not only about the trays. Utah State recommends clean, sterilised benches and notes that metal benches are easier to disinfect than wooden ones. At home, the same idea applies to shelves, heat mats, watering cans, dibbers and plant labels: anything that touches old soil can carry spores into a new sowing.
- Store clean trays sealed. Wisconsin suggests keeping new pots in sealed plastic bags until you use them, so dust and old soil do not settle on them.
- Keep bags of mix closed and off the floor, and use a clean scoop rather than your hands or a garden trowel.
- Wipe down the heat mat and shelf between sowings, and rinse the watering can before filling it.
- Keep outdoor soil away. Don’t set seedling trays next to pots of garden soil, compost or houseplants with soggy mix.
- Sow in batches. If one tray fails, a second tray started a few days later in separate, clean containers keeps you on schedule.
Penn State’s integrated list follows the same logic: sterilised growing media, proper spacing and fungicides only “when warranted.” For a home grower, cleanliness plus warm, well-lit, not-too-wet seedlings covers almost every case.
How to prevent damping-off: step by step
These steps combine the recommendations of Minnesota, Wisconsin, UMass, Utah State and NC State extension services. Each one reduces the pathogen load or helps seedlings grow past the vulnerable stage faster.
- Clean trays and pots. Soak reused containers in 10% household bleach (1 part bleach to 9 parts water) for 30 minutes, then rinse, as University of Minnesota Extension and Wisconsin Horticulture advise. Utah State suggests a one-hour soak. Wipe down shelves and benches too.
- Use new, sterile mix. Use fresh seed-starting mix. Minnesota and UMass both warn against garden soil, compost or reused potting mix.
- Buy good seed. Wisconsin recommends seed from reputable sources; vigorous, fresh seed germinates fast and escapes early infection.
- Sow shallowly and thinly. Plant at the depth on the packet (Utah State and Wisconsin both warn against sowing too deep) and space seeds so air can move between seedlings.
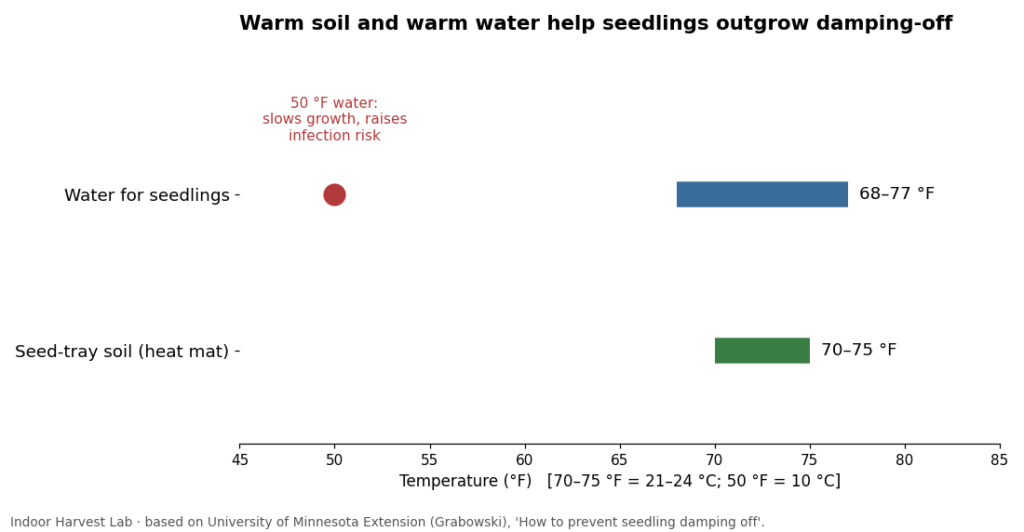
- Warm the mix. Use a heat mat to keep the mix at 70–75 °F (21–24 °C), Minnesota’s recommendation. Wisconsin specifically suggests heat mats in cold spots like basements.
- Water with warm water, and less often. Minnesota advises watering with water at 68–77 °F (20–25 °C) and warns that 50 °F (10 °C) water “slows plant growth and increases the opportunity for infection.” Water in the morning so the mix can dry somewhat before the next watering (UMass), and let the surface start to dry between waterings.
- Remove the humidity dome as soon as most seeds have sprouted, and run a small fan for gentle airflow (University of Saskatchewan and UMass).
- Give strong light. Minnesota recommends 12–16 hours of light from a fluorescent tube or grow light; a windowsill is usually not enough. See our grow light distance guide for how close to hang them.
- Hold off on fertiliser until several true leaves appear, then use quarter-strength soluble fertiliser (Minnesota).
- Consider a biological. UMass lists OMRI-approved products such as RootShield Plus and Mycostop Mix, mixed into the media before seeding. NC State lists products based on Trichoderma, Bacillus subtilis, Streptomyces lydicus and Gliocladium virens. Follow the label.
What to do when you see damping-off
Collapsed seedlings will not recover, so the goal is to protect the rest of the tray.
- Remove affected seedlings and their mix at once, plus a margin around the patch. Bag them and put them in the rubbish, not the compost.
- Separate the healthy cells. An Ask Extension expert answer recommends moving plugs from healthy cells into a clean, sterilised tray and keeping them apart from other plants.
- Change the conditions. NC State’s advice once the disease starts: increase temperature, air circulation and ventilation, reduce watering frequency, and improve drainage and light.
- Switch to bottom watering briefly (the same Ask Extension answer suggests letting cells absorb water from below for about 5 minutes), then drain the tray.
- Reseed in clean trays with new mix if you lost many seedlings, after checking the dates for your crop.
Seedlings become much less vulnerable as their stems harden. The Ask Extension answer notes that plants are generally safe once they have two sets of true leaves, which is another reason to give them warmth and strong light so they reach that stage quickly.
Home remedies: what the evidence says
| Remedy | What sources say | Verdict |
|---|---|---|
| Cinnamon dusted on the mix | The University of Saskatchewan says there is “no scientific study to show that cinnamon works,” though it “would likely do no harm.” | Harmless, unproven; don’t rely on it |
| Hydrogen peroxide spray | One Ask Extension answer suggests spraying the surface with 3% peroxide diluted at 1 tablespoon per quart of water. | A single expert suggestion, not a tested treatment |
| Commercial biologicals | Listed by UMass and NC State; Lamichhane et al. review Trichoderma, Pseudomonas and Bacillus as biocontrol agents. | Reasonable as prevention, used as labelled |
| Sanitation, warmth, drier surface, light | Recommended by every extension source cited here | The core of prevention |
Damping-off mistakes to avoid
- Reusing last year’s seed-starting mix or filling cells with garden soil.
- Leaving trays standing in a pool of water after bottom watering.
- Keeping the humidity dome on for days after germination.
- Watering with cold tap water straight from the tap in winter.
- Starting seeds on a cold floor or in an unheated room without a heat mat.
- Sowing thickly “to be safe”; crowded stems trap humid air.
- Putting collapsed seedlings in the compost, where the pathogens survive.
Where this applies
Damping-off is most common in late winter and early spring, when seeds are started indoors in cool rooms and daylight is short, and in humid climates or damp basements. In warm, dry homes, Rhizoctonia and Fusarium can still kill seedlings, so sanitation matters even when overwatering is not the problem. In humid tropical climates and in closed greenhouses, airflow and careful watering matter even more, because humid air slows drying of the mix surface.
Damping-off FAQ
Can seedlings recover from damping-off?
No. Once the stem has pinched and collapsed, the seedling will die. Remove it and protect the healthy seedlings around it.
Is damping-off a fungus?
Partly. Rhizoctonia and Fusarium are fungi, while Pythium and Phytophthora are oomycetes (water moulds), which is why UMass calls them “oomycete species.” They behave similarly and the same prevention steps work for all of them.
Can you reuse soil after damping-off?
Not for seedlings. Minnesota and UMass both recommend new sterile mix for seed starting and warn against reusing potting mix.
Does bottom watering prevent damping-off?
It helps by keeping the stem base drier, but only if the tray is drained after the mix has absorbed water. Trays left sitting in water favour the disease.
For more seed-starting help, browse our seedling problems guides.
Related guides: Seed Germination Temperature Chart for Vegetables (°F and °C) · Paper Towel Germination: How to Sprout and Test Seeds Step by Step
Sources
- Mazzone, J.D. (2026). Safeguard your seedlings from damping-off. Penn State Extension.
- Meadows, I. et al. (2017, revised 2025). Damping-off in flower and vegetable seedlings. NC State Extension.
- Grabowski, M. (reviewed 2024). How to prevent seedling damping off. University of Minnesota Extension.
- UMass Extension Vegetable Program (2024). Damping off.
- Hudelson, B. (2021). Dampening damping-off: tips on seed starting to avoid disease. University of Wisconsin–Madison Extension.
- Johnson, M. and Nischwitz, C. (2014). Damping-off. Utah State University Extension.
- Lamichhane, J.R. et al. (2017). Integrated management of damping-off diseases. A review. Agronomy for Sustainable Development 37: 10.
- University of Saskatchewan. Damping off. Gardening at USask.
- Ask Extension. Can anything be done about seedlings damping off?
Featured image: “Damping off of coffee seedlings” by Plant pests and diseases, CC0.