
Your tomato seedlings looked perfect last week: two neat cotyledons, a first jagged true leaf, deep green under the grow light. Now the leaves have gone a little pale, the cell dries out by lunchtime, and when you tip one out, white roots are wrapped around the bottom of the plug. That’s the plant telling you its home is too small.
Short answer: start potting up seedlings when they have their first one or two sets of true leaves, or sooner if roots fill the cell. Move each seedling into a container only 1–2 inches wider than its cell, filled with a light soilless mix, and hold it by a leaf, never the stem. Tomatoes can go in deeper than they grew; most other crops go in at the same depth.
Potting up seedlings (UK gardeners call it “potting on”) is one of those jobs that looks fussy but pays back for weeks. In this guide you’ll get the exact signs to watch for, the pot sizes extension services recommend, what the research says about cell size and yield, a step-by-step method, a crop-by-crop timing table and a fix-it table for when seedlings sulk afterwards. By the end you’ll know when to move each tray and how to do it without setting the plants back.
When to start potting up seedlings: 4 signs it’s time
Most guides give you one rule, the “true leaf” rule, and stop there. It’s a good rule, but it isn’t the only signal. Here’s what to look for, in order of how reliable each one is.
1. The first true leaves have opened
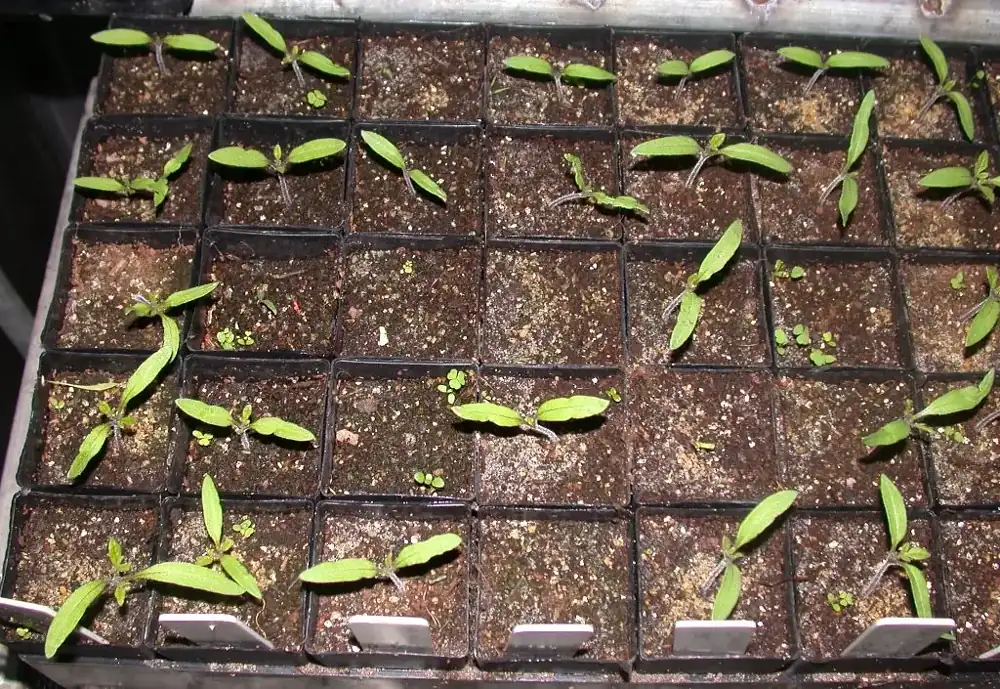
The first two leaves a seedling shows are cotyledons, the seed leaves. The next ones, which look like a small version of the adult leaf, are true leaves. University of Missouri Extension advises watching for the first true leaves before moving seedlings into their own pots. At that point the root system is big enough to handle being lifted, but still small enough to come out of the cell without tearing.
2. Roots are circling or poking out of the drainage hole
Gently squeeze the cell and slide the plug out. If you see a web of white roots around the outside of the plug, or roots growing out of the bottom, the seedling has run out of room. Don’t wait for leaves to count; move it.
3. The cell dries out much faster than it used to
A seedling that needed water every second day and now wilts by afternoon has more roots and leaf area than the cell can supply. Small containers hold little water, and once roots fill them they dry quickly. That’s a practical cue to go up a size.
4. Growth has stalled or the leaves are paling
Restricted roots slow the whole plant down. A review of container-size research by NeSmith and Duval (1998) found shoot growth and leaf area fell as rooting volume shrank, in every study they cited, and in watermelon the slowdown could begin just 4–5 days after emergence in the smallest cells. Paling lower leaves can also mean the mix has run out of nutrients, which is why University of Minnesota Extension suggests starting a weak feed once seedlings have several sets of true leaves.
Honest aside: if your plants will go outdoors within a week or two, you don’t always need to pot them up. A slightly crowded seedling that’s about to be planted out will catch up. Potting up matters most when seedlings will stay indoors for several more weeks, which is exactly the situation for winter indoor growers.
Potting up seedlings: the numbers to hold
Pin these to the wall above your seed-starting shelf. Every figure comes from an extension service or a peer-reviewed study, linked in the Sources list at the end.
| What | Target | Source |
|---|---|---|
| Stage to pot up | First 1–2 sets of true leaves, or roots filling the cell | Univ. of Missouri Extension |
| New container size | 1–2 in. (2.5–5 cm) wider in diameter than the cell | UMN Extension |
| Largest pot for indoor transplants | About 4 in. (10 cm); UF doesn’t suggest going bigger | UF/IFAS |
| Air temperature after potting up | Above 60 °F (15.5 °C); MU suggests under 70 °F (21 °C) by day and around 60 °F (15.5 °C) at night | UMN; Univ. of Missouri |
| Light distance (fluorescent/LED) | No more than 4 in. (10 cm) above the tops; 2 in. (5 cm) is ideal | UMN Extension |
| Light hours | 12–16 hours a day | UMN Extension |
| Fertiliser | ¼-strength general-purpose water-soluble fertiliser, once a week, after several sets of true leaves | UMN Extension |
| Effect of doubling pot size | Plants grew about 43% larger on average (meta-analysis of 65 studies) | Poorter et al. 2012 |
| Tomato cell size vs early yield | 39.5 cm³ cells gave about 2.2× the early yield of 4.4 cm³ cells | Weston & Zandstra 1986 |
| Weeks indoors before planting out | Tomatoes and peppers 6–8; eggplant 7–9; cabbage family 4–7; lettuce 3–5; cucumbers, squash, melons 2–3 | UMass Extension |
Those light and temperature numbers matter because a freshly potted seedling is trying to grow new roots. If it’s dim and warm, it stretches instead. For more detail, see our guides to how many hours of light seedlings need and grow light distance for seedlings.
What size pot to use (and why one move beats three)
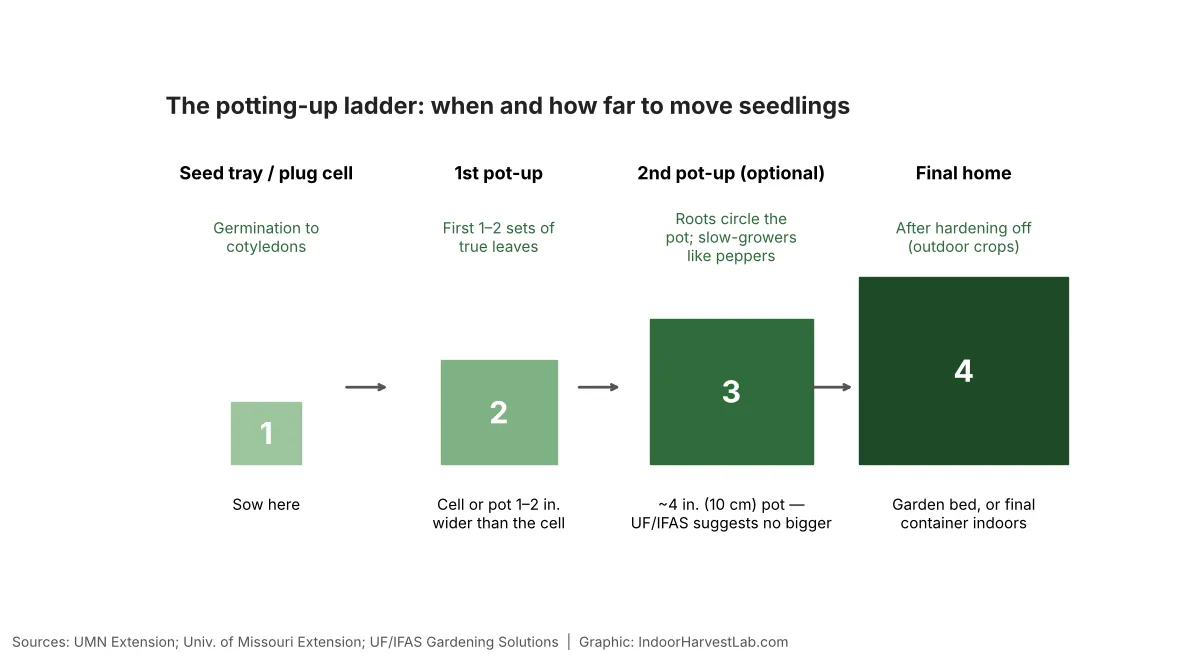
Here’s the mistake most people make: they jump from a tiny cell straight into a 1-gallon pot “to save a step”, or they pot up three or four times into ever-so-slightly bigger containers. Both cost you. University of Minnesota Extension recommends moving seedlings into containers that are 1 to 2 inches wider than the cell pack they came from, and UF/IFAS Gardening Solutions doesn’t suggest going beyond 4-inch pots for transplants raised indoors.
Why not jump straight to a big pot?
A small root ball sitting in a large volume of wet mix is surrounded by compost that no roots are drawing water from. It stays soggy, air space drops, and that’s the setting where root rot and fungus gnats thrive. A modest step up lets the roots explore the new mix quickly, so it dries at a healthy rate between waterings. If gnats have already moved in, our fungus gnat guide walks through the fixes.
Why not pot up again and again?
Each move disturbs roots, and each one costs you time. Dr. Linda Chalker-Scott of the Garden Professors reviewed the container research and concluded that it’s best to pot small plants up quickly into their final destination rather than making several intermediate transplants. For most vegetable seedlings that means one pot-up, from the seed cell to a 3–4 inch pot, then the garden or the final container.
What the research says about bigger root cells
Bigger rooting volume really does mean bigger plants. Poorter and colleagues (2012) pooled 65 studies on crops from tomato to wheat and found that, on average, doubling pot size let plants grow 43% larger, largely because plants in small pots photosynthesised less. For tomatoes the payoff shows up in the harvest. In Weston and Zandstra (1986), ‘Pik-Red’ transplants raised in the largest cells (39.5 cm³) gave 17.9 t/ha of early fruit, compared with 8.3 t/ha from the smallest (4.4 cm³) cells.
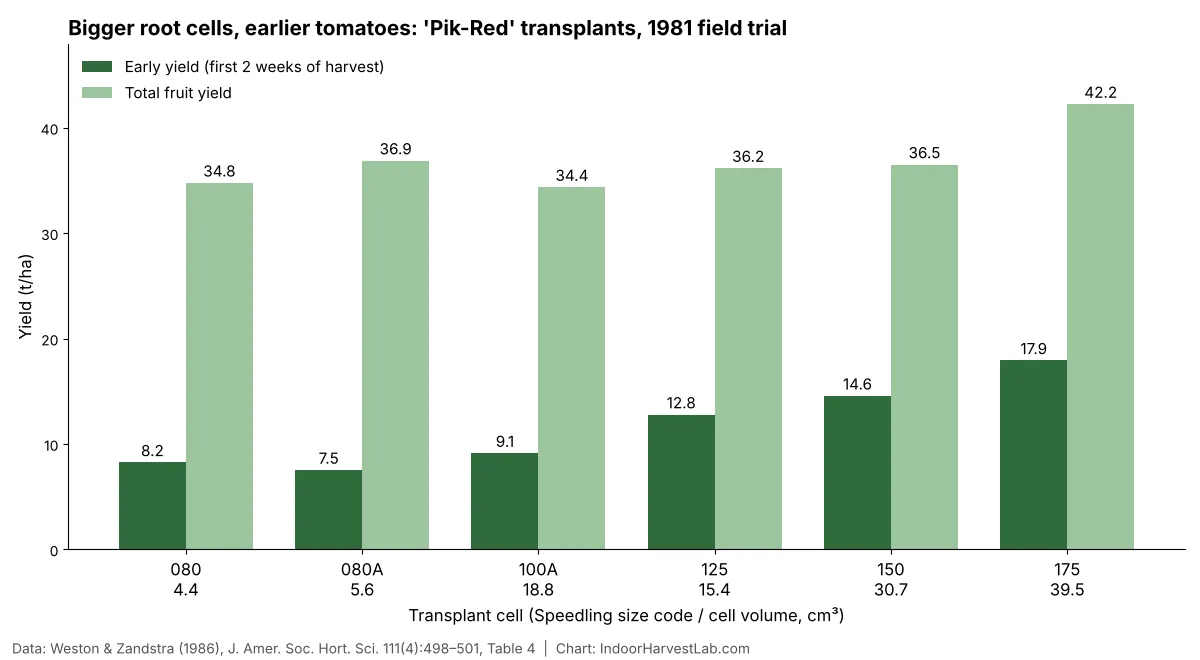
Notice what the chart also shows: total yield moved far less than early yield. In 1980 the authors found no significant difference in total yield between cell sizes, and in 1981 the largest cells gave about 21% more total fruit. The authors concluded that small, slow-growing transplants usually ended up with total yields similar to the large ones. So bigger cells mainly buy you an earlier harvest, which is exactly what an indoor grower racing the short days of winter wants.
How to pot up seedlings, step by step
Potting up seedlings takes about a minute per plant once you’ve done a few. Set up everything first so the roots spend as little time in the air as possible.
Step 1: Water the seedlings an hour before
A moist plug holds together and slides out cleanly. A dry plug crumbles and tears roots; a soaking-wet one is heavy and smears. Water the tray, then let it drain for an hour.
Step 2: Prepare clean pots and a light mix
Use pots with drainage holes. If you’re reusing pots, scrub them and soak them in a 10% bleach solution (1 part bleach to 9 parts water), as the UMass seed-starting fact sheet advises; this cuts the risk of damping off. Fill them with a soilless potting mix based on peat or coir with perlite or vermiculite. Skip garden soil and skip the gravel layer in the bottom: the Garden Professors point out it doesn’t improve drainage. Pre-moisten the mix so it feels like a wrung-out sponge.
Step 3: Make the hole first
Poke a hole in the new pot deep enough to take the whole root ball. For tomatoes, make it deeper (see Step 5).
Step 4: Lift by the roots, steady by a leaf
This is the step that saves seedlings. University of Minnesota Extension says never to hold a seedling by its stem, because you can crush it or damage the growing tip. Lift the root ball from below with a spoon, plant label or pencil, and if you need to steady the plant, hold it lightly by a leaf. A torn leaf grows back; a pinched stem doesn’t.
Step 5: Set the depth
Most seedlings go in at the same depth they grew in their containers. Tomatoes are the exception: they grow roots along their buried stems, which is why UC Master Gardeners (Contra Costa) advises planting them up to the top set of leaves when they go out to the garden. You can use the same trick when potting up a stretched tomato seedling: bury the stem up to just below the lowest true leaves. Don’t do this with peppers, brassicas or lettuce, which don’t root along the stem in the same way. If your seedlings are long and floppy, also read our leggy seedlings fixes.
Step 6: Firm gently and water in
Fill around the root ball and press lightly with your fingertips, just enough to remove big air pockets. Then water slowly until it drains from the bottom, or set the pots in a tray of water and let them wick up from below; MU Extension recommends bottom watering for seedlings and warns against leaving them standing in water.
Step 7: Give them a gentle first day
Keep potted-up seedlings out of the strongest light for a day if they droop, and keep them at normal room temperature. Then put them back under the lights at the usual distance. A little wilting the first afternoon is normal; plants generally perk up within a day.
Crop-by-crop guide: who needs potting up and who doesn’t
Potting up seedlings isn’t worth the effort for every crop. The deciding factor is simple: how long it will sit indoors before it reaches its final home. The weeks below are from the UMass Extension seed-starting fact sheet; the potting-up notes combine those timings with the container guidance above.
| Crop | Weeks indoors before planting out | Pot up? | Notes |
|---|---|---|---|
| Tomato | 6–8 | Yes, once | Bury the stem up to the lowest true leaves; benefits most from a larger cell |
| Pepper | 6–8 | Yes, once (sometimes twice indoors over winter) | Same depth as before; slow early growth means a long stay in the first pot |
| Eggplant | 7–9 | Yes, once | Same depth; keep warm |
| Broccoli, cabbage, cauliflower, Brussels sprouts | 4–7 | Often | Pot up if they’ll be inside more than 4–5 weeks |
| Lettuce | 3–5 | Rarely | Usually goes from cell to bed or hydroponic system directly |
| Cucumber, squash, melons | 2–3 | No | Sow straight into a 3–4 in. pot to avoid disturbing roots |
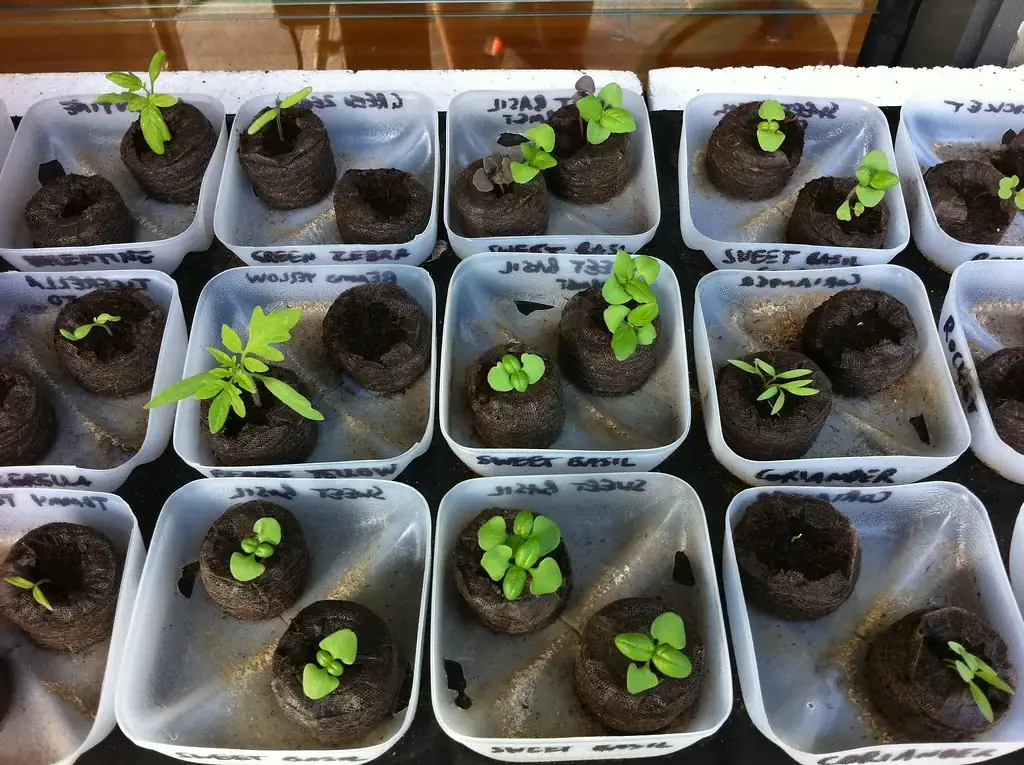
| Basil and other herbs grown indoors | Stay indoors | Yes | Move to the final indoor pot after 2 sets of true leaves |
Winter indoor growers are the big exception to the “weeks before planting out” logic, because your plants never go outdoors. If you’re raising tomatoes under lights through the winter, pot up once into a 4-inch pot, then into the final container. Our guide to growing tomatoes indoors covers final container sizes and pollination, and overwintering peppers indoors covers peppers you’re keeping through to spring.
Aftercare and troubleshooting transplant shock
The week after potting up seedlings decides whether the move was worth it. New roots need oxygen, steady moisture and enough light to fuel them. Start a weak feed once seedlings have several sets of true leaves: University of Minnesota Extension suggests a general-purpose water-soluble fertiliser at ¼ strength, once a week, with plain water the rest of the time. Avoid strong feeds right after the move; damaged root tips are easily burned.
If something goes wrong, use this table to work out what and why.
| What you see | Likely cause | What to do |
|---|---|---|
| Wilting the first afternoon, upright next morning | Normal transplant stress: roots briefly can’t keep up with leaves | Nothing. Keep out of strong light for a day and keep the mix moist, not wet |
| Wilting that lasts 2+ days | Torn roots, or mix too dry or too wet | Check moisture with a finger; water only when the top feels dry; keep cooler and shaded until it recovers |
| Stem pinched and collapsing at soil level | Stem crushed when handling, or damping-off fungi | Remove the plant. Use clean pots and mix, and handle by leaves next time |
| Lower leaves turning pale yellow 2–3 weeks later | Seedling mix has run out of nutrients | Start ¼-strength fertiliser weekly |
| Tall, thin stems after potting up | Too little light or too warm | Lights 2–4 in. above tops for 12–16 h; keep days under 70 °F (21 °C) |
| Mix stays soggy for days; small flies around pots | Pot too large for the root ball; overwatering | Let the surface dry between waterings; next time step up only 1–2 in. |
| Growth stalls again and roots circle the new pot | Seedling has outgrown the pot and isn’t going out yet | Pot up once more to the final container |
If seedlings collapse at the base, read our full guide to damping off in seedlings; it’s the most common reason a potted-up tray suddenly loses plants.
From the lab bench
Here’s how to think about potting up seedlings, rather than just following the steps.
Roots set the pace for shoots. The Poorter meta-analysis is striking because it ruled out the obvious explanations: plants in small pots weren’t simply short of water or nutrients, yet they still photosynthesised less and grew more slowly. The plant seems to read its rooting space and scale its growth to fit. Practically, that means a root-bound seedling is held back even if you feed and water it perfectly. Moving it on time is the fix.
Timing beats size. The Weston and Zandstra data show the biggest gain from roomier cells was in early yield, not total yield. Read that as: a well-timed move keeps the plant on schedule, but a seedling that has been stalled for a week or two doesn’t fully make up the lost time. For a home grower with a single tray, that’s the argument for checking roots every few days once true leaves appear.
One good step up, not several small ones. Each transplant costs the plant some root tips, and root tips are where most water uptake happens. That’s why the advice converges on a single move of 1–2 inches up to about 4 inches. It’s a big enough jump to relieve crowding but small enough that new roots reach the outer mix before it goes stale and soggy.
Use biology to your advantage. Tomato’s habit of rooting along a buried stem lets you turn a leggy seedling into a sturdier one at the same time as you pot it up. Peppers, brassicas and lettuce don’t share that habit to the same degree, so bury them only to their original depth. And for cucurbits, which spend just 2–3 weeks indoors, the most sensible potting-up plan is not to do it at all: sow them straight into the final indoor pot.
FAQ
When should I pot up seedlings?
When they have their first one or two sets of true leaves, or as soon as roots fill the cell, whichever comes first. University of Missouri Extension uses the first true leaves as the signal to move seedlings into their own pots.
What size pot should I pot seedlings up into?
Choose a container 1–2 inches wider than the cell the seedling is in now (University of Minnesota Extension). For indoor transplants, UF/IFAS doesn’t suggest going beyond a 4-inch pot.
Can you pot up seedlings too early?
Yes. Before the first true leaves open, the root system is tiny and easily damaged, and a small root ball in a big pot of wet mix stays soggy. Wait for true leaves unless roots are already escaping the cell.
Should I bury the stem when potting up?
Only for tomatoes, which grow roots along buried stems; you can plant them up to just below the lowest true leaves. Peppers, brassicas, lettuce and most other seedlings should go in at the same depth they were growing.
Do I need to fertilise seedlings after potting up?
Once they have several sets of true leaves. University of Minnesota Extension suggests a general-purpose water-soluble fertiliser at ¼ strength, once a week, with plain water in between.
Why are my seedlings wilting after potting up?
Some wilting on the first day is normal transplant stress, and plants usually recover within a day. If wilting lasts two or more days, check for a mix that is too dry or waterlogged, or roots damaged during the move.
Is potting up the same as potting on?
Yes. “Potting on” is the usual UK term and “potting up” is the usual US term; both mean moving a young plant into a slightly larger container.
More guides on moving young plants are collected in our transplanting section, and germination temperatures for each crop are in our seed germination temperature chart.
Sources
- University of Minnesota Extension. Starting seeds indoors. Reviewed 2026.
- Geist, L. (quoting D. Aufdenberg). Plant now for seeds of success. University of Missouri Extension.
- UF/IFAS Gardening Solutions. Starting transplants indoors. University of Florida.
- UC Master Gardener Program of Contra Costa County. 2.3 Transplanting. UC Agriculture and Natural Resources.
- UMass Amherst Extension. Starting seeds indoors (fact sheet, PDF).
- Weston, L.A. and Zandstra, B.H. (1986). Effect of root container size and location of production on growth and yield of tomato transplants. Journal of the American Society for Horticultural Science 111(4): 498–501.
- NeSmith, D.S. and Duval, J.R. (1998). The effect of container size. HortTechnology 8(4).
- Poorter, H. et al. (2012). Pot size matters: a meta-analysis of the effects of rooting volume on plant growth. Functional Plant Biology 39(11): 839–850. Summary: ScienceDaily, 2 July 2012.
- Chalker-Scott, L. Plant containers: does size really matter? The Garden Professors.